Navigating your Android smartphone may be a journey full of unexpected and delightful discoveries. You may occasionally encounter a software glitch and need to factory reset your device. Maybe you’re a tech enthusiast who wants to try out modified ROMs or root your smartphone. In any case, you’ll need to understand how to go into recovery mode on your Android device. On Samsung, Google Pixel, and Motorola phones, learn how to enter recovery mode, what you can do in recovery mode, and how to exit recovery mode.
What exactly is Android Recovery mode?
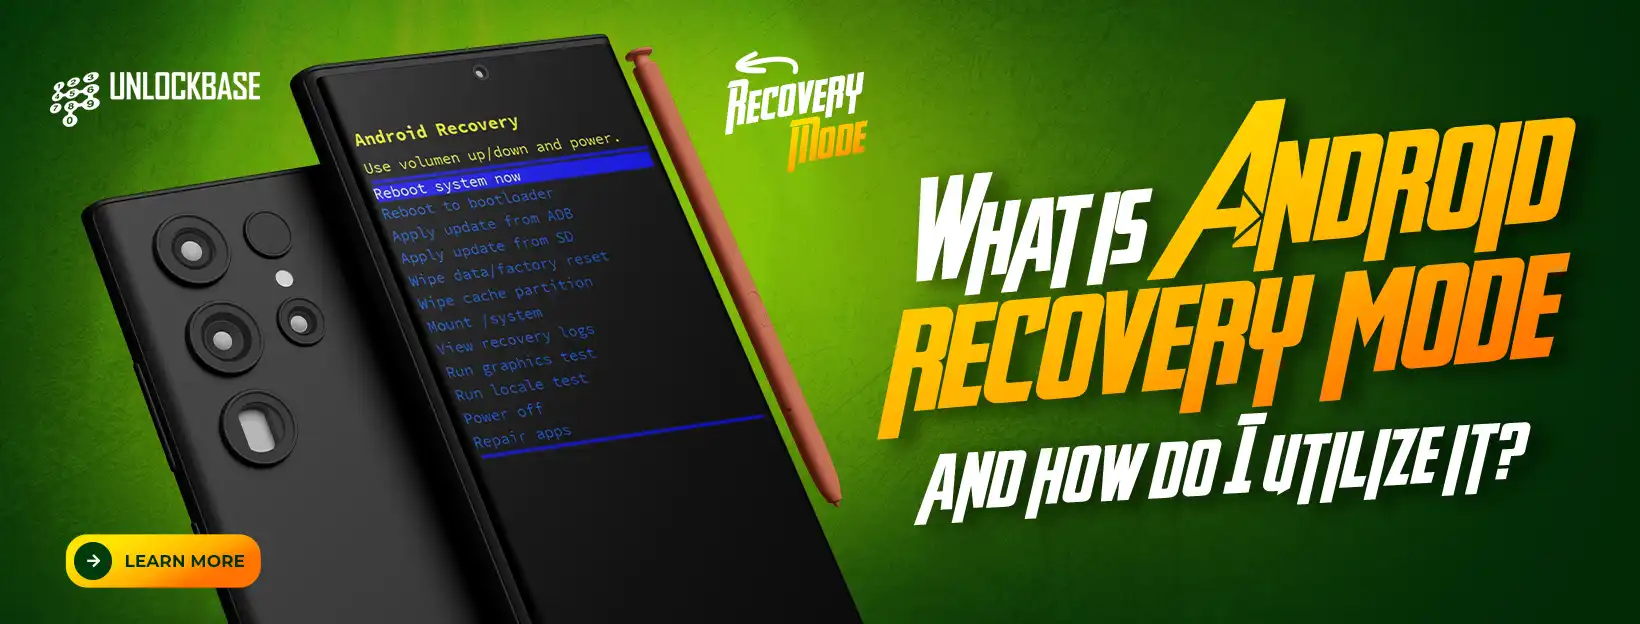
Android recovery mode is a one-of-a-kind starting mode accessible on all Android devices that includes a number of tools for diagnosing and fixing issues that cannot be addressed inside the operating system. This mode is commonly used to conduct system upgrades, factory resets, and the installation of custom ROMs.
The android recovery mode, which is commonly used for troubleshooting and maintenance, offers options such as deleting data/factory reset, cleaning cache partition, installing updates from ABD or SD cards, and more. Recovery mode, in essence, functions as a distinct bootable partition that is required for executing system-level operations and making modifications to the Android system’s file system.
How to activate Recovery Mode on an Android Device
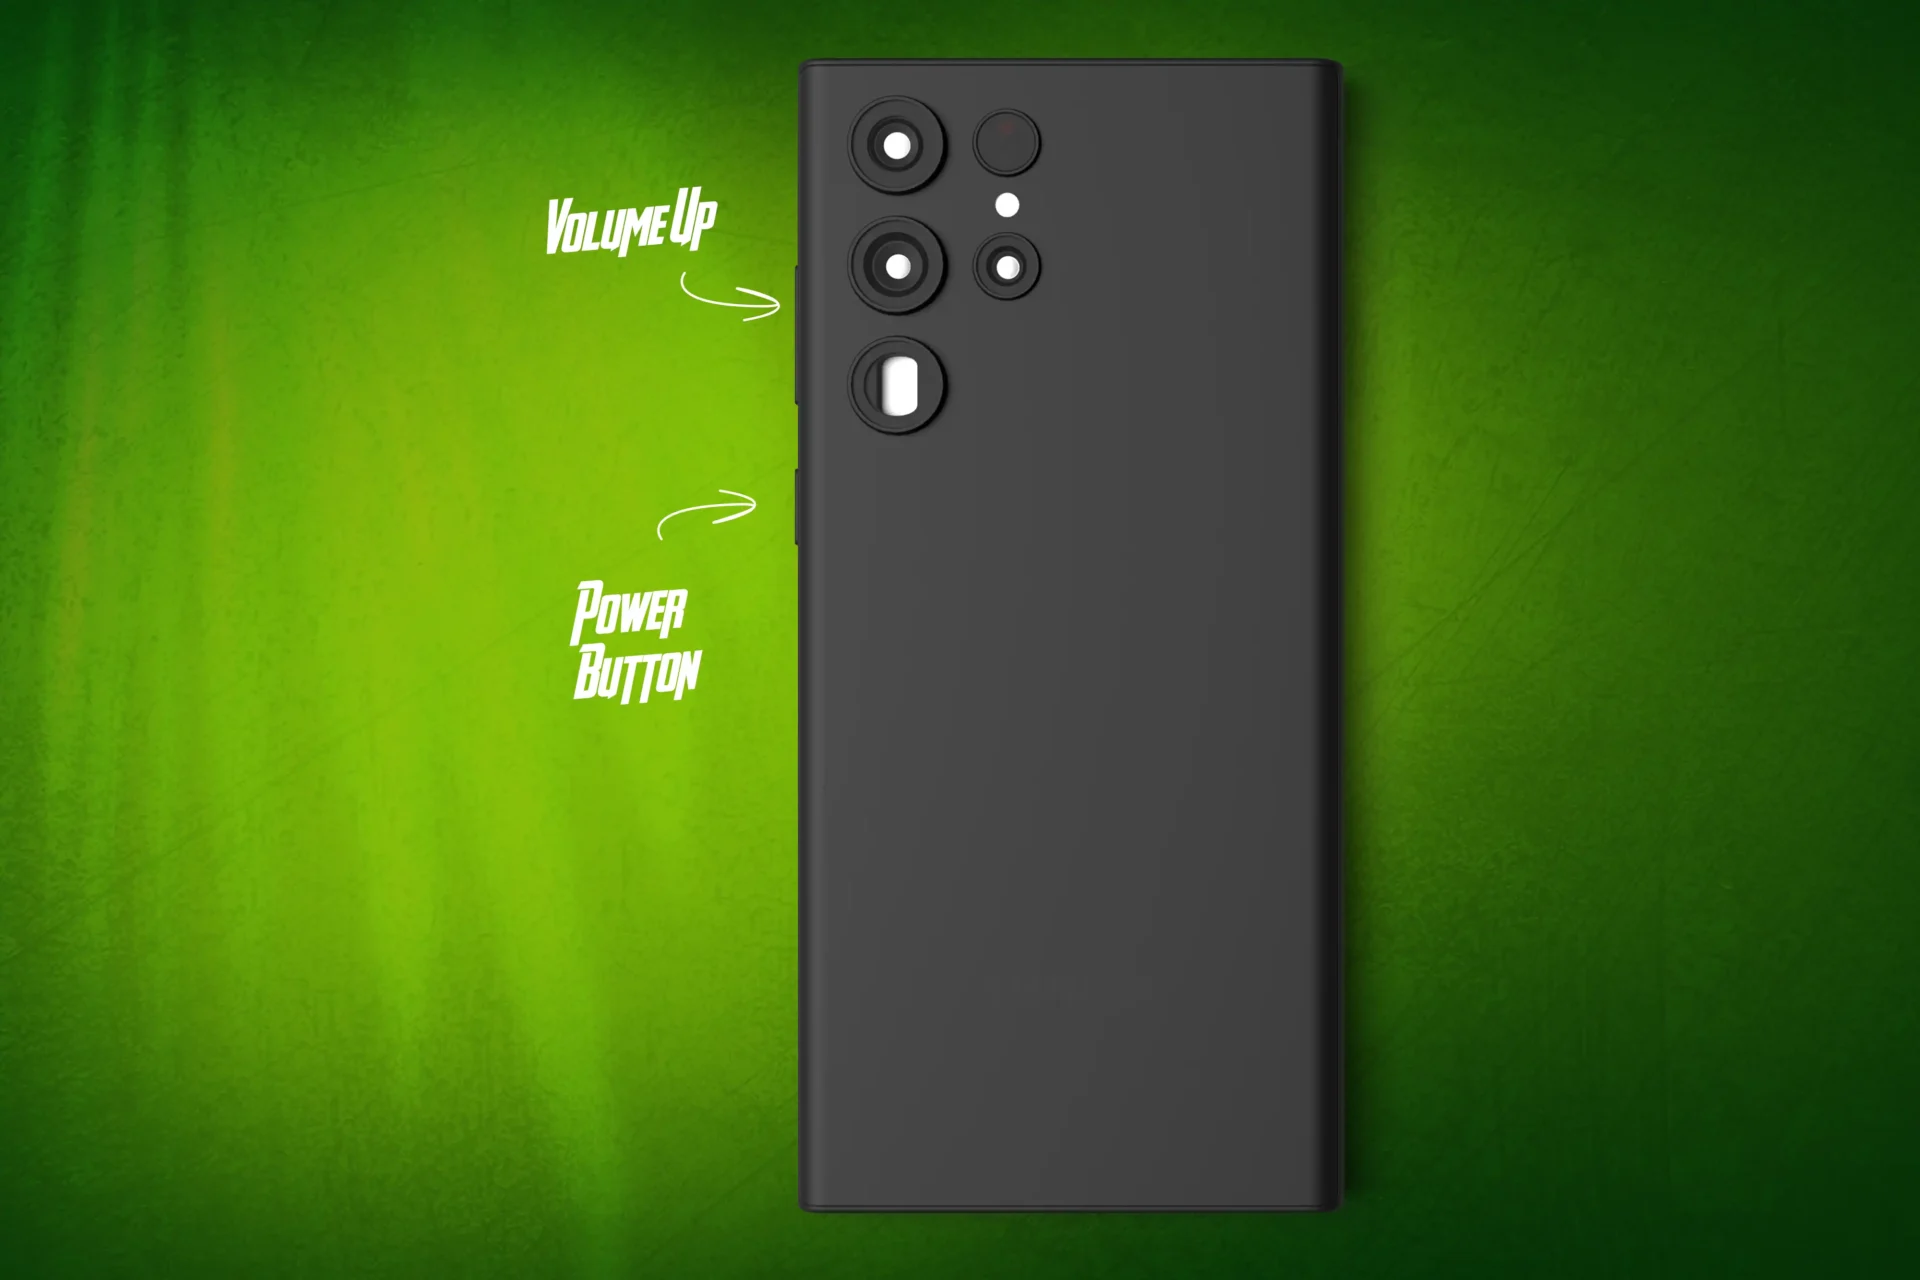
While most Android smartphones enter recovery mode by holding the Power and Volume Down buttons simultaneously, there are differences across manufacturers. We’ll go over the steps for Samsung, Pixel, and Motorola phones.
Samsung Phones
Shut off your Samsung smartphone.
Hold down the Volume Up and Power buttons at the same time until the Samsung logo shows.
When the smartphone vibrates once, release all buttons. The recovery mode menu for Android should now show.
Pixel Phones
Switch off your Pixel phone.
When the screen turns black, press and hold the Power and Volume Down buttons simultaneously until the bootloader screen appears.
Navigate to the Recovery Mode choice using the Volume keys and pick it with the Power button.
Motorola Phones
Shut off your Motorola gadget.
For a few seconds, hold down the Power and Volume Down buttons until the bootloader displays.
Navigate to the Recovery option using the Volume buttons and choose it with the Power button.
How to utilize Recovery mode
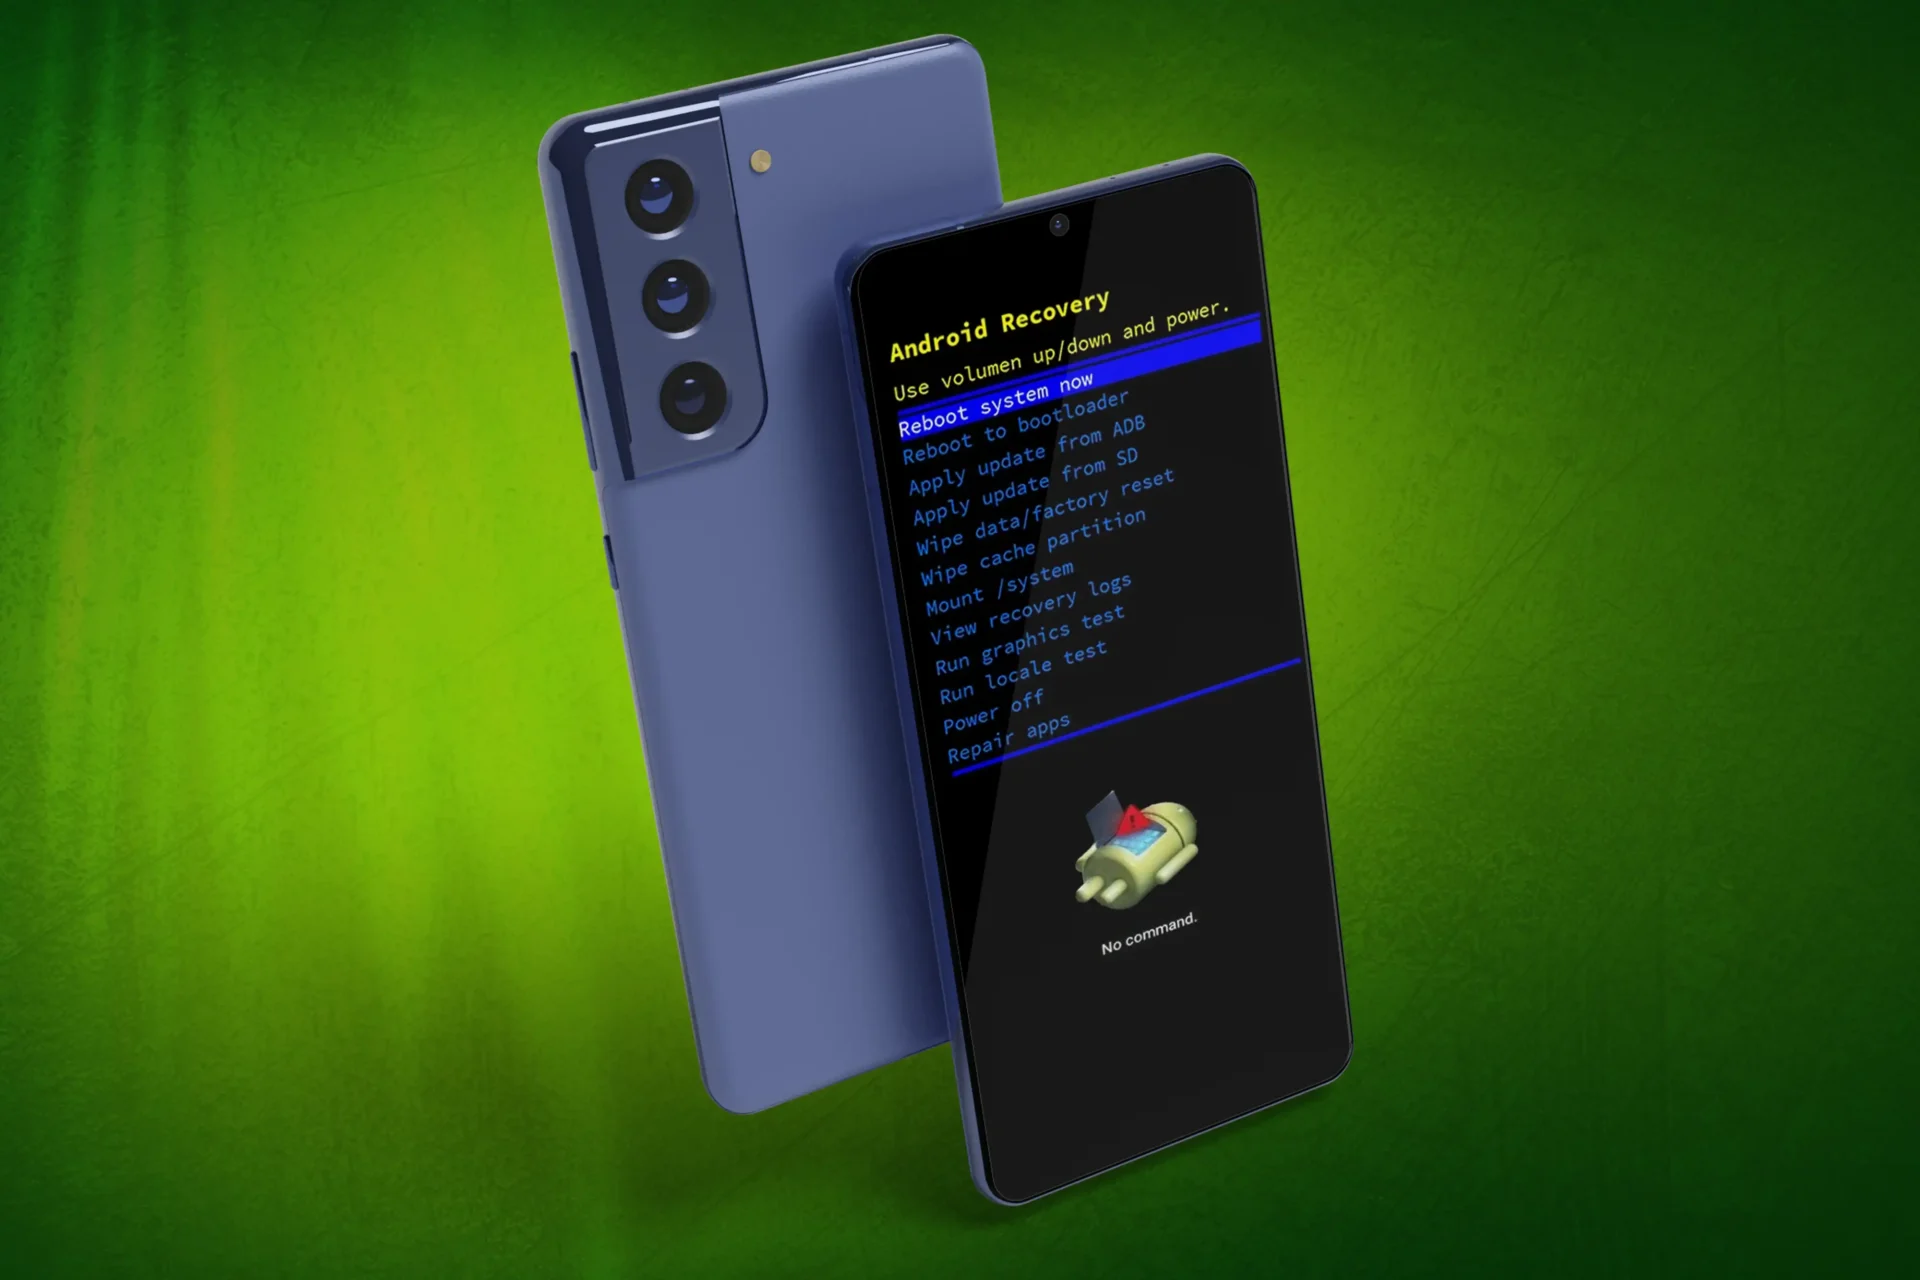
Recovery mode provides a number of troubleshooting and device administration options. Let’s look at each function individually:
Wipe cache partition: Clear up storage space and fix data-related issues with ease. Wipe cache partition in recovery mode, removing temporary files without data loss. Get optimal performance now!
Reboot system now: You can use this option to exit recovery mode without making any modifications.
Wipe data/factory reset: This does a factory reset, erasing all data and returning your device to factory settings. It’s a useful feature to have when your gadget isn’t working properly or before you give it away or sell it.
Apply update from ADB: This allows you to install updates or custom ROMs from your computer via the Android Debug Bridge (ADB).
Apply update from SD card: If you have an update file or a custom ROM on your SD card, you can install it with this option.
How to Exit Recovery Mode
To exit the recovery mode on a Samsung, Google Pixel, or Motorola handset, use the Volume buttons to scroll to the Reboot system now option and select it with the Power button.
Conclusion
Android recovery mode is a powerful feature that allows you to manage the troubleshooting and recovery processes on your smartphone. Understanding how to enter and use recovery mode allows you to handle common issues, restore your device’s functionality, and even experiment with advanced solutions. With the knowledge and direction offered in this thorough tutorial, you will be able to successfully utilize the potential of Android recovery mode. Accept its potential, overcome obstacles, and assure a more enjoyable Android experience.
All products, and company names, logos, and service marks (collectively the "Trademarks") displayed are registered® and/or unregistered
trademarks™ of their respective owners.
The authors of this web site are not sponsored by or affiliated with any of the third-party trade mark or third-party registered trade mark owners,
and make no representations about them, their owners, their products or services.
In the digital age we live in, advertisements have become an unavoidable presence during our online activities. They disrupt our browsing sessions, infiltrate our favorite apps, and bombard us on websites. But fret not, as we bring you good news: you have the ability to block these pesky ads on your Android device. In this in-depth guide, we will provide you with the most effective techniques on how to block ads on android, allowing you to enjoy a seamless and uninterrupted browsing experience. Whether you’re searching for a draftkings promo code or simply reading the news, say goodbye to the intrusive distractions and reclaim control over your online journey.
Block pop-ups, redirects, and ads on Google Chrome
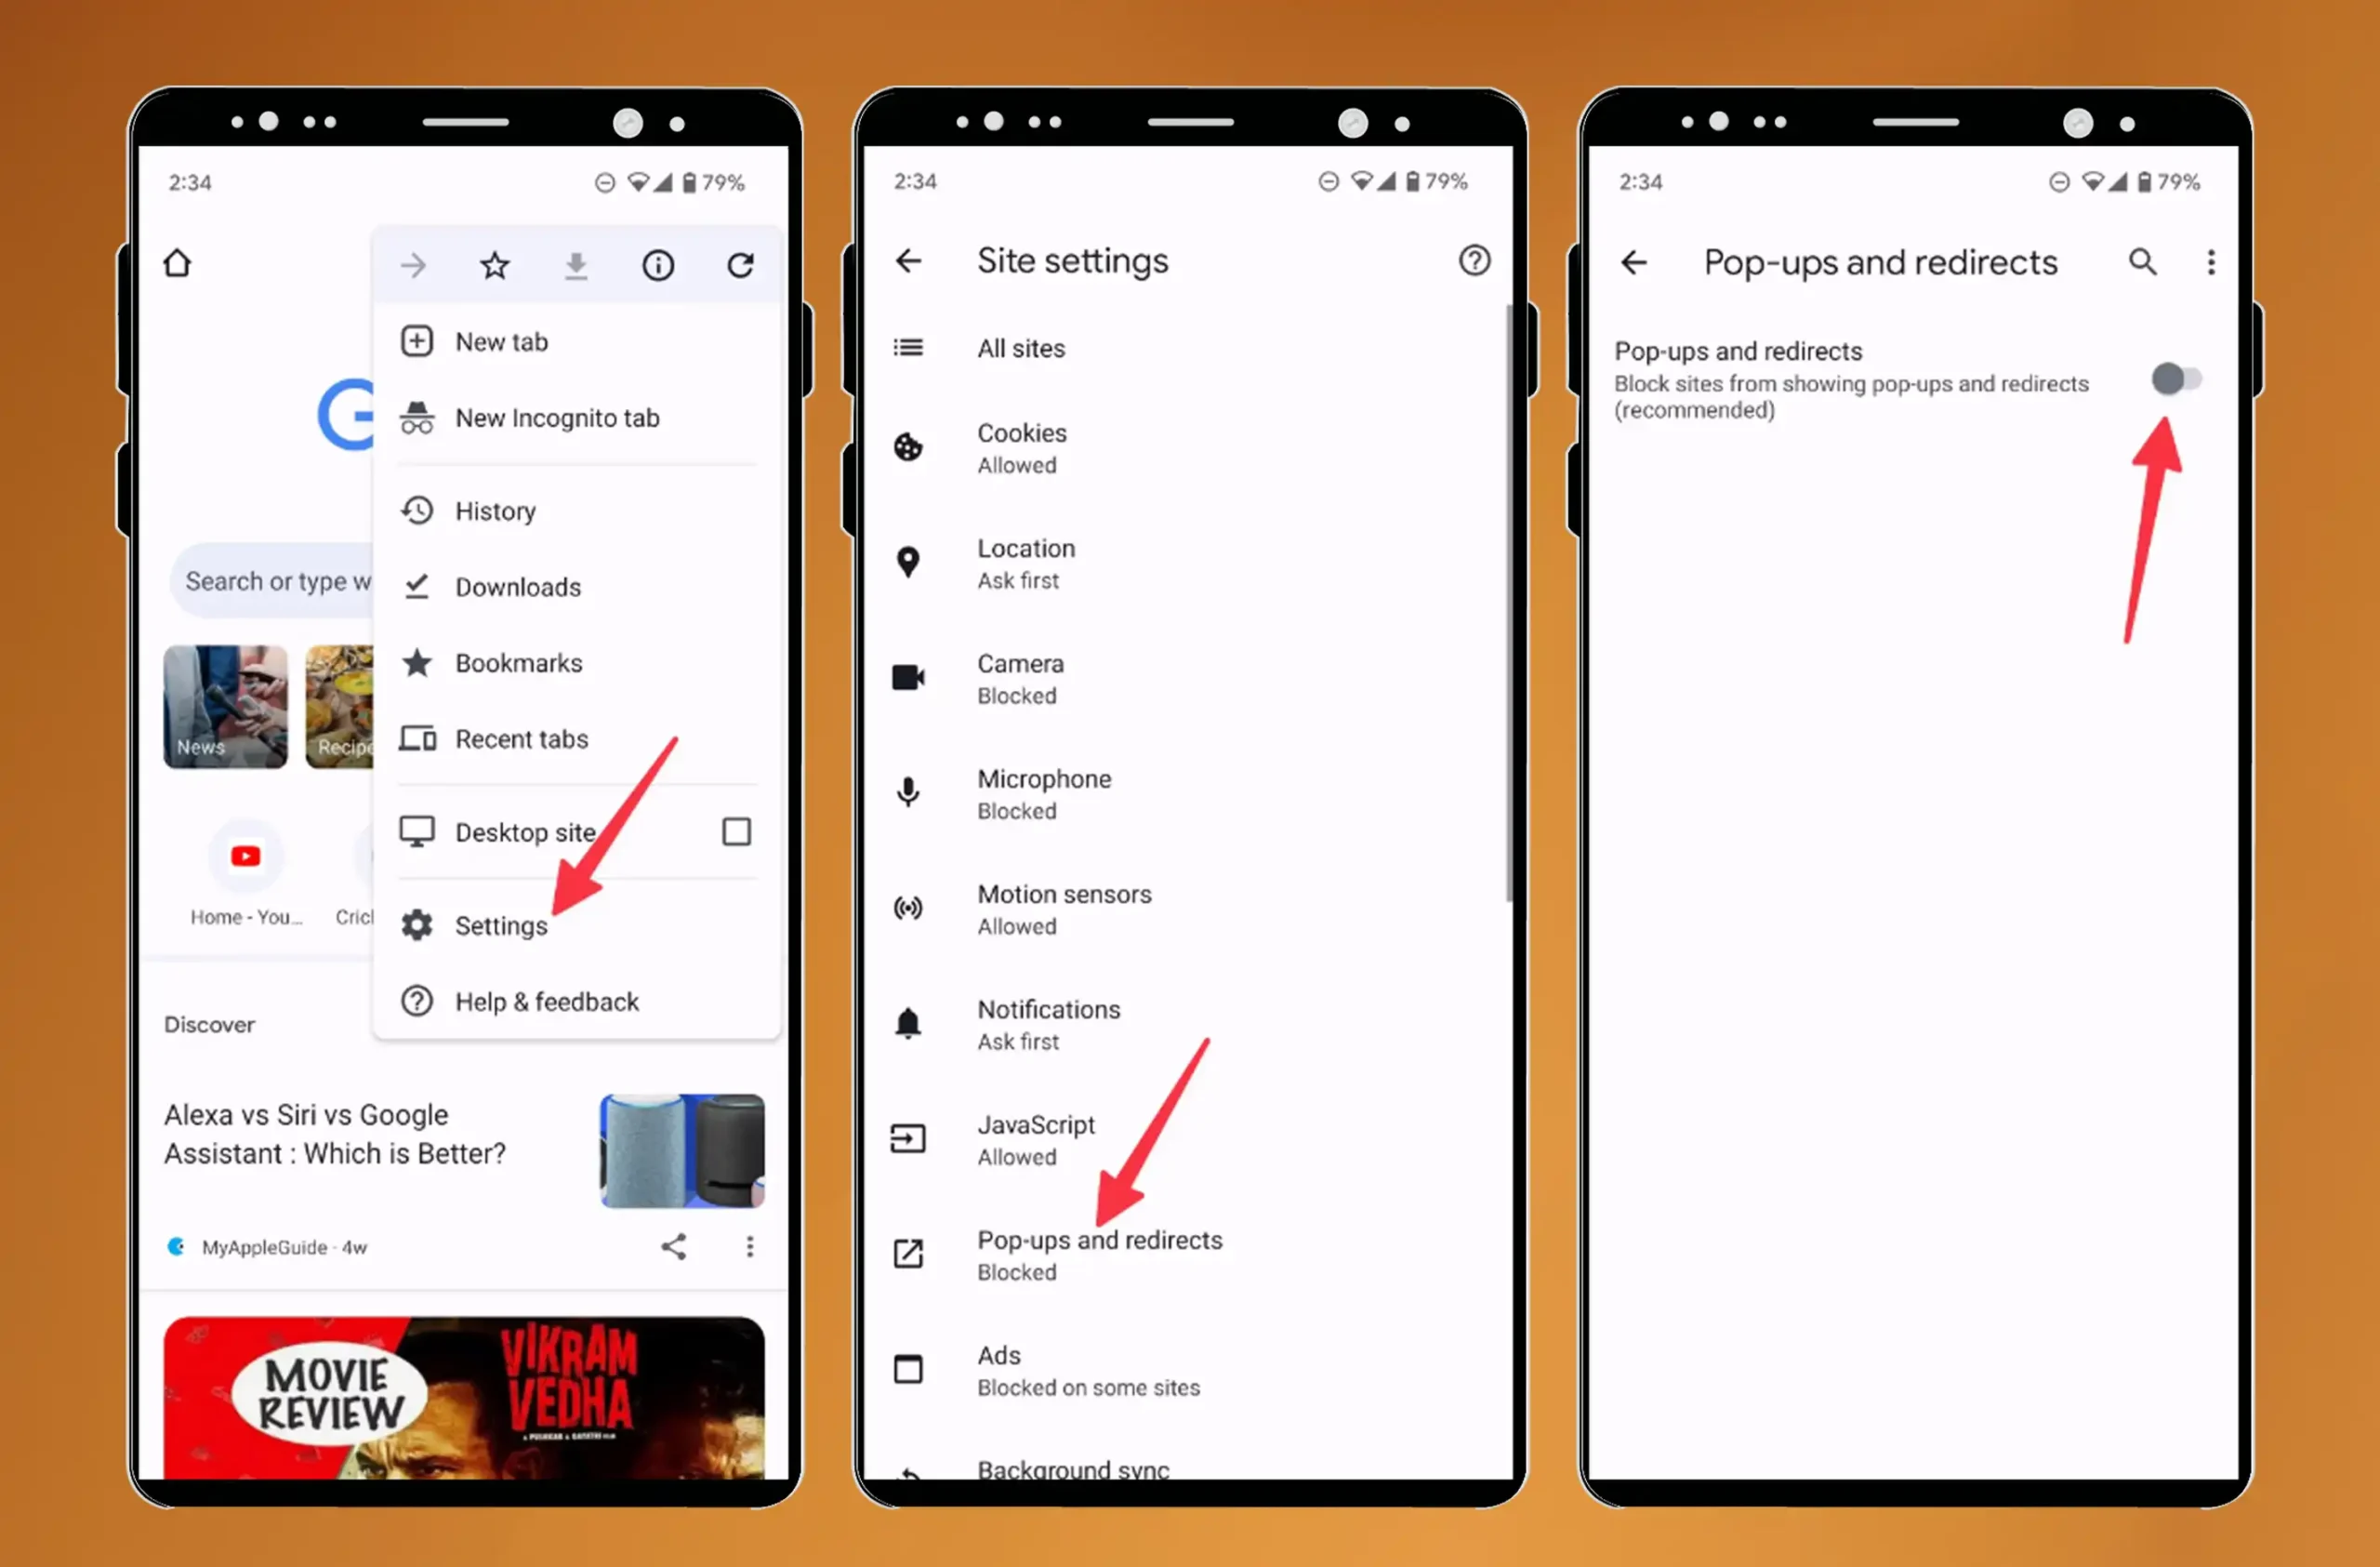
You’ll be pleased to know that Google Chrome comes equipped with its very own built-in blocker for pop-ups and ads, designed to put an end to those intrusive and misleading advertisements. To activate this feature on your phone, simply follow the step-by-step instructions outlined below on how to block ads on android.
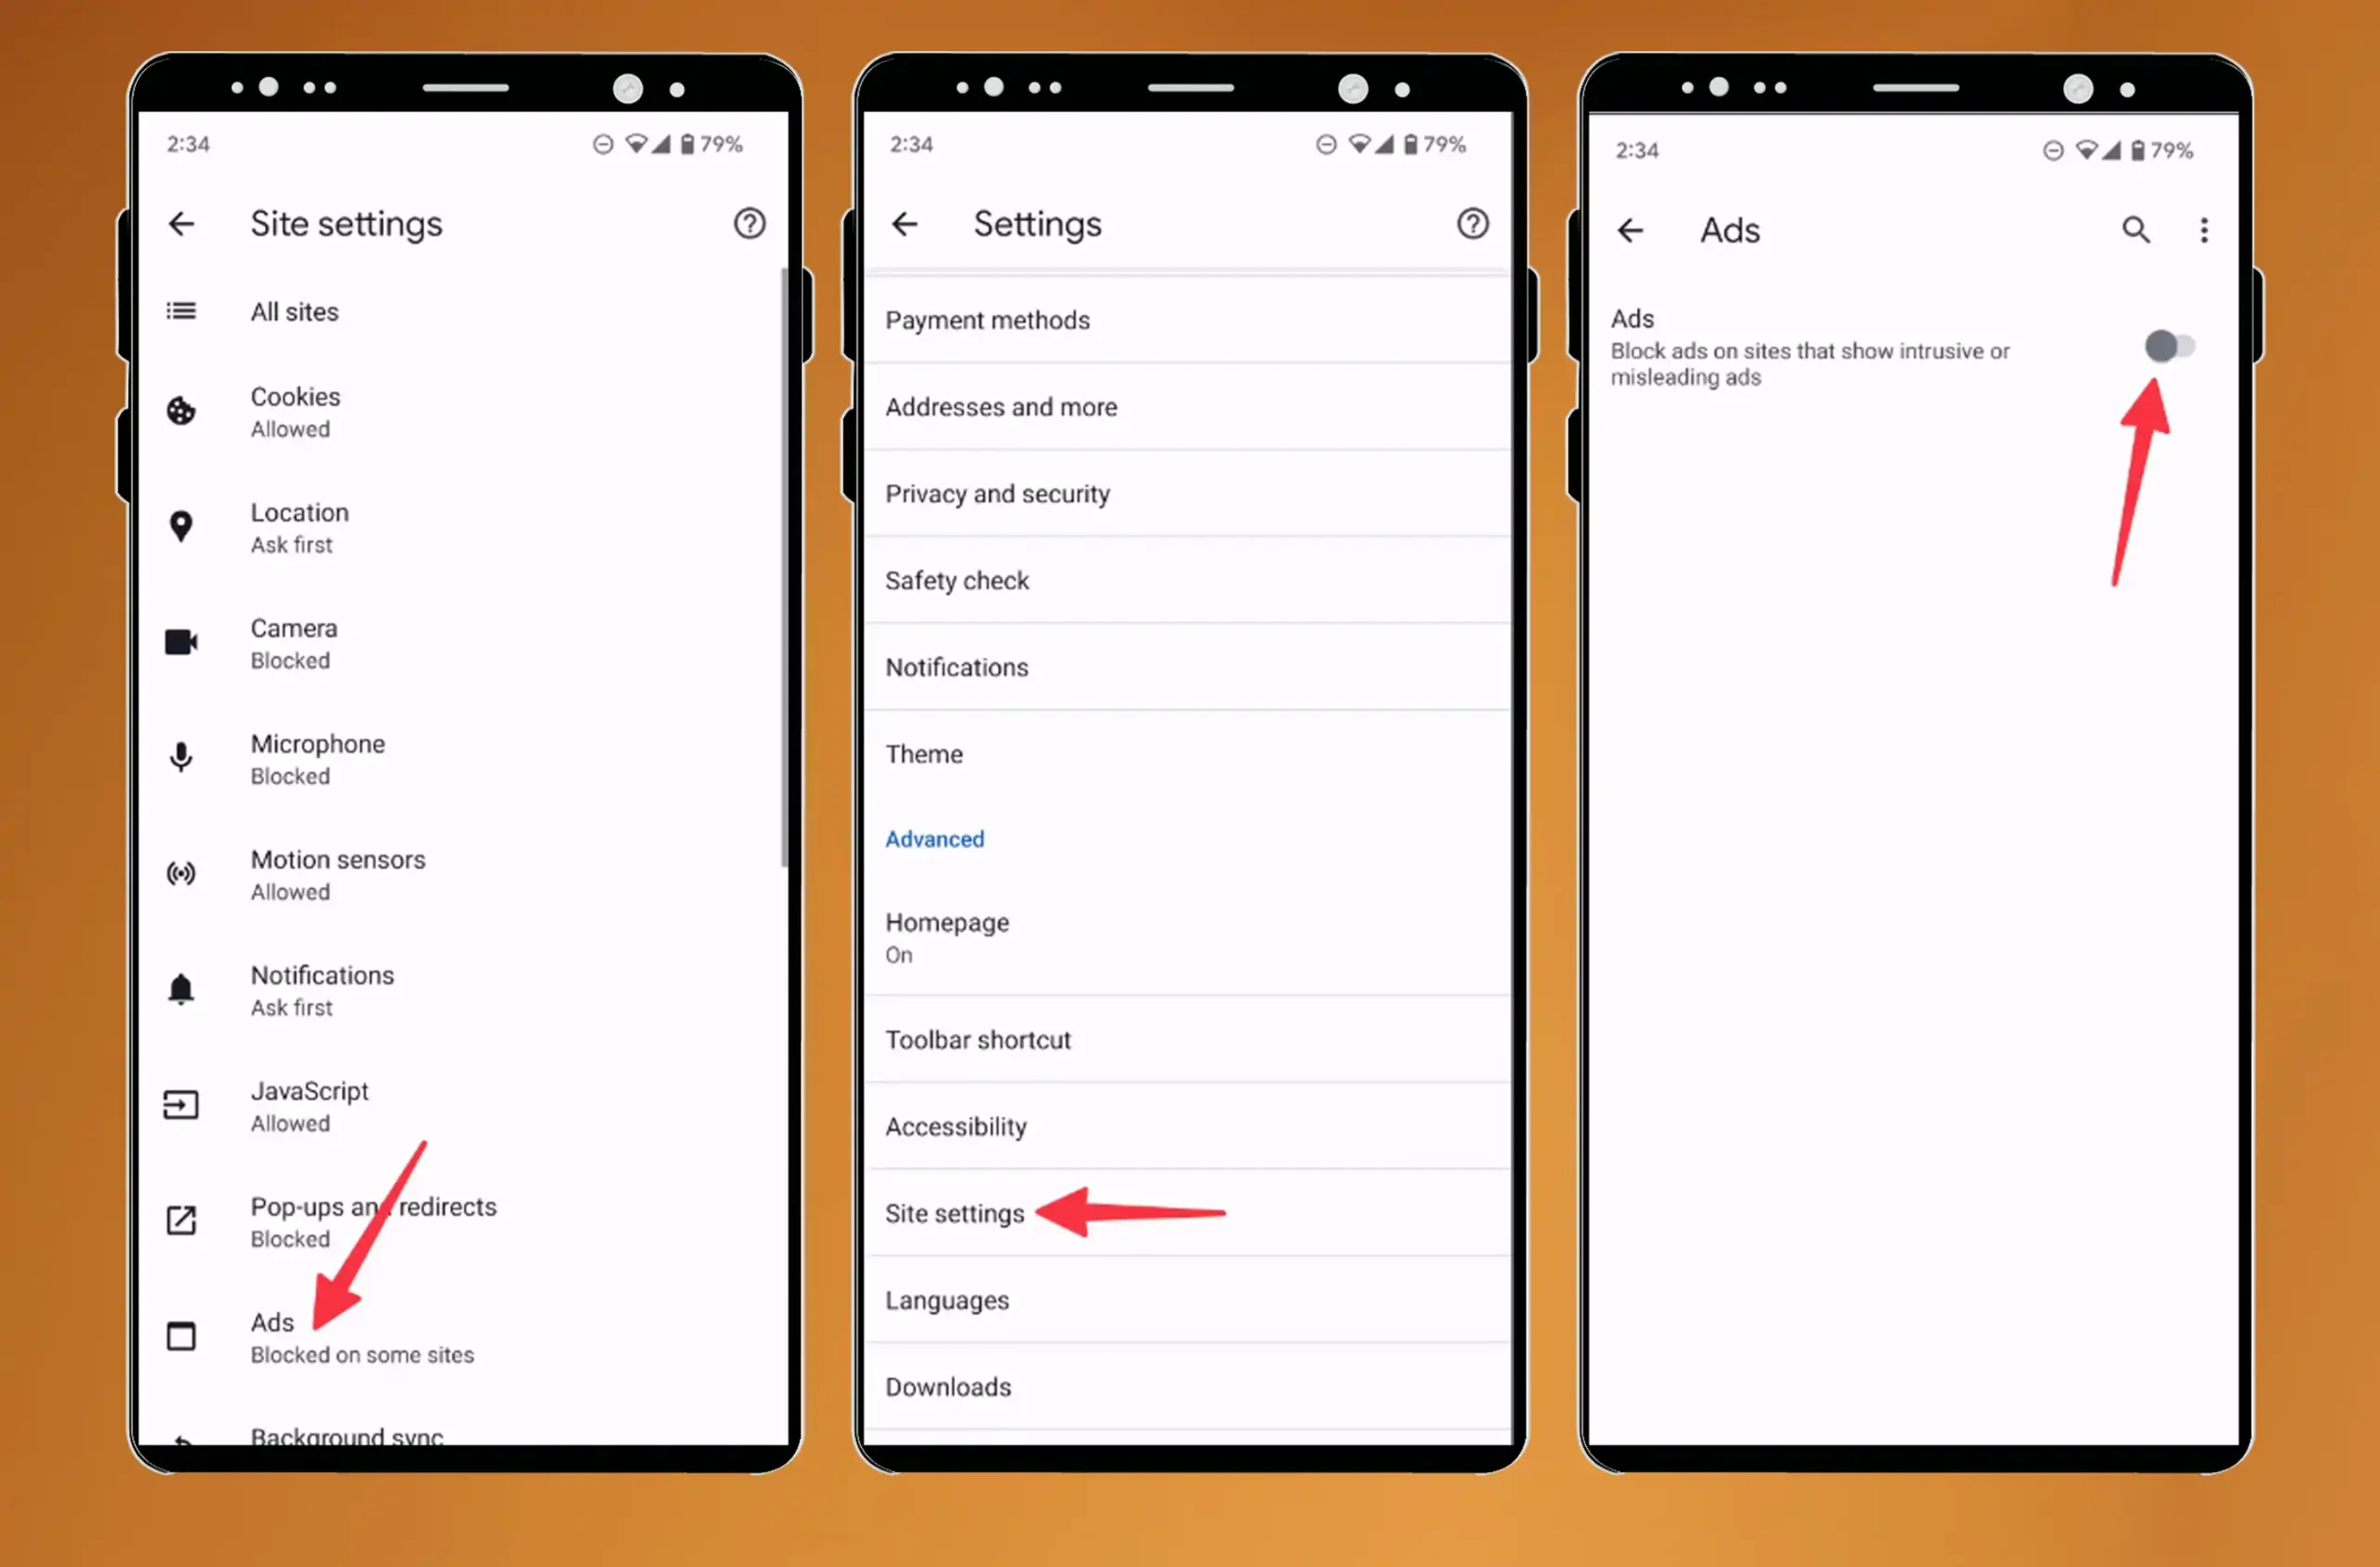
On your Android device, launch Google Chrome.
Tap the three-dot menu in the upper-right corner and open Settings.
Proceed to Site settings.
Open Pop-ups and redirects.
Enable the Pop-ups and redirects option from the menu.
Return to Site settings and select Ads.
Enable the Ads option.
Chrome does not support an ad-blocker extension on mobile devices, so you must use one of the third-party web browsers on Android if you wish to block ads while browsing the web. Samsung Internet and Firefox are two popular Chrome alternatives on Android that offer ad-blocker extensions.
Check Google Chrome website notifications
Granting permission for all websites to send real-time notifications to your Android phone or tablet may not be the most ideal decision. While some websites may send valuable and relevant alerts, others may take advantage of this privilege and flood your device’s notification center with irrelevant partner content. It is important to consider the potential consequences and exercise caution when enabling notifications from every website.
Here’s how to disable notifications for sites that are unnecessary:
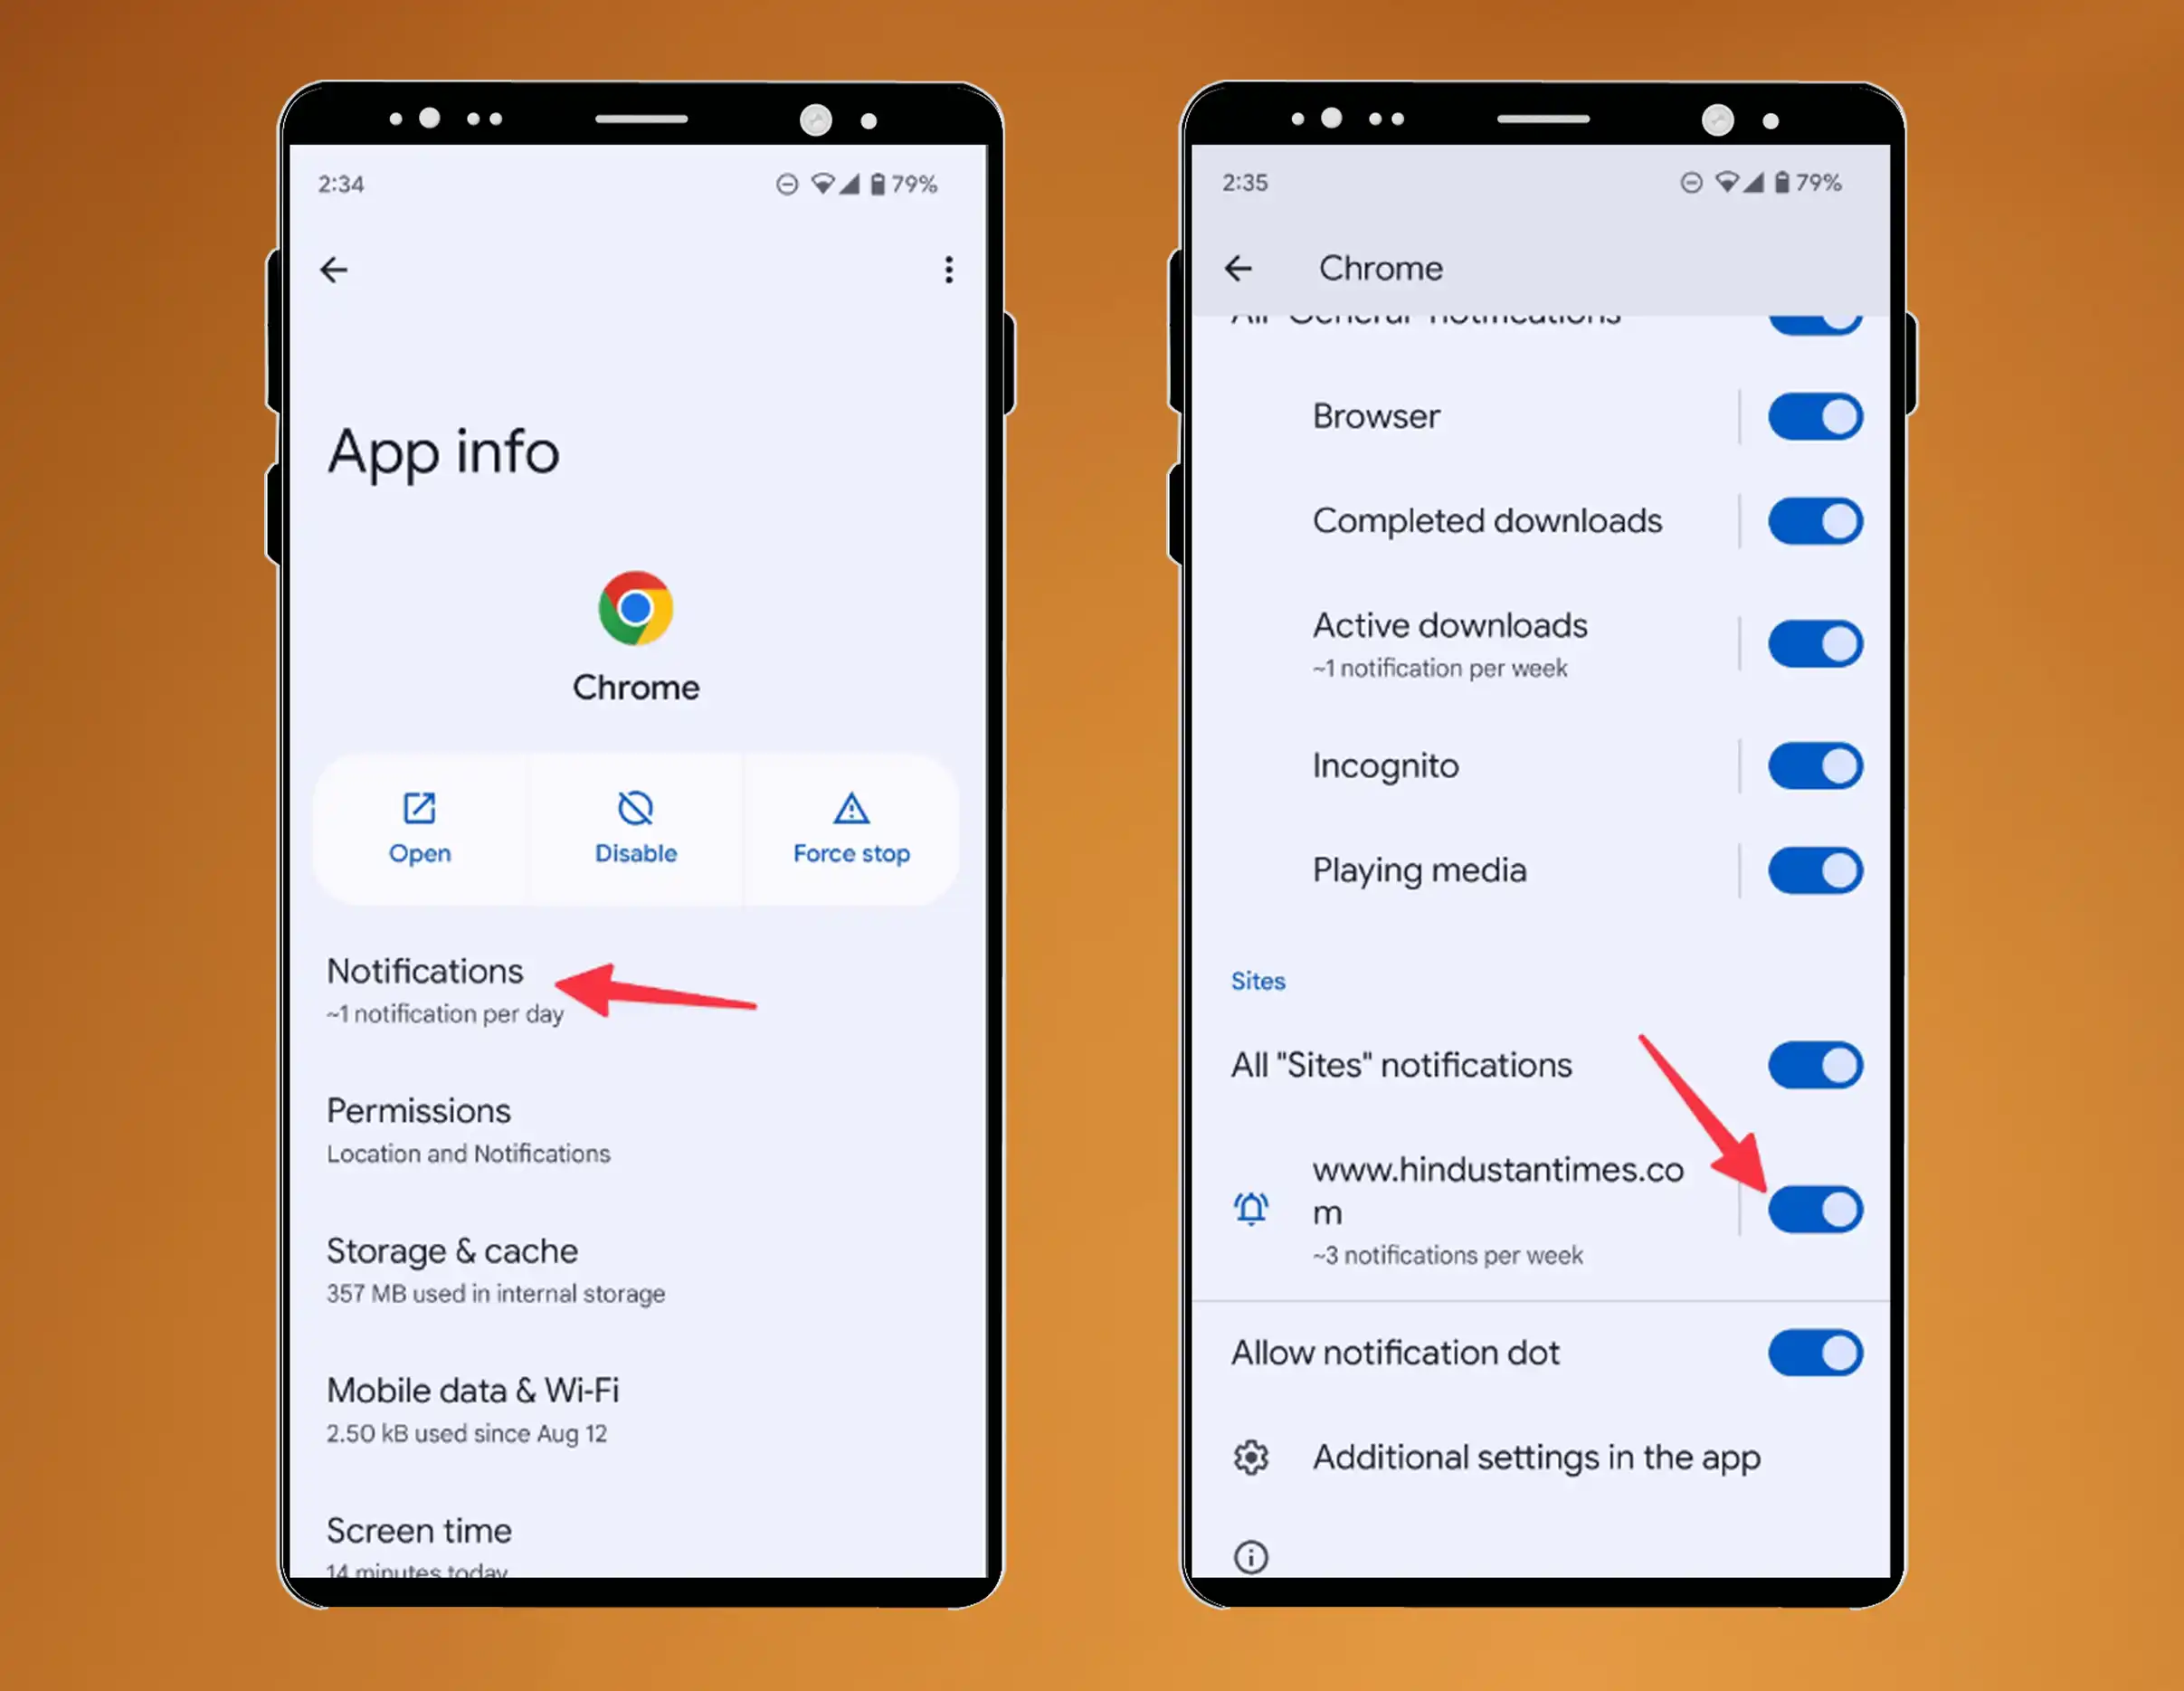
Press and hold the Google Chrome application icon, then tap the i button.
Click on Notifications.
Scroll to All Sites notifications .
Examine the list of authorized websites and the number of alerts each website sends per week.
Disable the notification permission for any unidentified websites on the list.
How to Block Ads on Android Homescreen
advertisements appearing on the homescreen are worse than advertisements in a web browser or notification center. These full banner advertisements display on top of any app on your smartphone or tablet. Android permits app developers to request the “Display over other apps” permission in order for their apps to function ordinarily.
Messenger and Truecaller require these permissions to display conversation bubble heads and identify incoming calls, respectively. However, some shady apps trick users into granting permission and continue to display advertisements on the homescreen. When you receive such advertisements, look for the app’s icon on the home screen. Follow the steps below on how to block ads on android to disable the permission once you’ve determined which apps require it.
Long-press the app icon to head to the app info menu.
Scroll to Display above other applications.
Turn off the Allow display over other applications toggle
Disable lock screen wallpaper services
To enhance the experience of your device’s lock screen, wallpaper services such as Glance display app recommendations, news, and partner content. It is available on Samsung and Xiaomi low-end and mid-range devices. Go through the steps below on how to block ads on android to disable wallpaper services.
Swipe up from the homescreen to access the application tray.
Choose the Settings gear icon.
Navigate to the Lock screen.
Open Wallpaper services.
Click None.
How to Block Ads on Android with a DNS Service
DNS-based ad blocking is the solution for those who desire a more comprehensive method of ad blocking. Using DNS-level filtering, you can block advertisements across all Android apps and browsers. We will walk you through setting up DNS-based ad blocking, including recommended DNS provider and step-by-step instructions for configuring your device.
Launch Settings
Tap Network and Internet
Open Private DNS options near the screen’s bottom.
Tap the Private DNS provider hostname option and enter the hostname of your preferred DNS service, such as family.adguard-dns.com.
Tap Save to activate AdGuard.
Install Applications with Caution
It’s best not to fill your Android phone or tablet with apps that you don’t need, like flashlight apps, app openers from third parties, or apps with only one or two stars. Your Android device doesn’t require a protection app, either. Read reviews of an app before you install it. If other people say that there are too many ads, you should avoid those apps or look for better ones.
Google Play Protect is available, but it keeps harmful apps from showing up in the Play Store. The company has no say over the ads that show up in other apps.
To block ads, you can also root your Android phone and run a system-wide ad blocker. But be careful when you “root” your phone. If you make a mistake during the process, you could end up with a broken gadget and lose the warranty.
Conclusion
With the tips and tricks in this guide on how to block ads on android, you’ll be able to take control of your Android device again and get rid of those annoying ads. You now have the power to create an ad-free environment on your Android device. You can use ad blocker apps, change your browser settings, use DNS-based ad blocking, browser extensions, or look for ad-free options. Accept the options and enjoy a smooth, interruption-free browsing experience. Enjoy not seeing any ads!
All products, and company names, logos, and service marks (collectively the "Trademarks") displayed are registered® and/or unregistered
trademarks™ of their respective owners.
The authors of this web site are not sponsored by or affiliated with any of the third-party trade mark or third-party registered trade mark owners,
and make no representations about them, their owners, their products or services.
How to find deleted sms on android? In today’s world, instant messaging apps like WhatsApp and Messenger have taken the world by storm. However, despite their growing popularity, many users still prefer the classic text messaging for their day-to-day communication needs. It’s a common occurrence for those who rely on text-based communication to accidentally delete a message. Whether it’s a message from a friend or an important work message, it can be frustrating to lose that information.
Fortunately, there are ways to recover deleted messages, depending on the device and messaging app being used. It’s important to act quickly and follow the appropriate steps to increase the chances of successful recovery. A few options can help you retrieve deleted texts whether you use a Google Pixel or one of the top Samsung Galaxy phones.
What options are available on how to find deleted sms on Android ?
There are multiple ways to recover deleted text messages on an Android device. If the conversation was archived, it will be located in the Archived Inbox. Samsung Galaxy phones include a Recycle bin menu that is useful for locating deleted communications.
If Google Drive backup is enabled in Messages, you may need to factory reset your Android phone and set it up from scratch in order to locate deleted texts. There are also third-party Android recovery applications if none of these tools work. Consult the sections that follow for specific instructions on how to recover deleted text messages.
How to find deleted sms on android using Google app archive
In Messages, it’s simple to unintentionally archive conversation threads. It is also possible for conversations that were deliberately archived in the past to become relevant once more. Recovering archived text messages is uncomplicated regardless of the circumstances. To locate and recover archived texts, follow these steps.
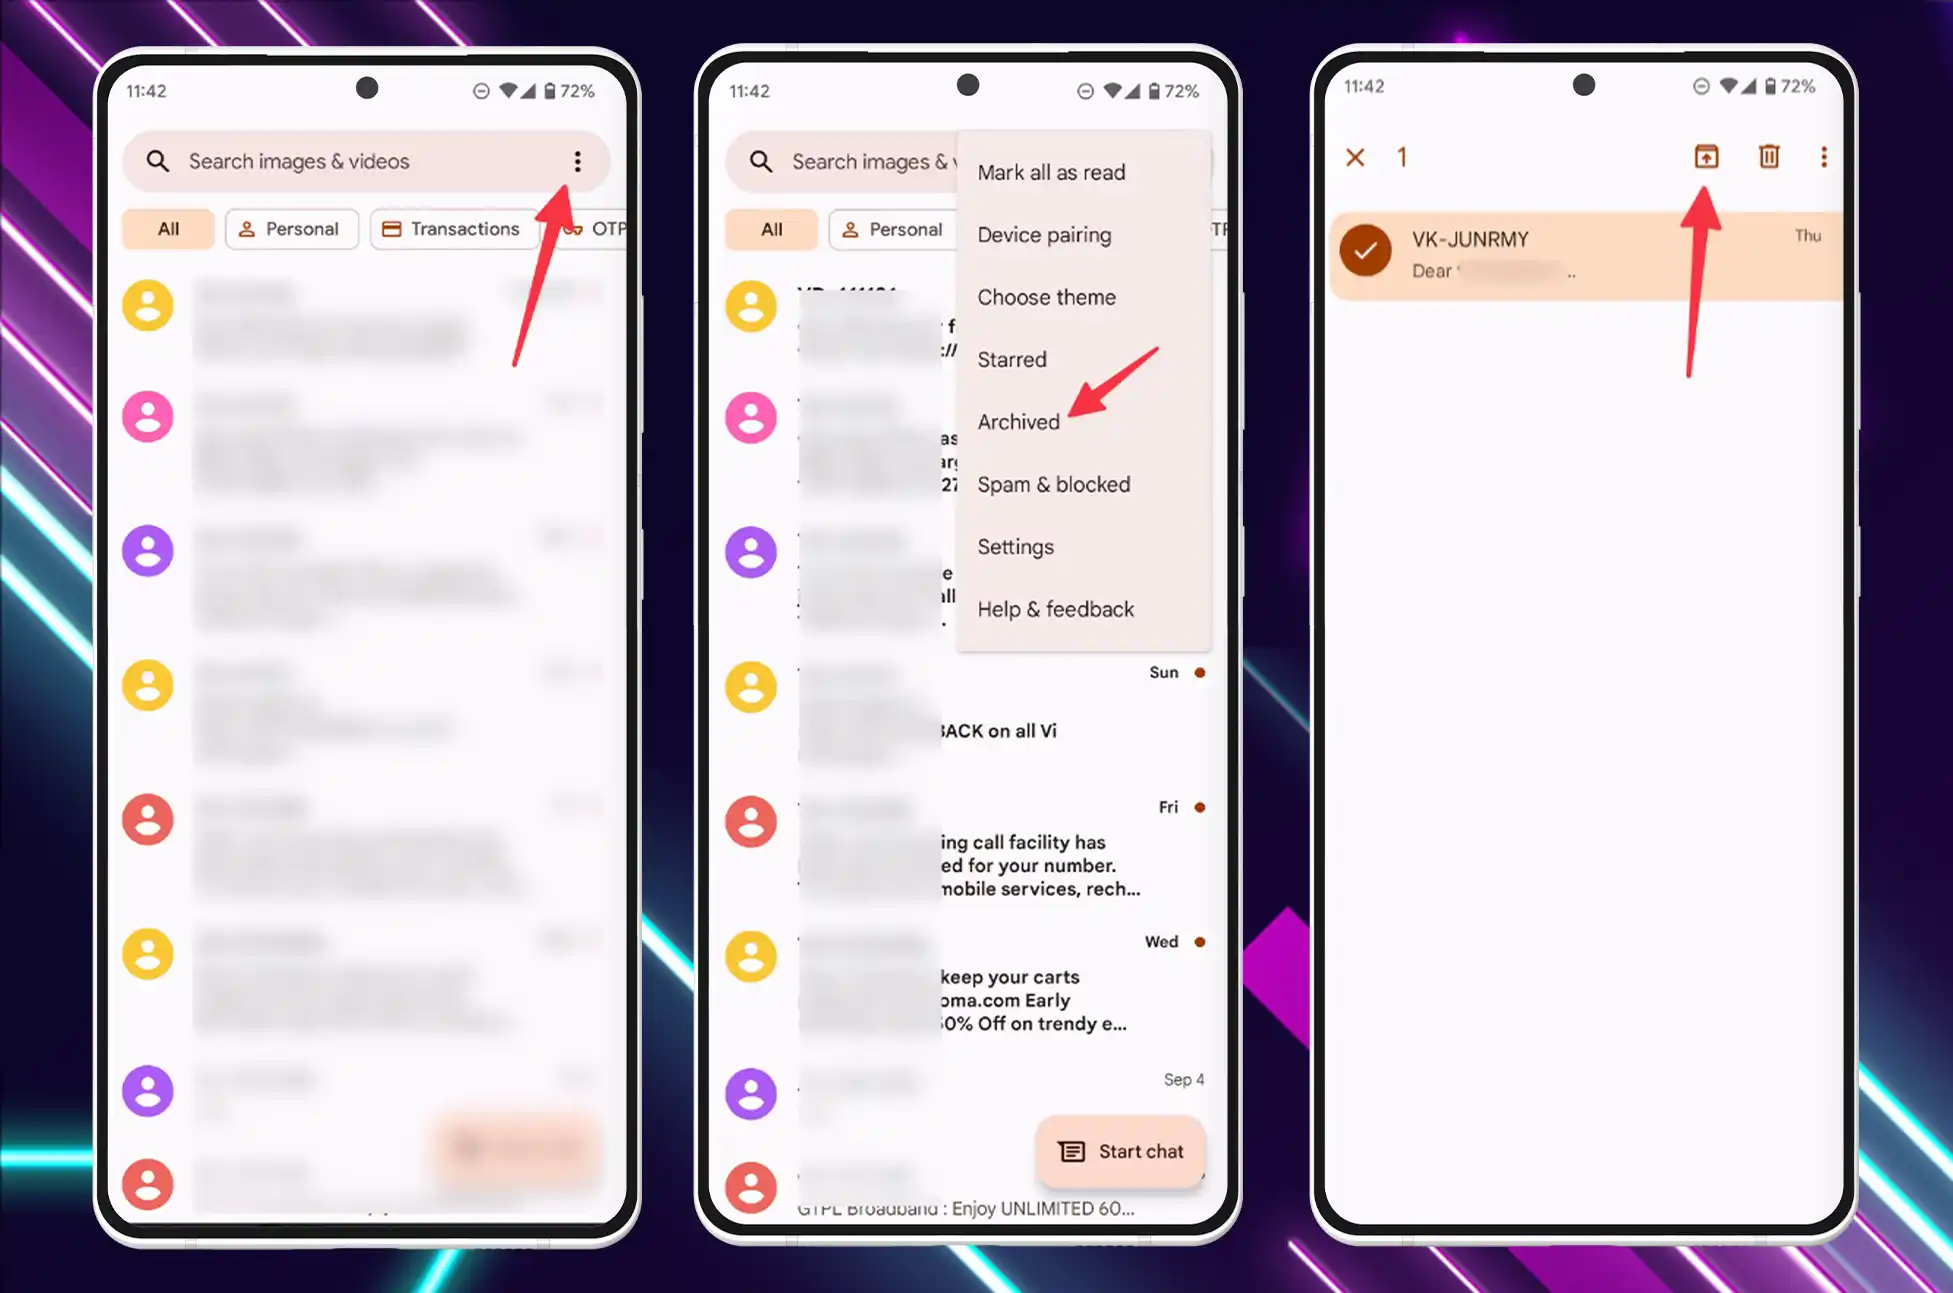
Launch the Messages app on your smartphone.
Tap the overflow icon (also known as the menu with three dots) in the upper-right quadrant.
Select Archived
Long-press the message you wish to retrieve and select the up arrow icon at the top of the screen
Google’s Messages service does not offer a Recycle bin. Therefore, it is a bit more difficult to recover deleted text messages that were not sent to an archive. If you have Google Drive backup enabled, that will suffice. If not, you must rely on third-party data recovery programs to retrieve the deleted communications.
Samsung users can retrieve deleted text messages from the Messages Recycling bin
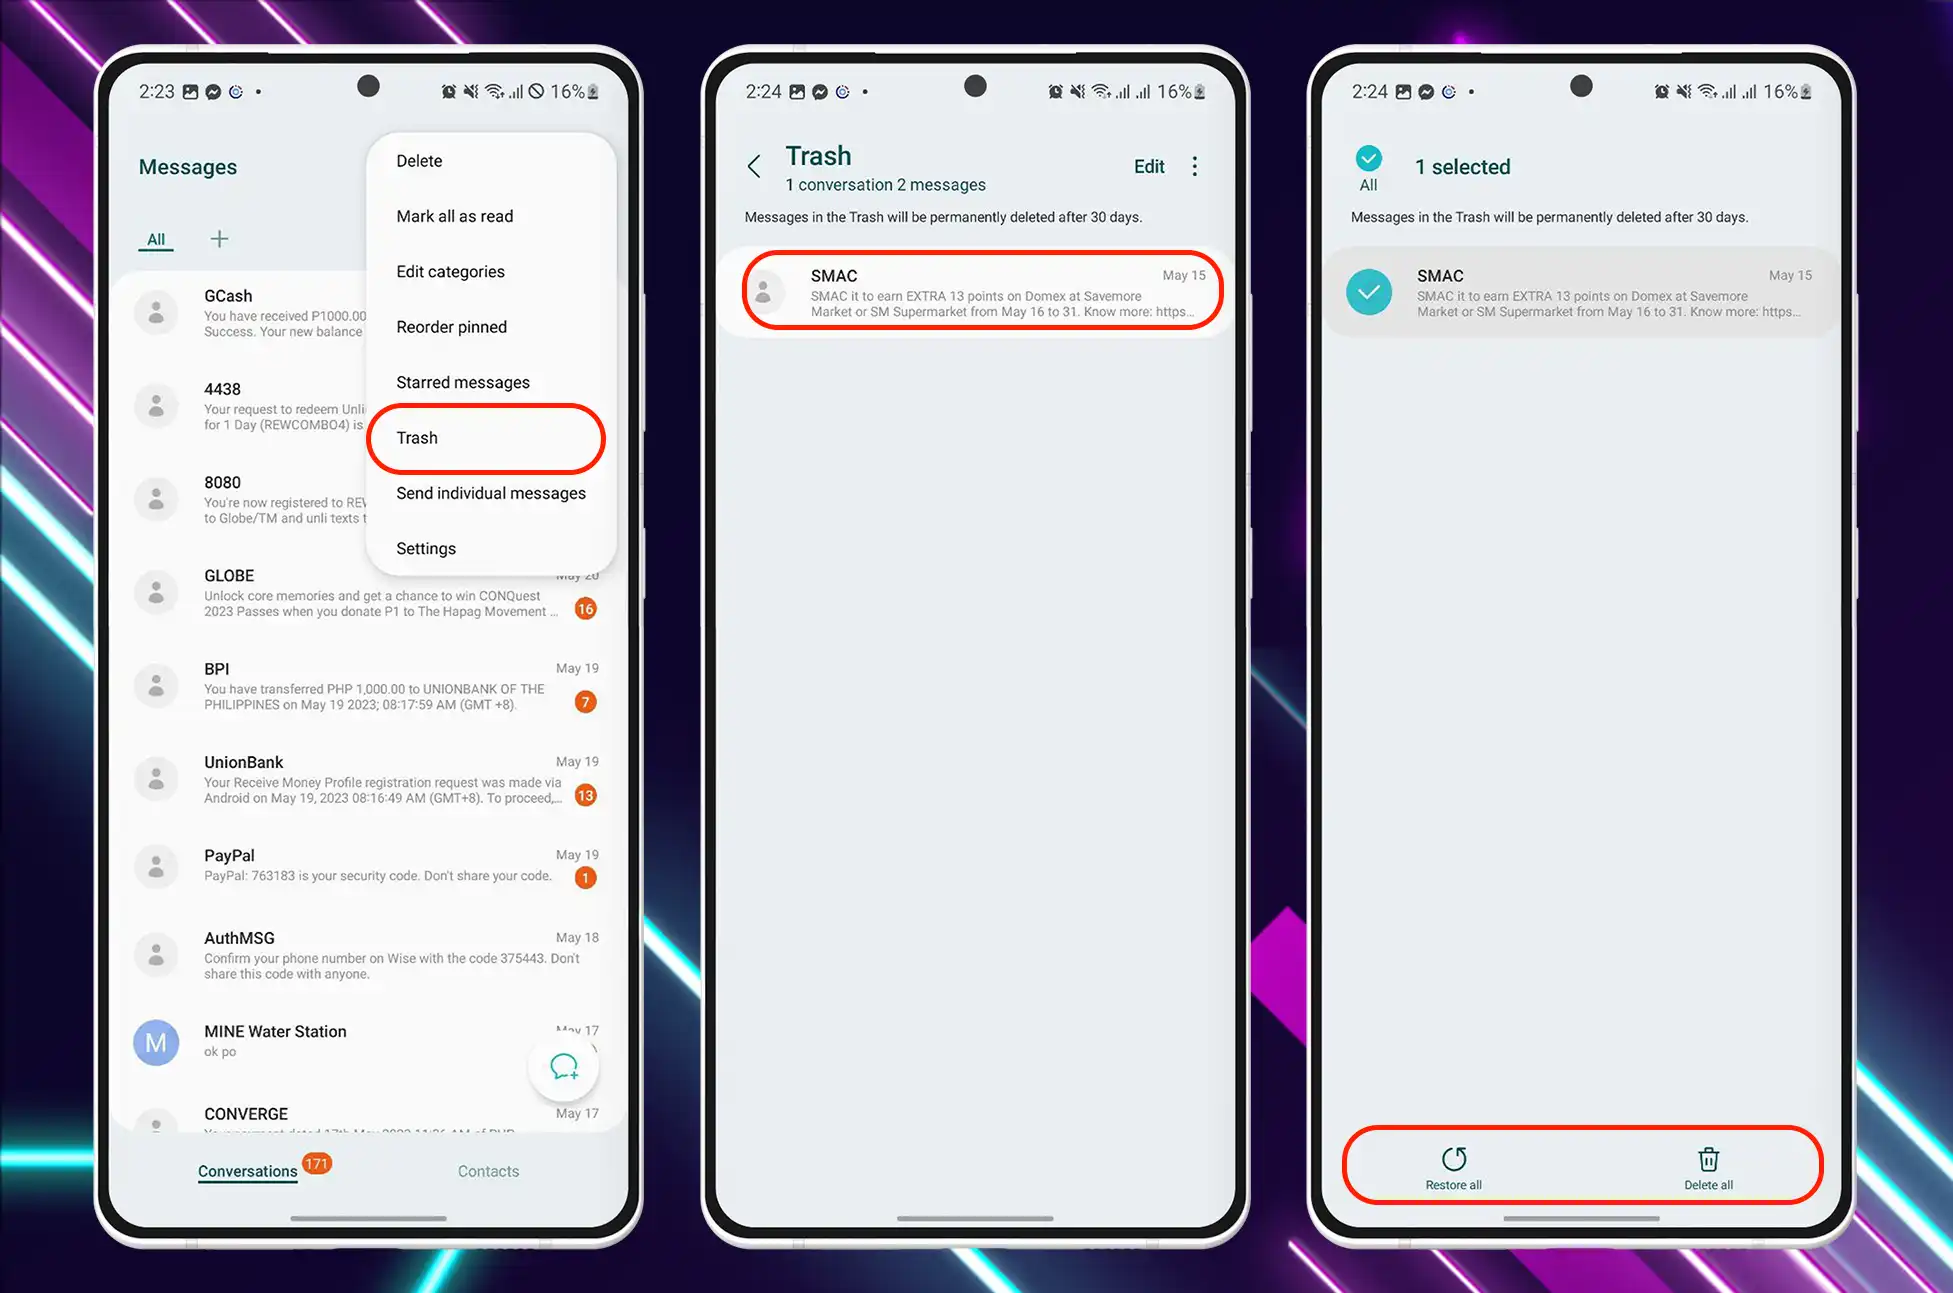
On Galaxy phones, the default One UI Messages app includes a number of useful features. The Samsung Messages app retains deleted text messages in the Recycle bin for 30 days. After this period, the Recycle bin permanently deletes the messages. Follow these steps to recover messages from the Recycle receptacle within the specified time frame.
Launch the Messages app on your Samsung device.
Tap the menu button with three dots in the upper-right corner to access the Recycle bin
Check the text messages you have deleted. Long-tap the message to retrieve it.
Select Restore at the bottom and confirm the same in your primary email account.
Tips for preventing the permanent loss of your text messages
It’s never enjoyable to lose something permanently that you wish you hadn’t. This circumstance is no stranger to text messages. Try some of these tips and tactics to prevent permanent loss of your texts.
Instead of deleting messages, archive them
The default Messages app lets you archive a chat instead of deleting it. Most of the other texting apps also have this function. If you want to hide a chat that doesn’t belong from the main menu, don’t delete it. Instead, archive it. The swipe gestures that come with the Messages app make it easy to save a chat topic.
Use Google Drive to back up your text messages
By enabling Google Drive backup on your Android phone, you can safeguard your text messages from permanent loss. Google Drive backs up data from installed apps, media files, SMS messages, call logs, device settings, and Google account data. You can also use other devices to get to these files.
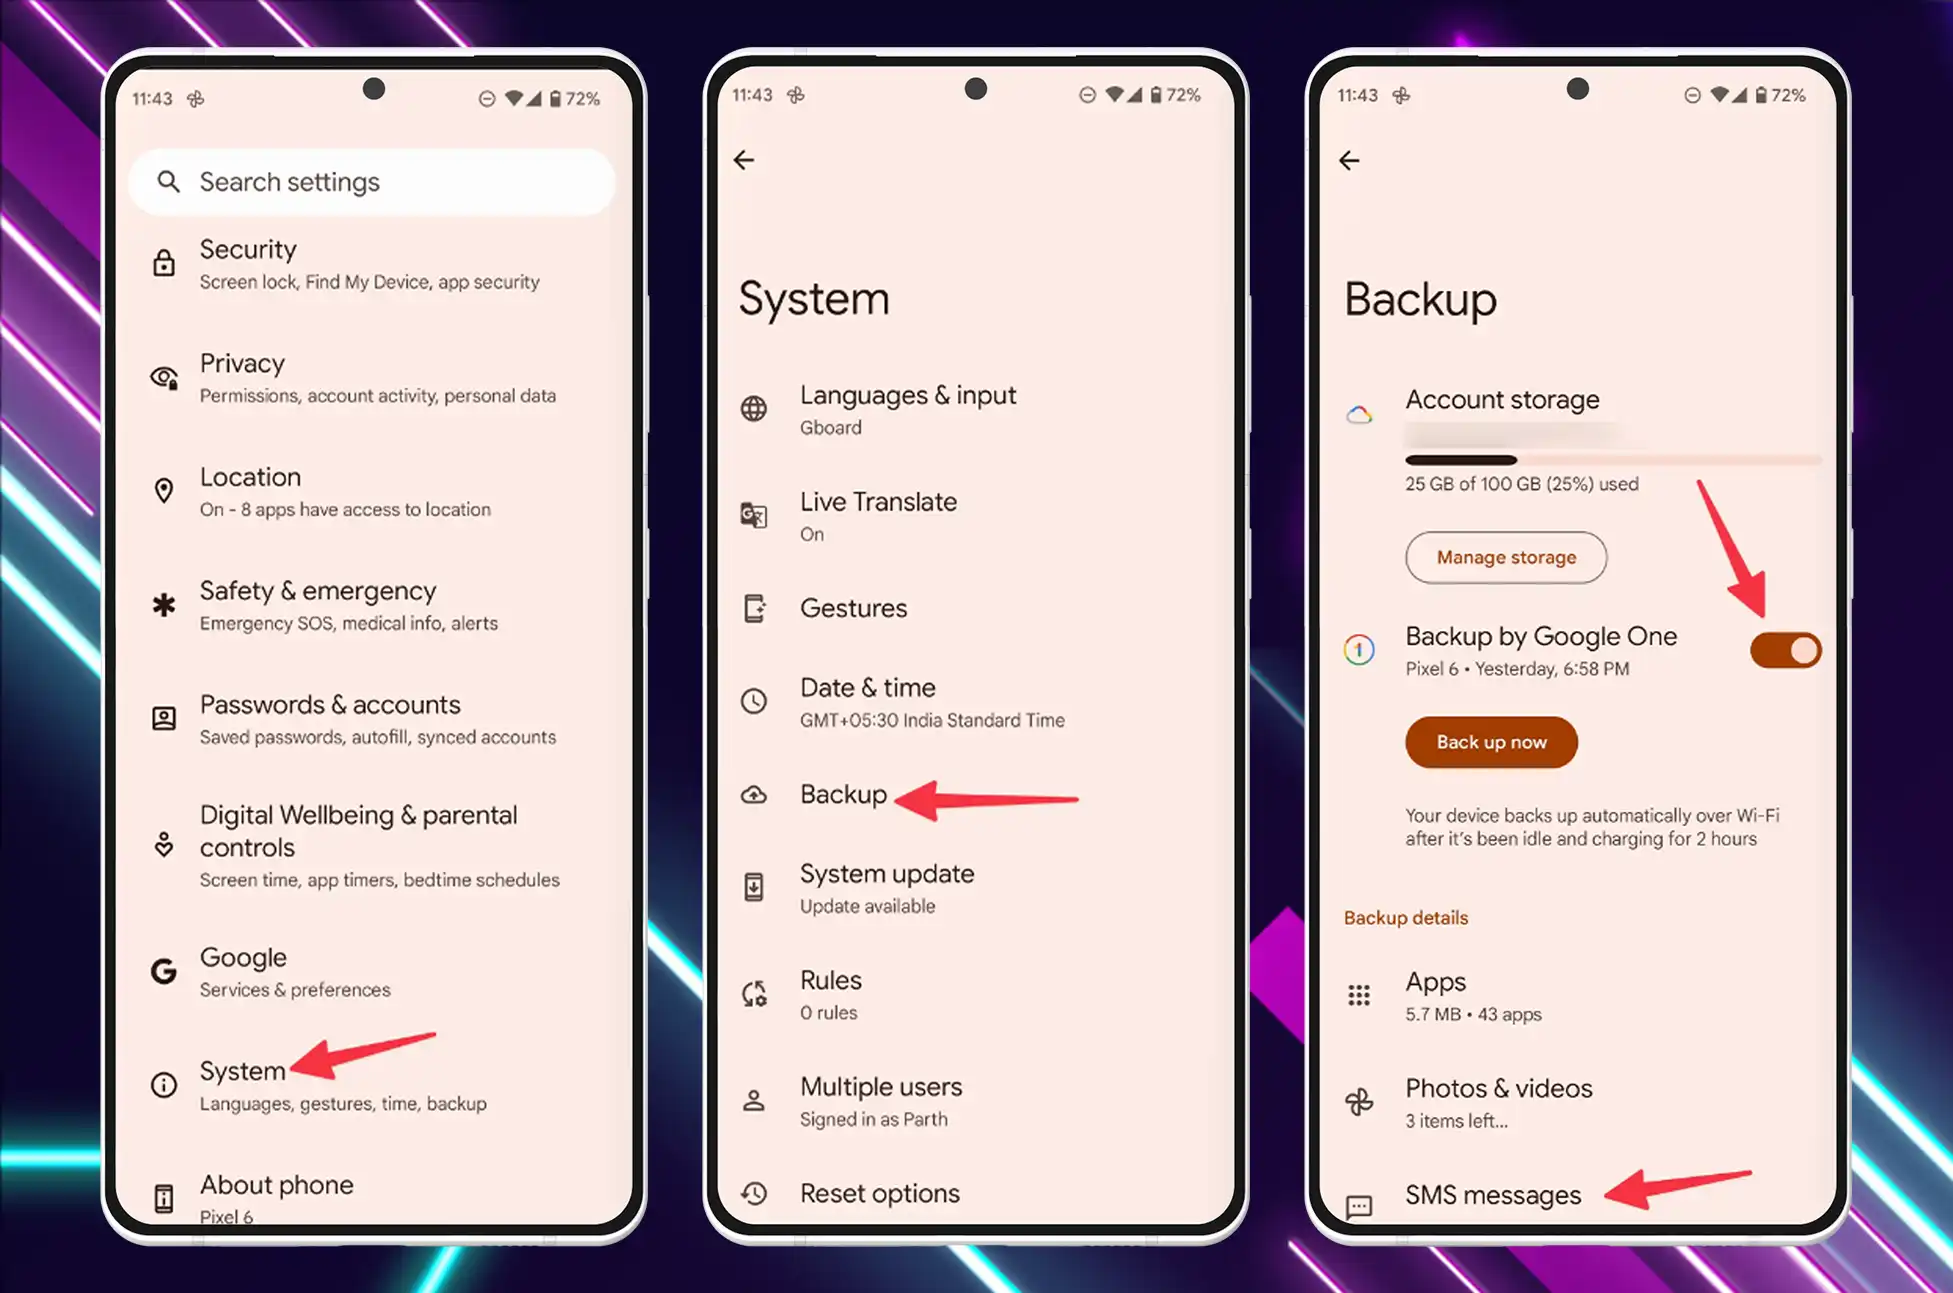
To get to the app drawer, swipe up from the home screen.
Find the app that looks like a known gear.
Click on System.
Choose to back up
Check your account’s storage space and turn on Backup by Google One from the next choice.
Your Google Account storage is affected by how much your Android phone backs up. If you run out of the default amount of storage space, you might want to free up some room or sign up for one of the Google One plans.
To recover deleted text messages on your Android using Google backups, you need to reset your phone to factory settings and opt to restore the Google Drive backup during the setup process.
Conclusion
It can be stressful to lose important text messages, but with the right information and tools, it is often possible to get them back. Remember that you need to act quickly, stop using your device, and look into your recovery choices. Whether you use the Android device’s built-in features, backup apps, or professional data recovery software, there is a chance you can get back those lost SMS. Take a deep breath, follow the steps in this guide, and you’ll have a better chance of getting those important texts back.
All products, and company names, logos, and service marks (collectively the "Trademarks") displayed are registered® and/or unregistered
trademarks™ of their respective owners.
The authors of this web site are not sponsored by or affiliated with any of the third-party trade mark or third-party registered trade mark owners,
and make no representations about them, their owners, their products or services.
How to change your default google account on android? In today’s digitally-driven society, it’s common for individuals to have multiple Google accounts for different purposes, such as personal, professional, and academic. Google accounts are required for data synchronization and access across Android devices. There may be times, however, when you need to alter the default Google account on your Android device. This guide will walk you through the process of changing your default Google account on Android and help you avoid losing any essential information.
Why Change the Default Google Account?
There are many reasons to change the default Google account on Android. The most common reasons include:
You started to use a new Google account more frequently and wish to synchronize data with it instead.
You wish to separate personal and professional information on your device.
You added the incorrect account by mistake during initial setup and wish to transfer to the correct one.
You have sold or donated your device, and the new owner must set their Google account as the default.
How to Change your Default Google Account on Android
Before starting the process of changing the default Google account, it is essential to ensure that all data associated with the current default account has been backed up and synced. This will prevent data loss throughout the procedure.
Verify that every important file has been backed up and synced to your default Google account. This can include contacts, calendar events, communications, and Google Drive documents.
After changing the default account, make sure you have the login credentials for all Google accounts you wish to add to your device.
After changing the default Google account, it may be necessary to reconfigure certain app settings and preferences.
Step-by-Step Process to Change the Default Google Account
Follow these steps to change your Android device’s default Google account:
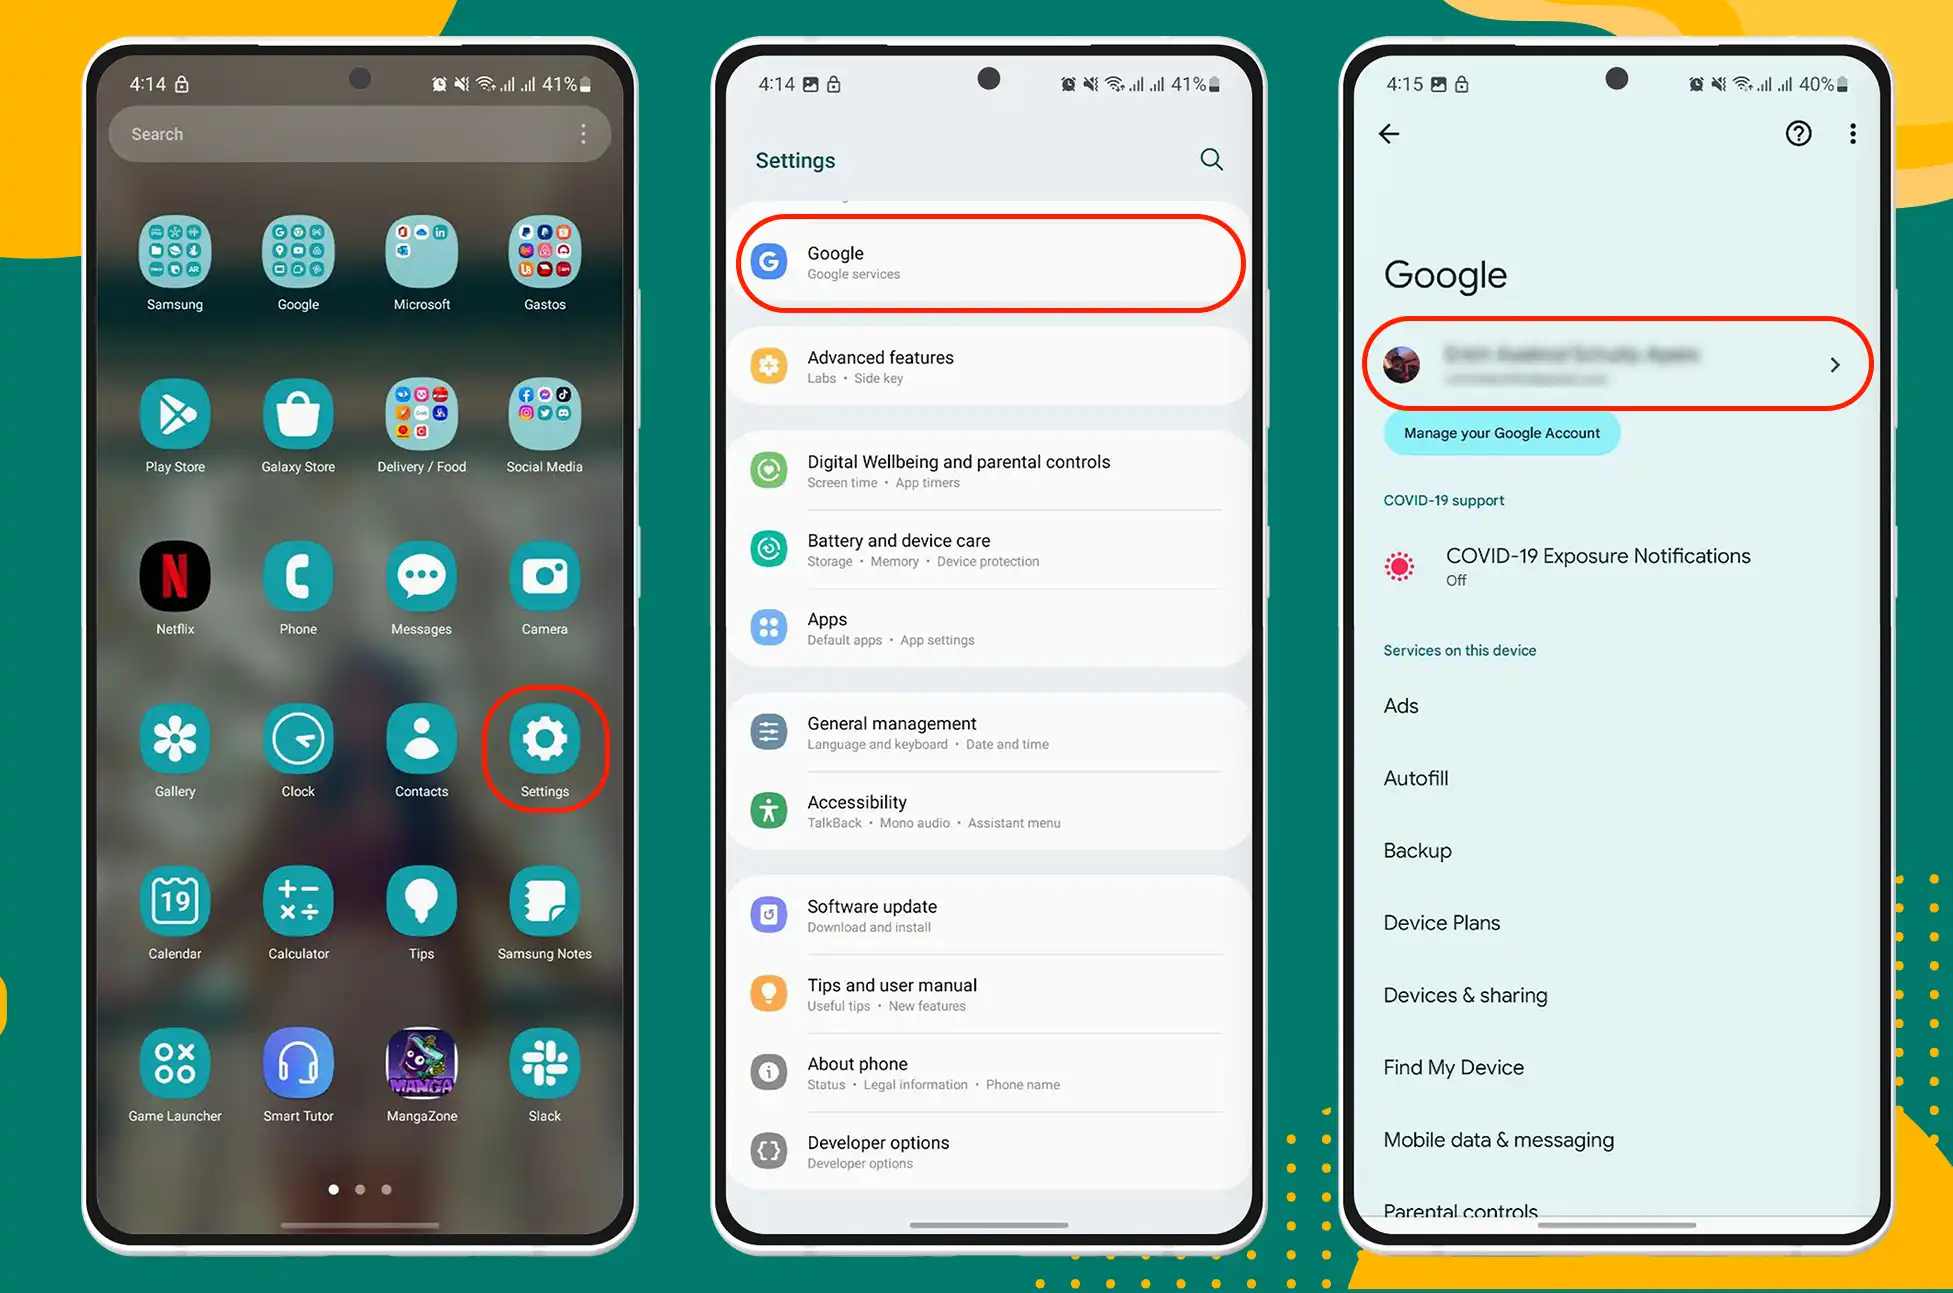
Step 1: Open the Settings app on your Android device.
Step 2: Scroll down and tap on “Google.”
Step 3: Tap on the right arrow next to your current default Google account.
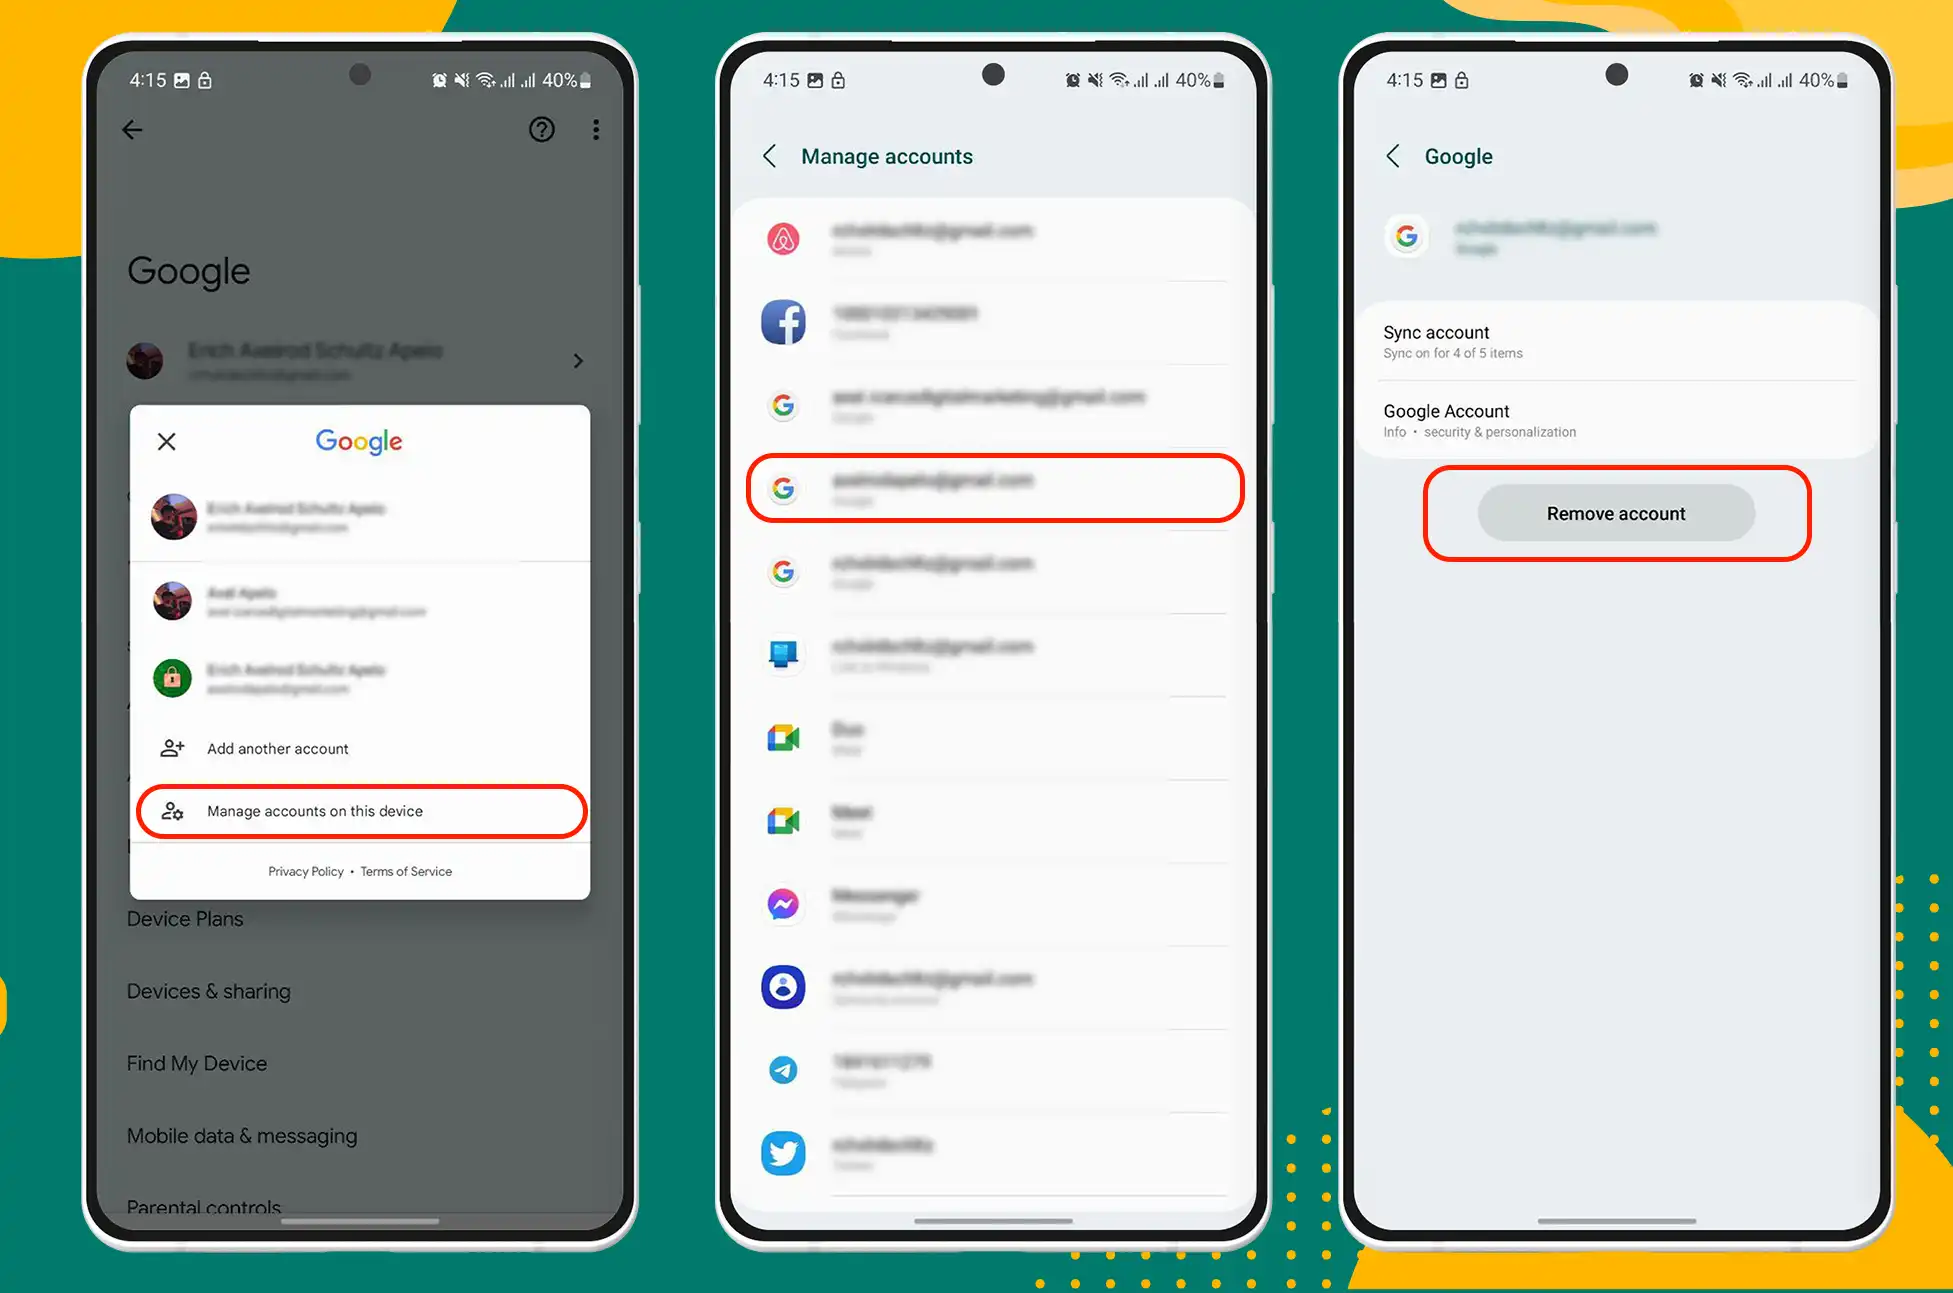
Step 4: Select “Manage accounts on this device” from the pop-up menu. This will display a list of all accounts currently linked to your device.
Step 5: Tap on the Google account you want to remove.
Step 6: Tap “Remove account” twice to confirm the removal.
Repeat steps 5 and 6 for each additional Google account on your device, except the one you wish to make the default.
Android will automatically designate the remaining Google account as the default after removing all other Google accounts.
Adding Google Accounts to Your Device
After changing the default Google account on your device, you may wish to re-add other Google accounts. These accounts will be considered secondary and will have no effect on the new default account.
To add a Google account to your Android device:
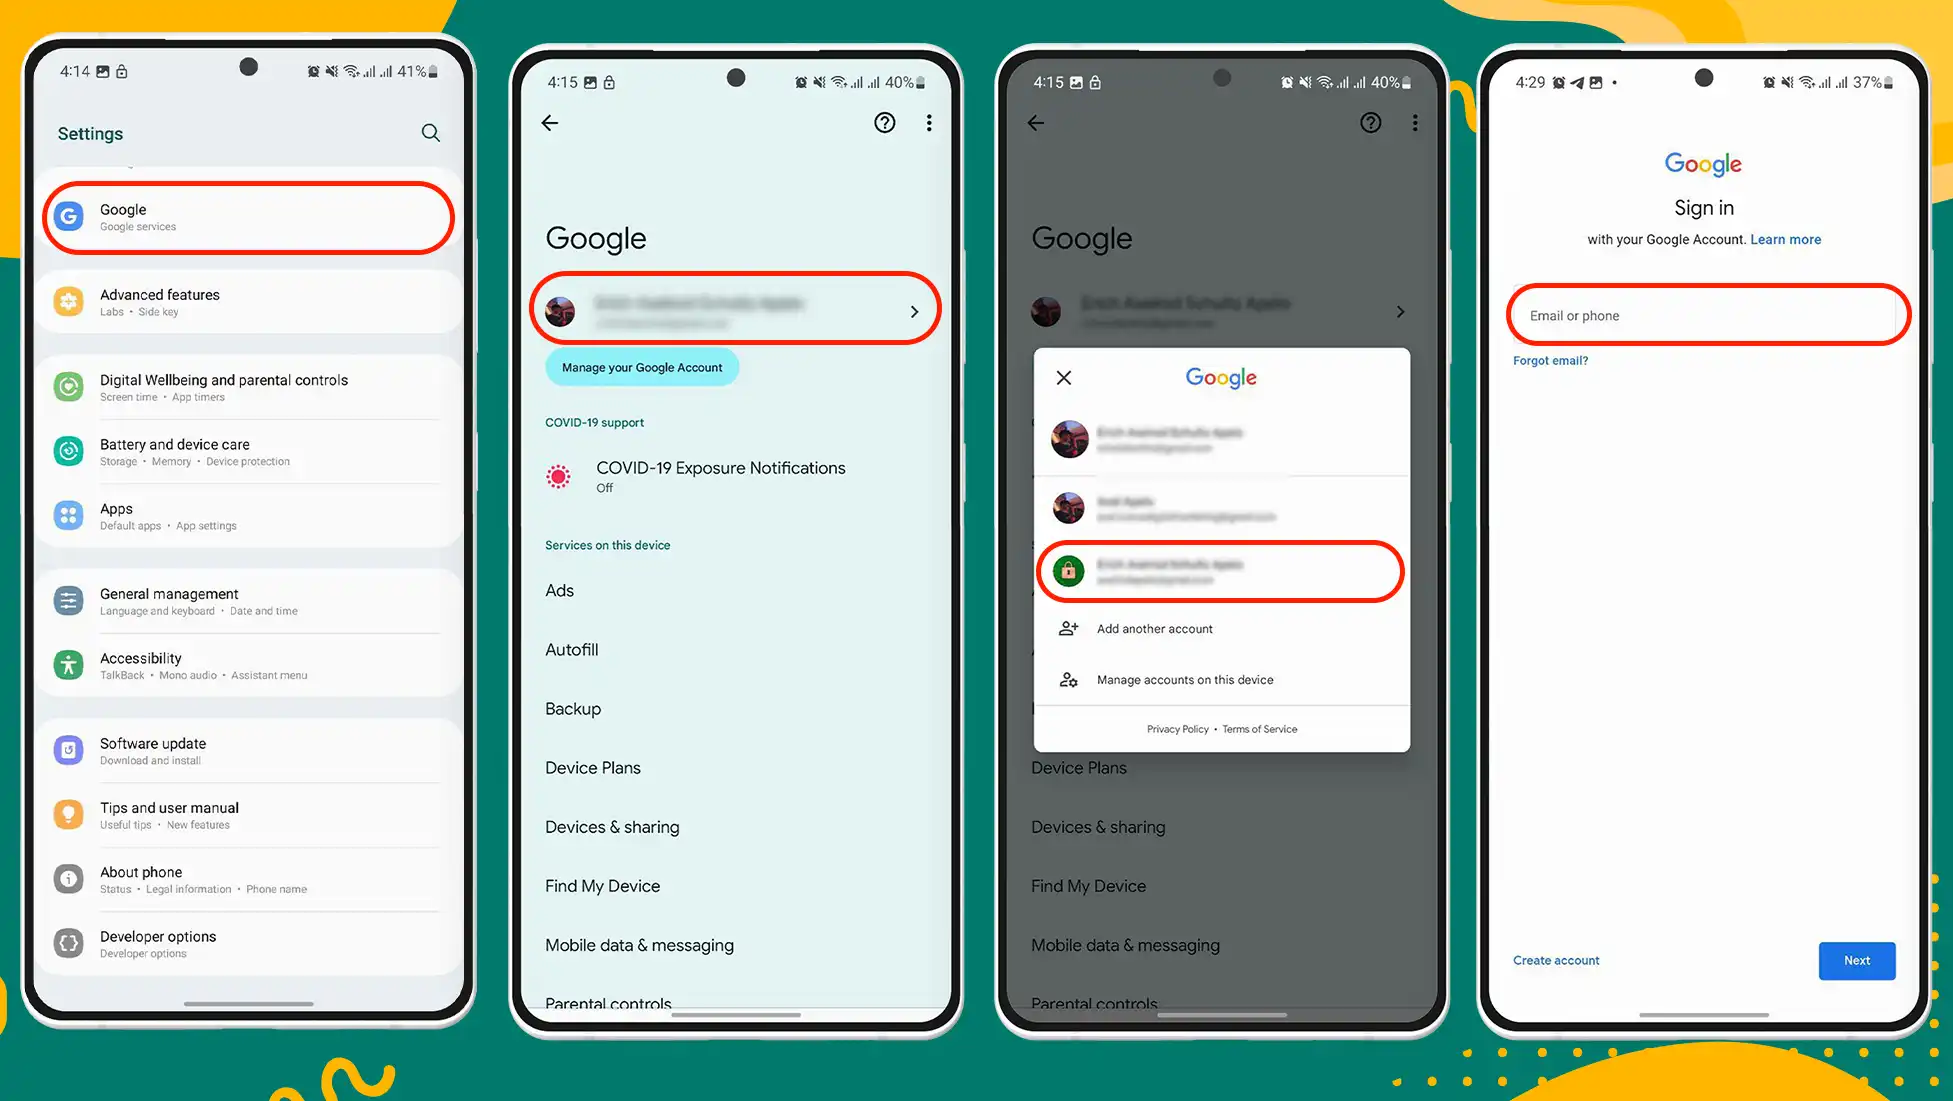
Step 1: Open the Settings app.
Step 2: Tap on “Google.”
Step 3: Tap the arrow on the right side of the account name and email address.
Step 4: Select “Add another account” from the pop-up window.
Step 5: Verify your identity using a fingerprint, pattern, or PIN.
Step 6: Enter the desired Google account’s email address and tap “Next.”
Step 7: Type the password for the account and tap “Next.”
Step 8: If you have set up two-factor authentication (2FA) for the account, you may need to enter the code from your authenticator app or the text message.
Once you have successfully logged in, the account will appear as a secondary account on your device.
Verifying the Default Google Account Has Been Replaced
To confirm the successful change of your default Google account, open any Google app on your device, such as Gmail or Google Drive. The app’s upper-right corner should display the new default account.
Troubleshooting Common Issues
Consider the following troubleshooting steps if you encounter any problems while changing your default Google account on Android.
Ensure that you have a stable internet connection and, if available, connect to a Wi-Fi network for optimal performance.
Verify the registration information for each Google account you intend to add to your device.
If you are unable to delete a Google account from your device, reset it and try again.
If you continue to encounter issues, consider contacting Google support or the manufacturer of your device.
Conclusion
You can accomplish changing the default Google account on Android without difficulty by properly planning and following a step-by-step approach. By adhering to this detailed guide, you can ensure that you have access to all of your vital data and enjoy a seamless experience with multiple Google accounts on your Android device.
All products, and company names, logos, and service marks (collectively the "Trademarks") displayed are registered® and/or unregistered
trademarks™ of their respective owners.
The authors of this web site are not sponsored by or affiliated with any of the third-party trade mark or third-party registered trade mark owners,
and make no representations about them, their owners, their products or services.
Having constant access to the web is crucial in today’s society. Our mobile gadgets are essential for keeping us in touch, whether at work or at home. Unfortunately, there are occasions when problems with our network configuration prevent us from staying connected. In this article, we’ll show you how to reset the network settings on your iOS or Android device.
When should you clear your iPhone’s or Android’s network settings?
If you have consistent problems with your phone’s network, try resetting the network settings. Some instances are as follows:
Problems connecting to Wi-Fi or seeing network names on mobile devices.
The Bluetooth either unexpectedly drops out or stops functioning.
You can’t make or take calls on your phone.
Disconnection of calls occurs frequently.
The VPN connection failed to establish.
You have a phone signal problem.
Things you need to know before resetting your networking settings
Your Android or iOS device’s network settings can be reset to assist you solve connectivity problems. But, there are a few things you should be aware of before you change the network settings:
All previously remembered Wi-Fi networks and passwords, Bluetooth device settings, cellular network settings, VPN and APN settings, and Bluetooth devices will all be deleted when you reset your network settings. After the reset, you will have to set them up once more.
Customized network settings, such as a static IP address or DNS settings, will be reverted to their default values if you have altered your network settings.
App-specific options might be impacted: Depending on the network settings on your device, certain apps could have unique network configurations. The app’s ability to connect to the network may be impacted by resetting the network settings.
Data on your smartphone will not be deleted if your network settings are reset; this includes contacts, movies, and images.
Make sure your device has the most recent software updates installed before resetting the network settings. Occasionally a software update might fix connectivity problems.
Backup your device: Before making any significant changes or resetting the network settings, it is usually a good idea to backup your smartphone.
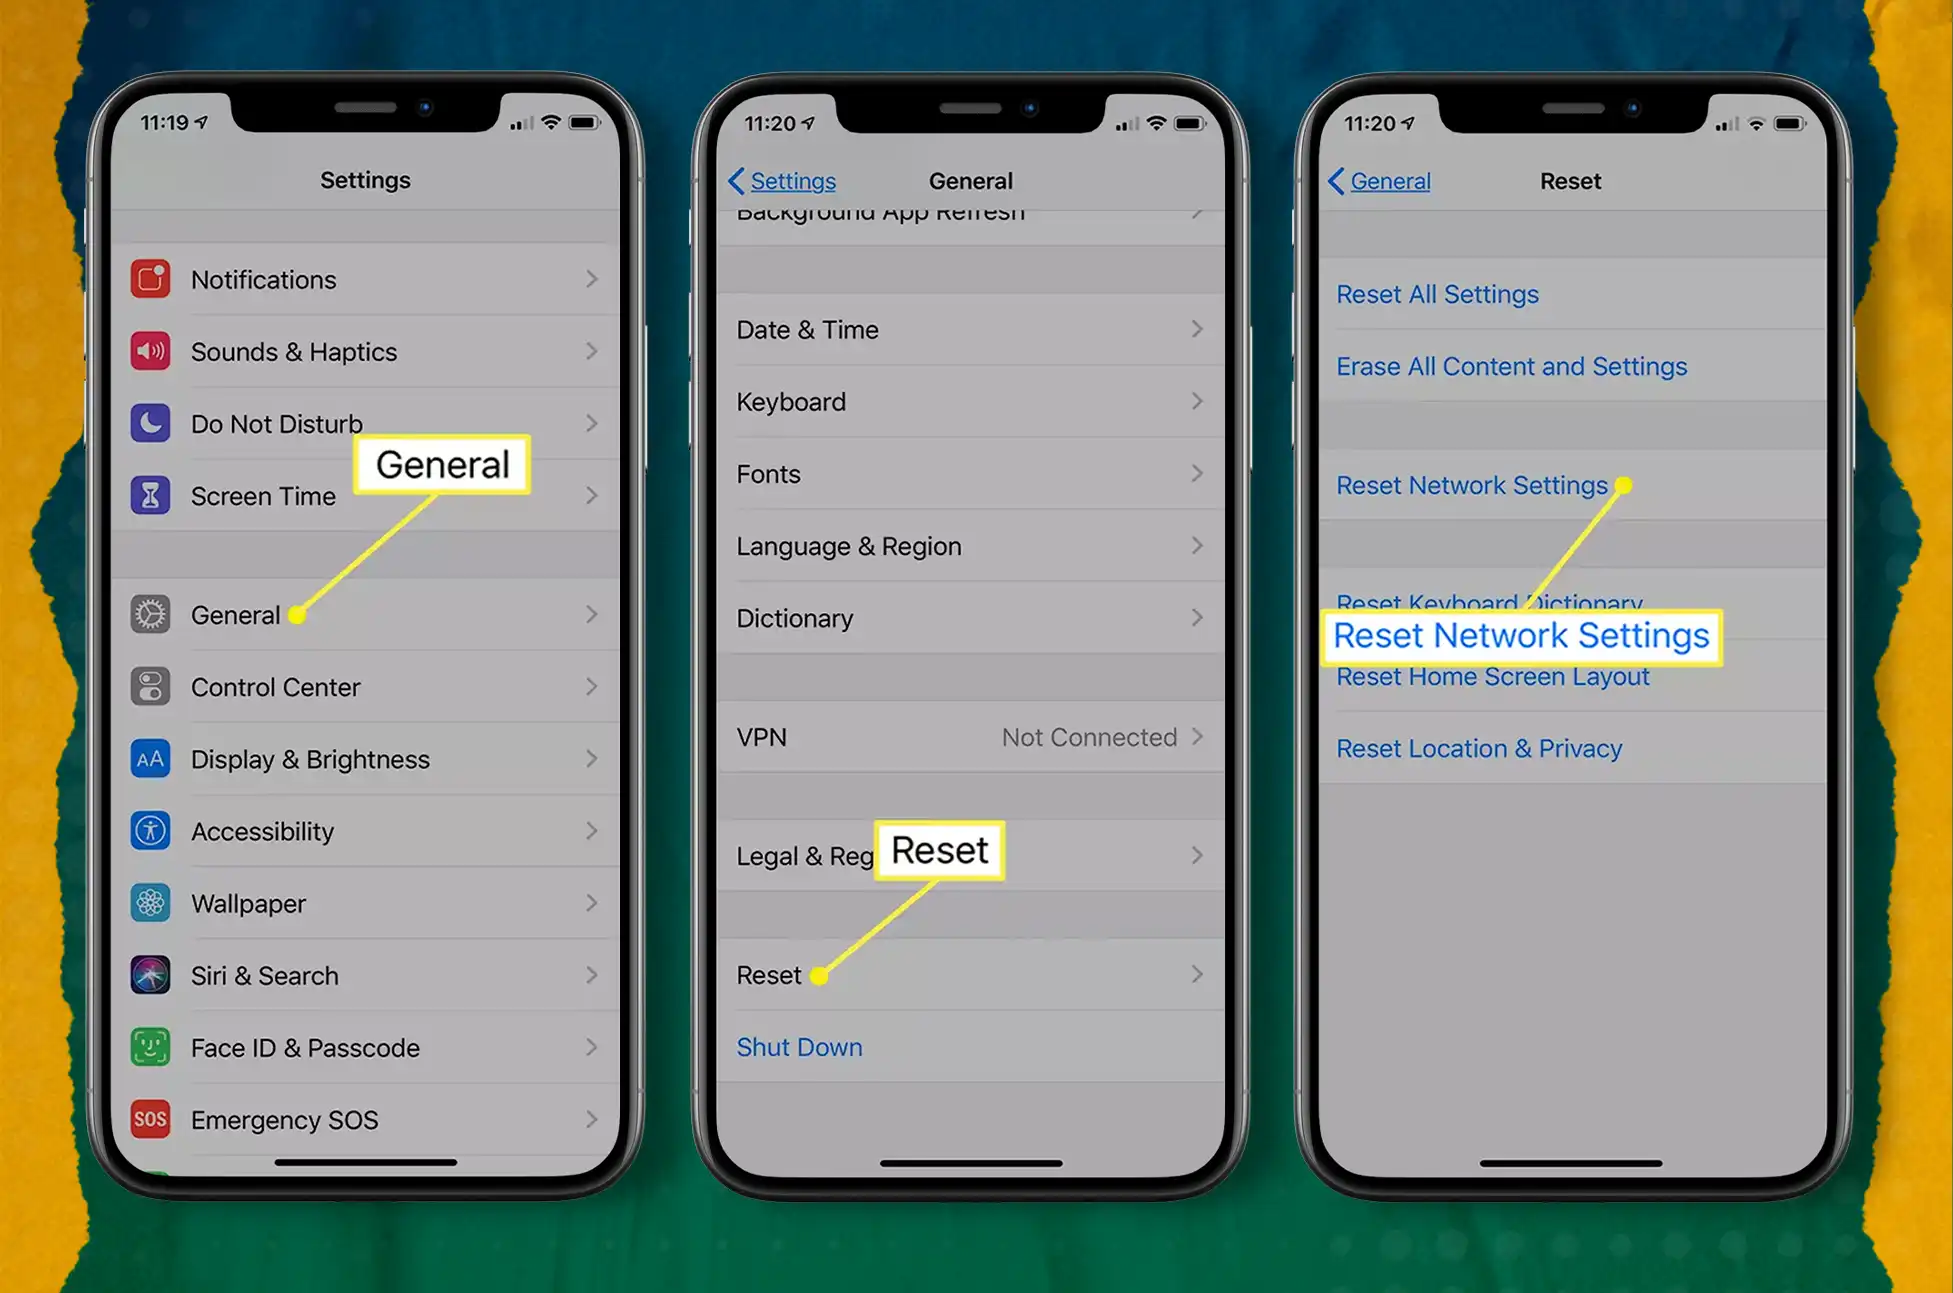
How to reset the network settings on your iPhone or iPad
Resetting the network settings on an iOS device can also help resolve issues related to network connectivity, Bluetooth, and Wi-Fi. Here’s how to do it:
Follow the steps below to reset network settings on an iPhone.
Open Settings on iPhone
Scroll to General.
Select Transfer or Reset iPhone.
Click Reset
Select Reset Network Settings and enter your device password to confirm
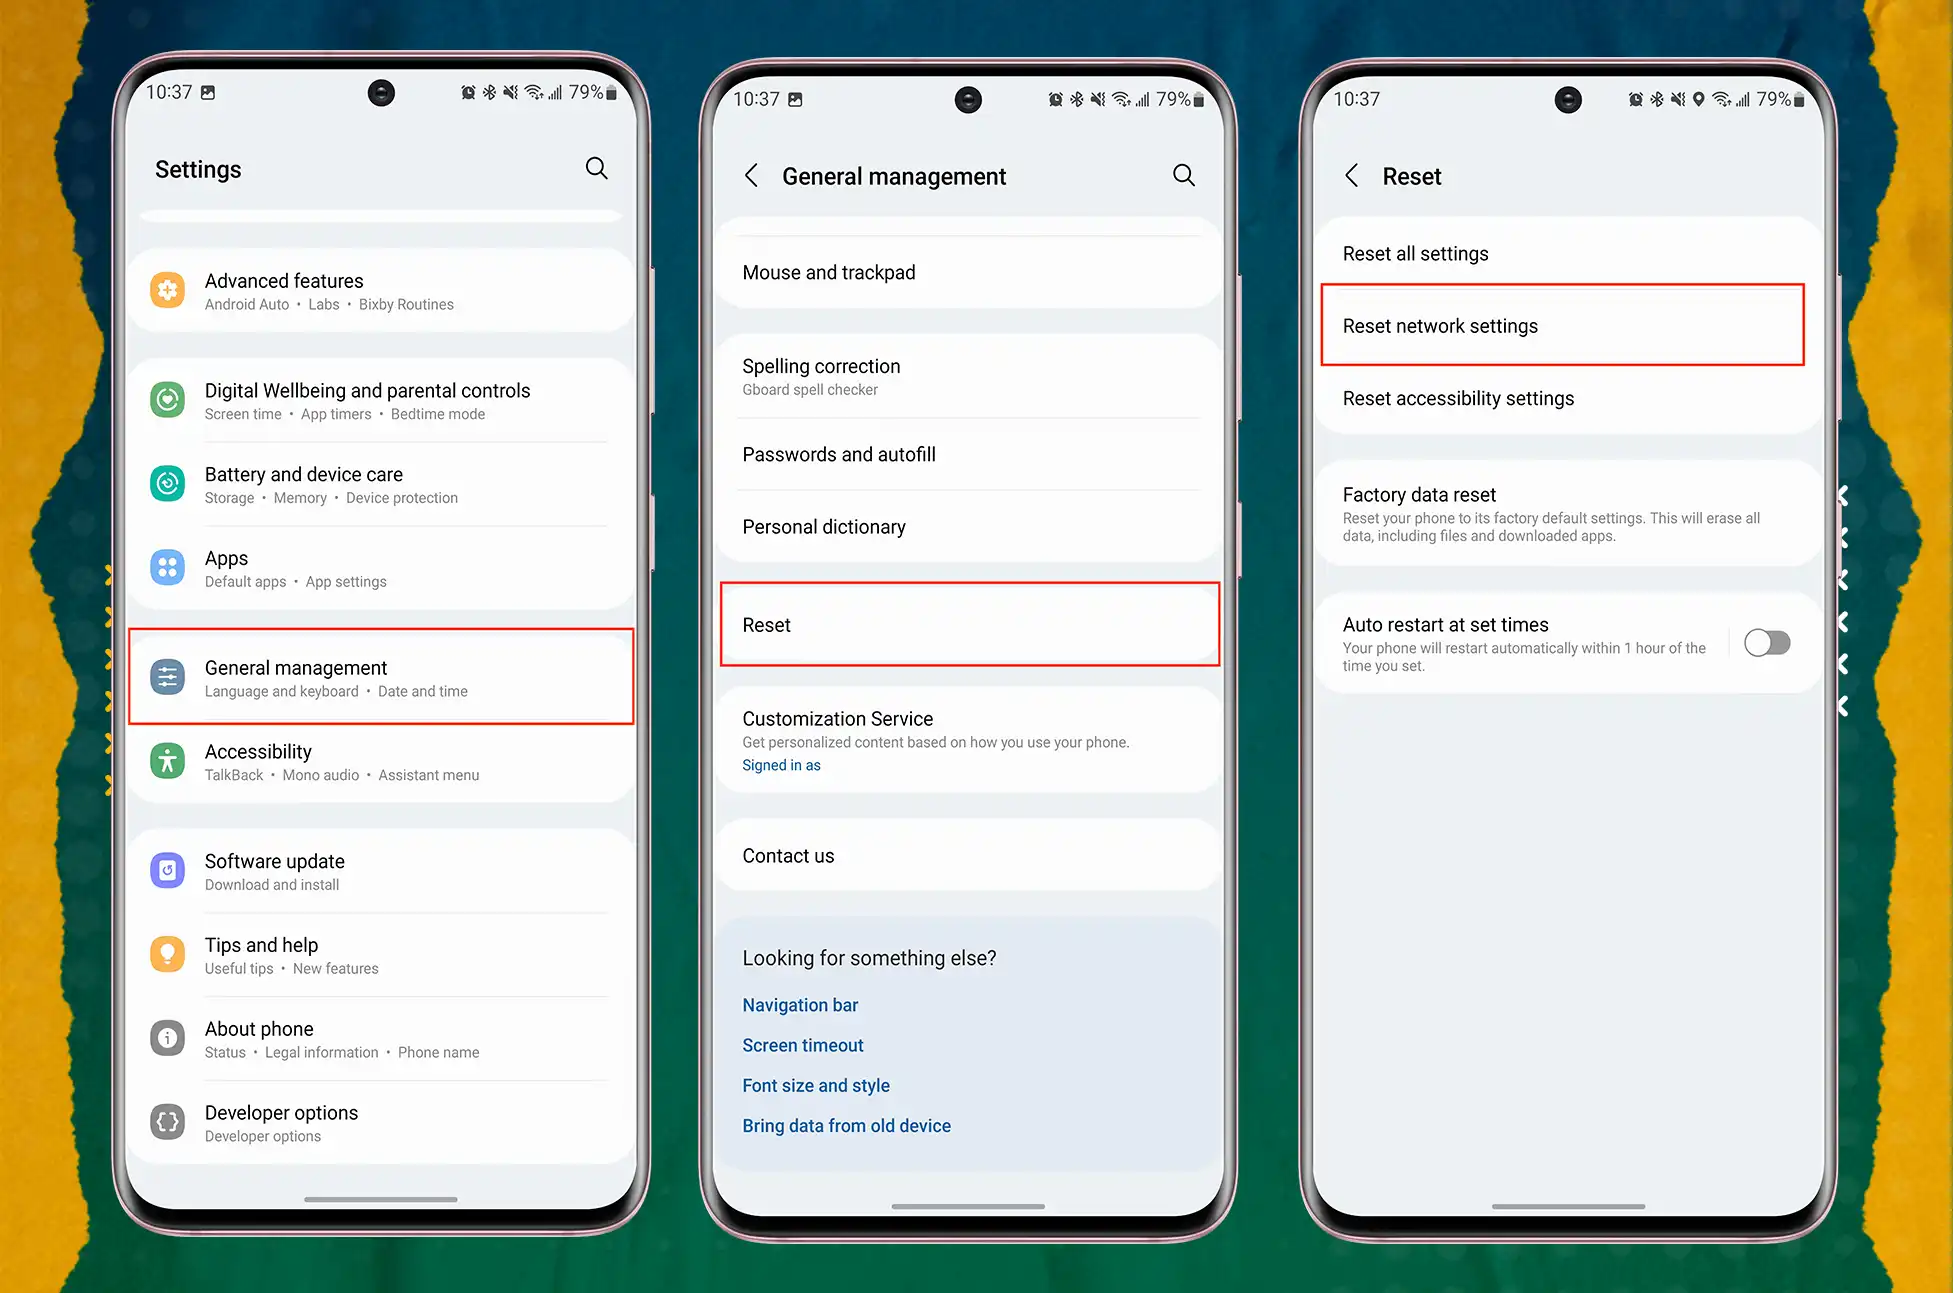
How to reset network settings on your Android phone or tablet
Most Android phone manufacturers use the stock Settings app. Here are the steps to reset network settings on your Android phone.
Swipe up from the home screen and open the app drawer.
Tap the Settings app (the one with a gear icon).
Scroll down and tap to System.
Select Reset options.
Select Reset Wi-Fi, mobile, & Bluetooth and tap Reset settings from the following menu.
Note: Resetting the network settings on your iOS device will erase all saved Wi-Fi networks, Bluetooth devices, and VPN settings.
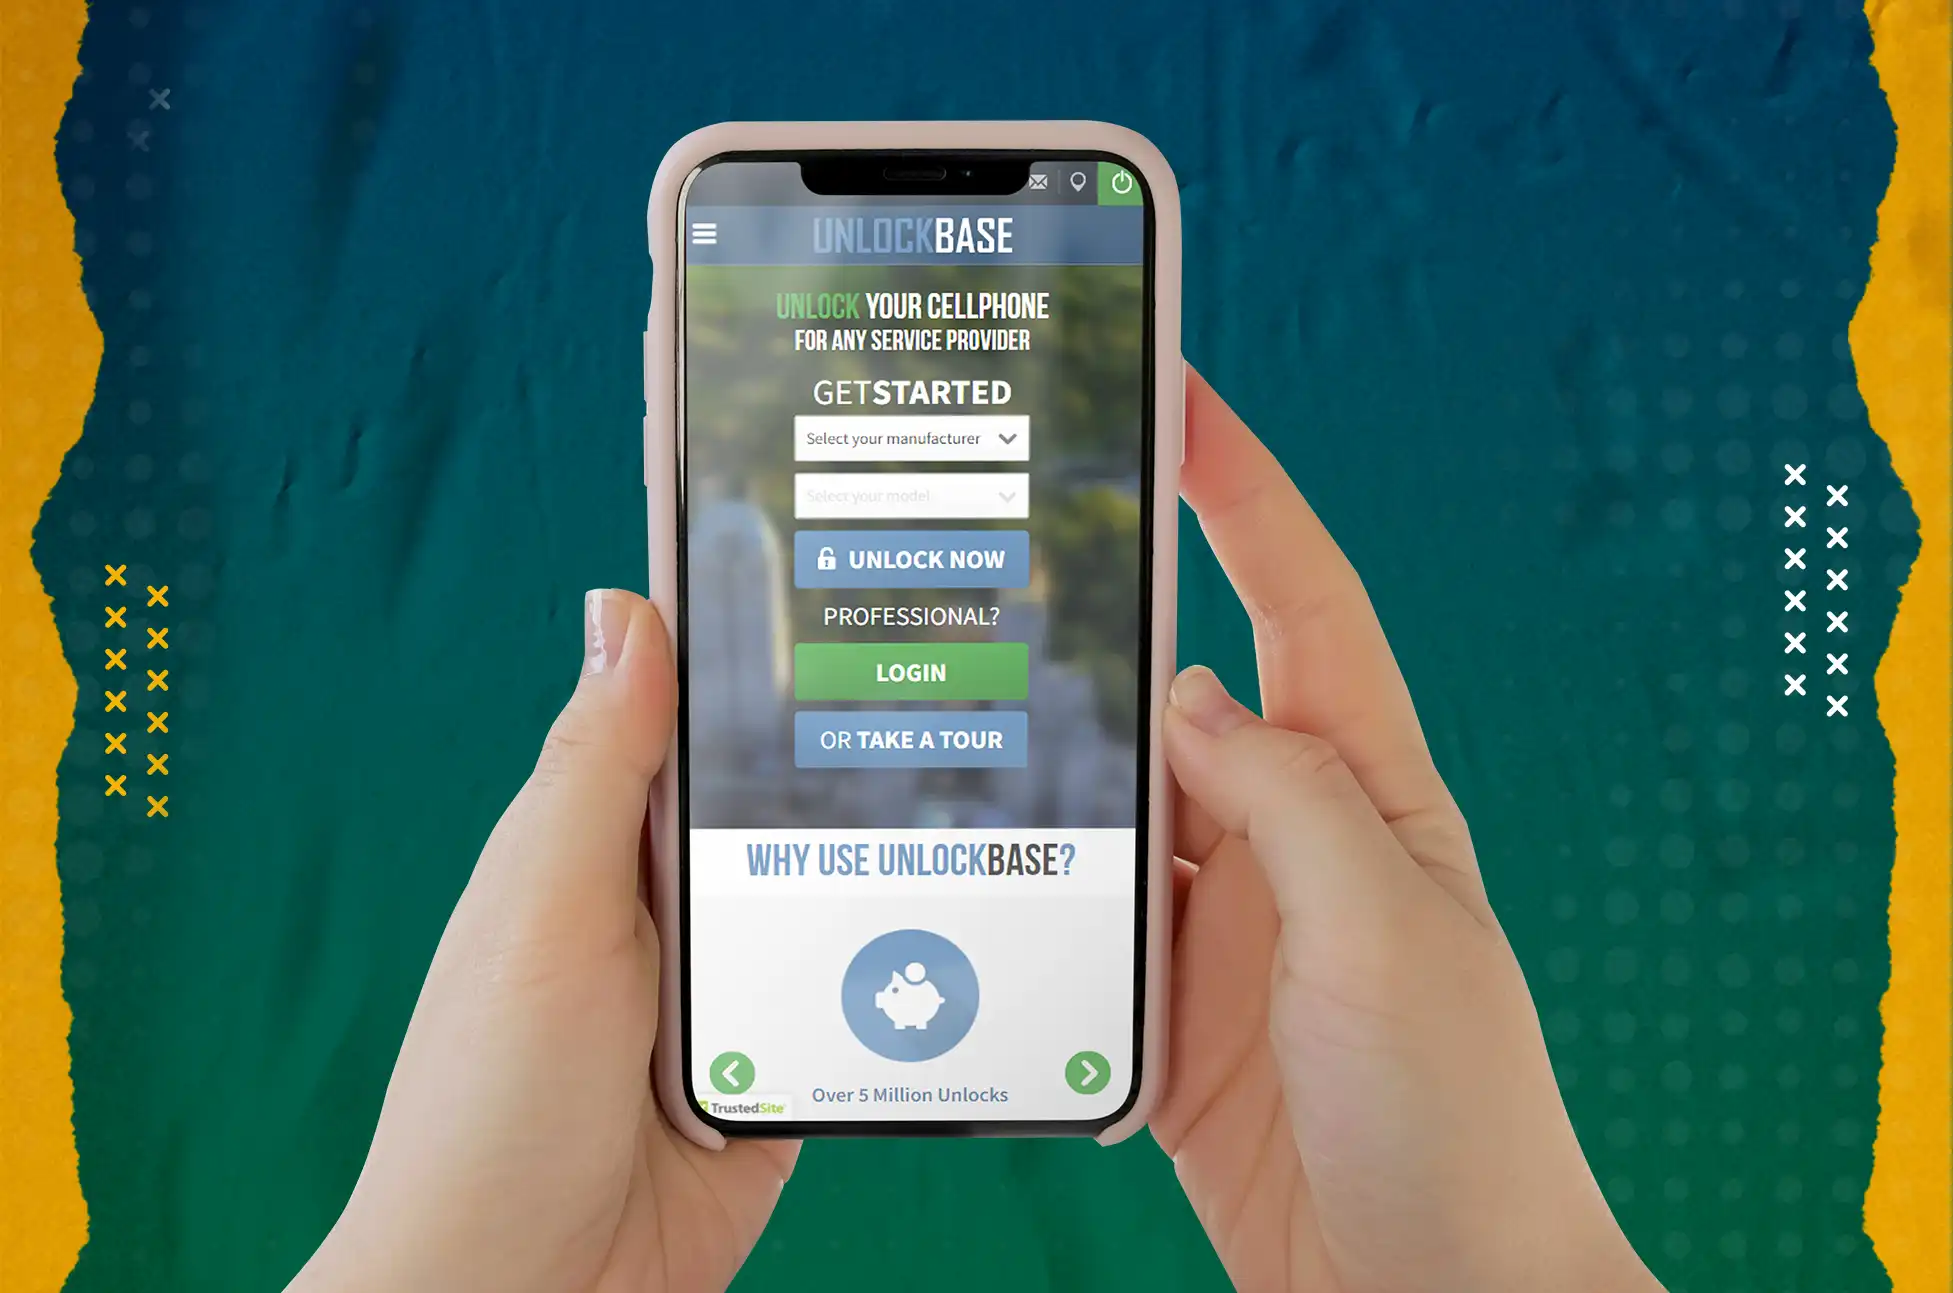
Network is still not working after Resetting?
Is your network still not functioning properly despite resetting it? Have you attempted to reset your network after inserting a new SIM card, but to no avail? It’s possible that your phone is locked to your current carrier, in which case you may need to consider unlocking it. UnlockBase can assist you with this. Just go to this link and follow the unlocking process! https://www.unlockbase.com/unlock-phone/
Conclusion
Resetting the network settings on your smartphone, whether it’s an Android or an iOS one, is a straightforward step that may assist in fixing a wide range of connectivity problems.
Be aware, however, that changing your network settings will delete all of the Wi-Fi networks and passwords that you have previously stored. Before you go ahead and reset your network settings, you should make sure that you have these credentials saved in a secure location. If you have any questions, let us know in the comment section below!
All products, and company names, logos, and service marks (collectively the "Trademarks") displayed are registered® and/or unregistered
trademarks™ of their respective owners.
The authors of this web site are not sponsored by or affiliated with any of the third-party trade mark or third-party registered trade mark owners,
and make no representations about them, their owners, their products or services.
Android and iOS are the two most popular mobile operating systems worldwide. Both have their distinct benefits and drawbacks. Android is a highly adaptable open-source operating system, whereas iOS is noted for its simplicity and user-friendliness. In this blog, we will compare the most recent versions of both operating systems, Android 13 and iOS 16, to determine their relative strengths and weaknesses.
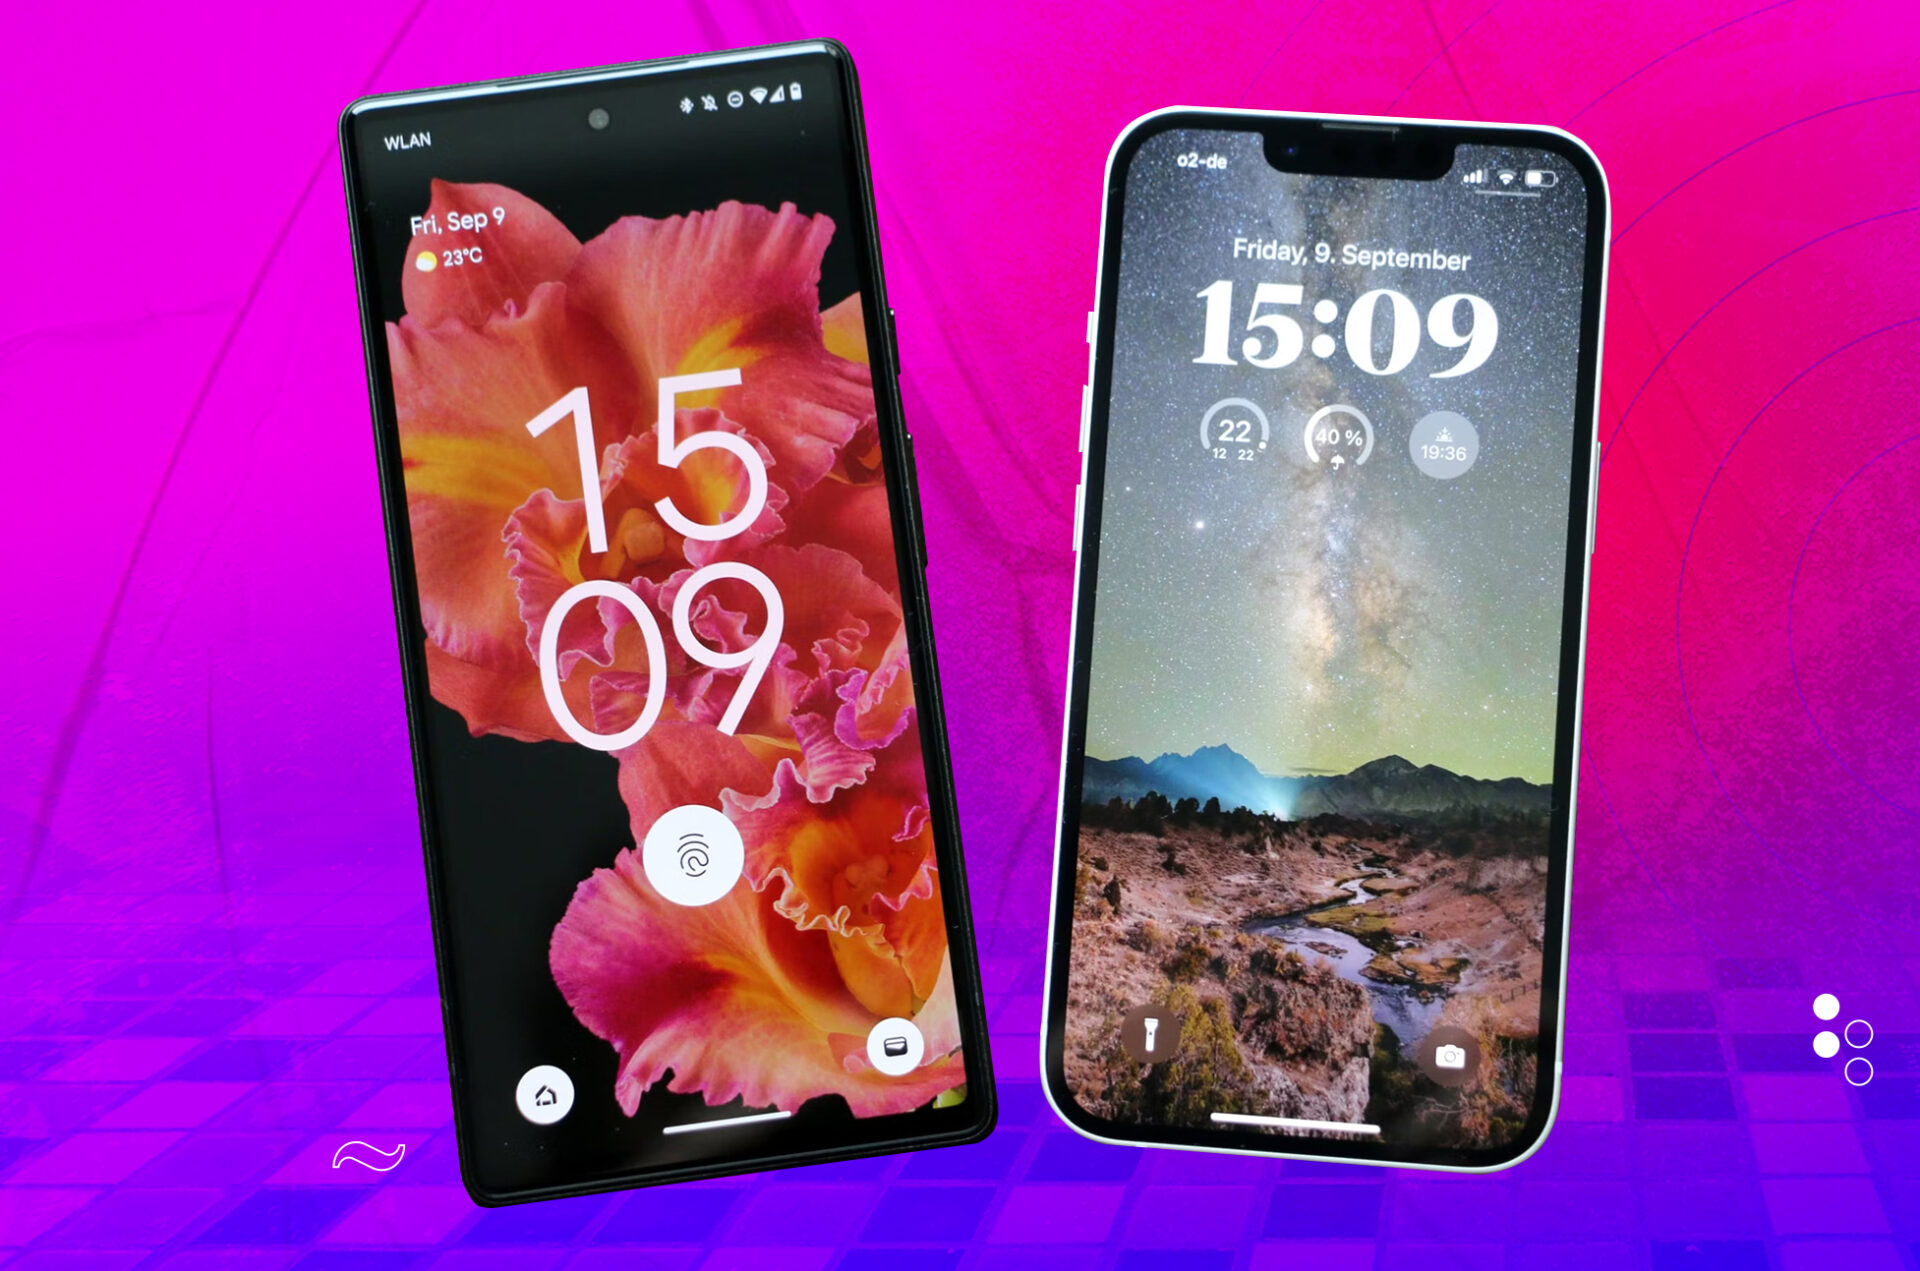
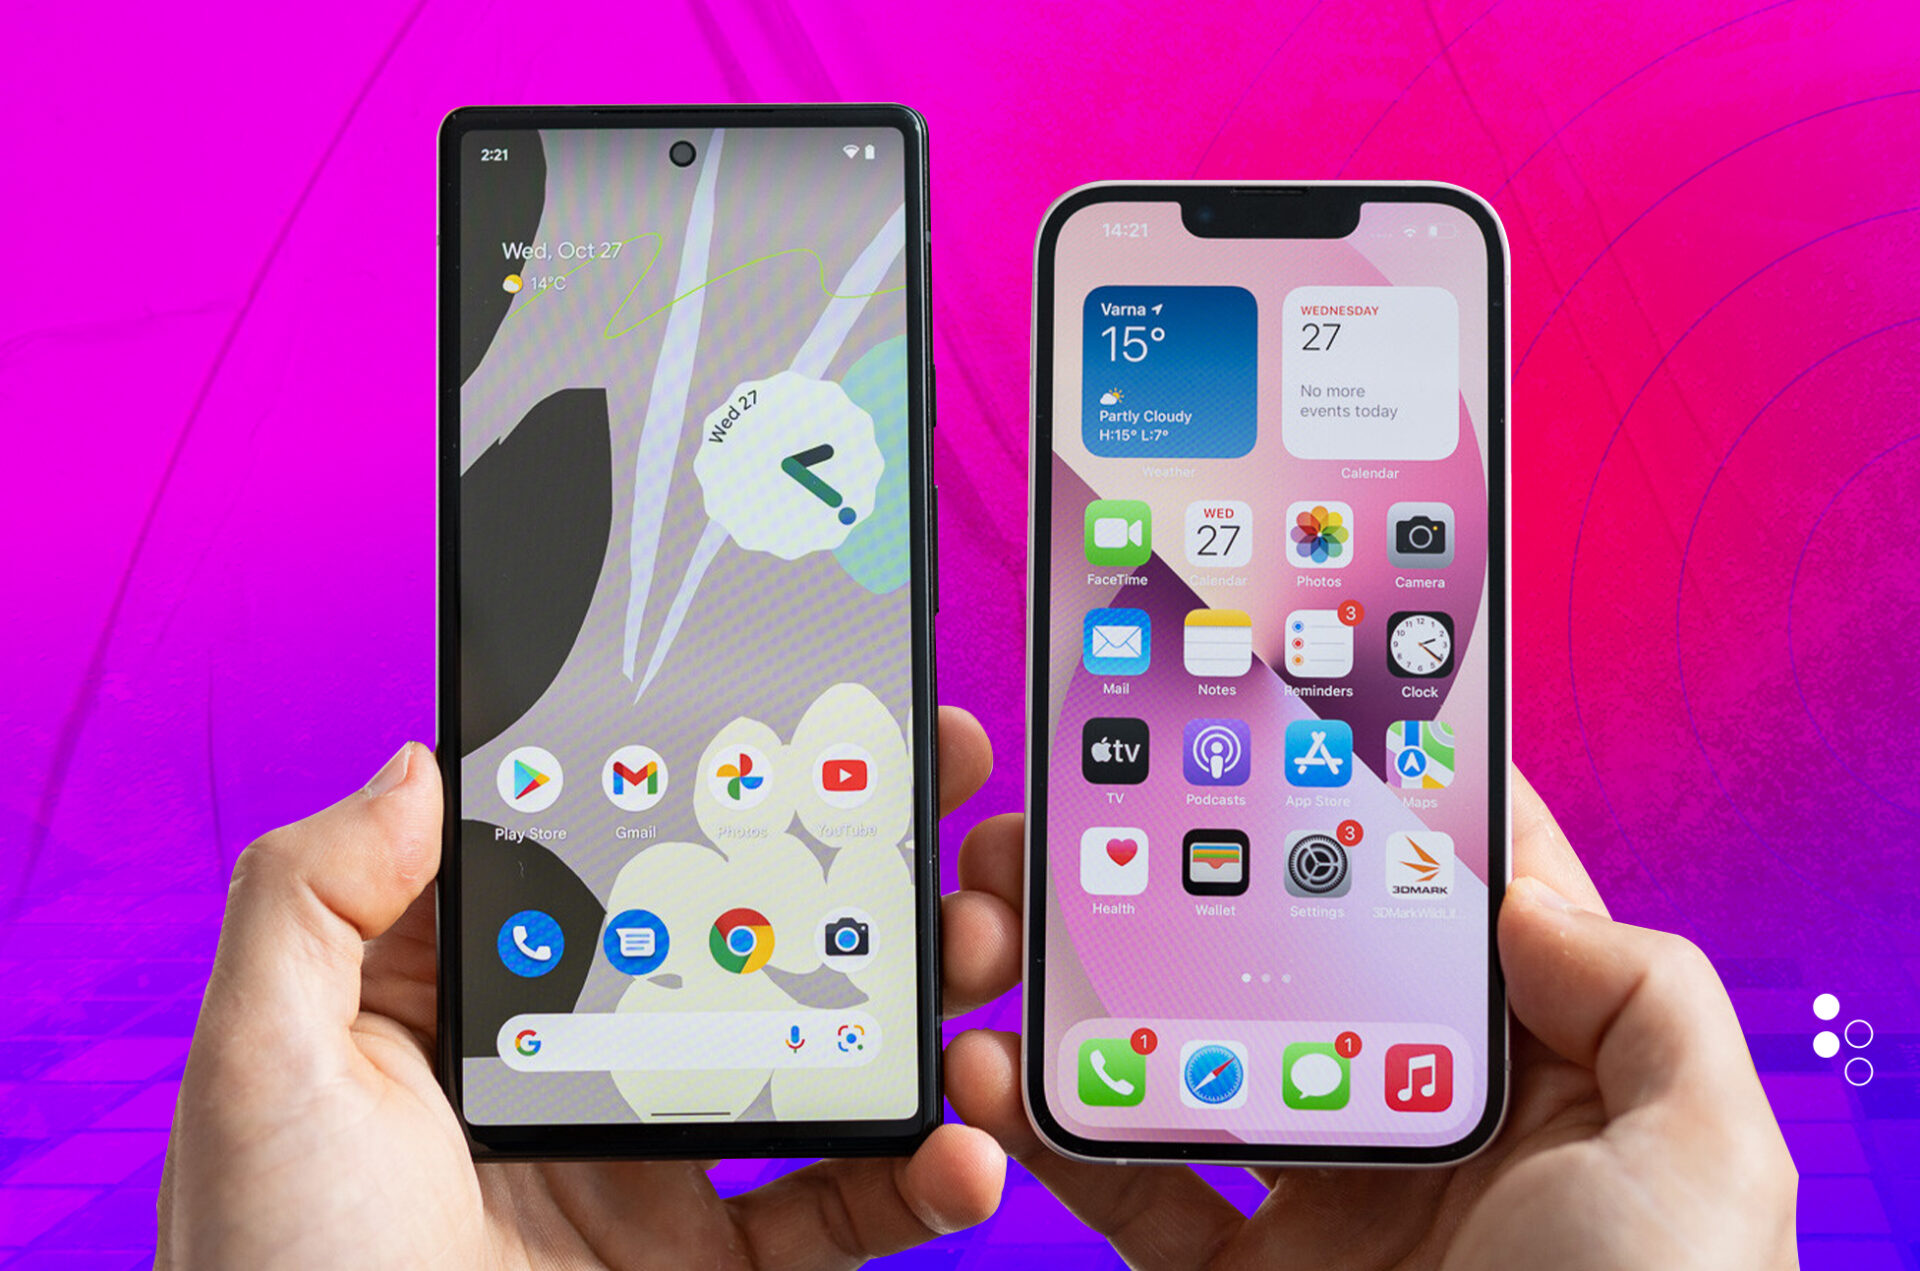
Android 13 vs iOS 16: Customizable lock screen and home screen
Android has always had great customization, but Android 13 takes this to a new level. Material You enables users to create a fully personalized smartphone experience by customizing colors, fonts, and icon shapes. In addition, Android allows users to install custom launchers, which can radically alter the device’s appearance and functionality.
iOS 16’s lock screen outperforms Android 13’s. Since app developers regarded them as an afterthought, Google seems to have lost interest in lock screen widgets. Two years after introducing widgets to iOS, Apple is adding a few to the lock screen.
Apple’s lock screen has more than widgets. The company allows the wallpaper to hide the clock. This produces a three-dimensional, immersive experience. With the flexibility to choose your favorite typeface and wallpaper, iOS 16’s lock screen customization is unmatched. Focus Mode lets your iPhone automatically switch lock screens and backgrounds. This lets you receive personal app notifications just at home or away from work.
Android 13 vs iOS 16: Language options per app
Google first supported per-app language options in Android 13. This lets you utilize any app on your phone in your favorite language, regardless of your system or app language. The choice is excellent for multilingual people, who comprise half the world’s population.
Google offers two simple ways to translate apps. Long-press the app on your home screen and tap the app details button (usually a small I in a circle) at the top of the popup on Pixel phones and others. Scroll down until you find the Language menu. Tap and choose. This is the fastest way to switch languages.
You can also check a list and change your apps’ languages. System settings, Languages & input, App languages. The supported apps and languages you assigned will appear. Tap one to alter your selections. Mishaal Rahman’s ADB program removes the opt-in and allows all apps to swap languages. We use various apps in English and German on a Google Pixel 6 without any concerns.
In iOS 16, however, per-app language choices are not new. Apple began supporting the functionality with iOS 13 in 2019. The company has simplified the procedure for its developers more than Google. Suppose an application is localized into multiple languages. In that case, the developer does not need to add additional code to their project for the per-app language switching option to appear in system settings.
With iPhones, changing the language is significantly more complex than on Android 13, and you must know where to find the choice. Long-pressing the home screen icon does not take you directly to the language preferences. Instead, you will navigate to system settings and seek the application toward the end of the list. Touch it to find the language selection option. iOS lacks a list indicating which languages are assigned to which apps, as Android 13 does. Apple has not modified this feature for iOS 16.
Android 13 vs iOS 16: App Ecosystem
Millions of apps are available for download on Android and iOS app stores. Yet, iOS is recognized for its more vetted app store, which can give a more safe and more trustworthy experience. On the other hand, Android offers a more open app store, which might occasionally result in less dependable or secure apps.
The iOS keyboard is integrated into the Apple ecosystem, but Google’s Gboard is an app that can be upgraded anytime through the Play Store. This enables Google to iterate on improvements faster than Apple, as it does not need to deploy a system update. In addition, Gboard is accessible on almost every Android smartphone, not just Google Pixel phones.
As part of system update announcements, Google and Apple keyboards will continue to undergo modifications. As part of the Pixel 6 series launch and Android 12, Gboard gets enhanced on-device dictation capabilities. Apple attempted to imitate with iOS 16. The dictation functionality on both platforms is comparable, although there are significant variances. On both platforms, punctuation is inserted automatically, and you may effortlessly transition between voice input and typing when you need to make changes or modify what you say. On both platforms, you can also dictate a selection of standard emoticons.
Apple’s iOS 16 dictation has become more dependable and represents a step forward, although Cupertino cannot catch up to Google in this area. Using Gboard on the Pixel 6 and Pixel 6 Pro, you can use dictation to send and delete messages and undo your previous dictation. Voice commands such as “send,” “clear,” “clear all,” and “stop” do this. Moreover, you may keep the microphone engaged indefinitely, allowing you to chat without touching your phone.
Android 13 vs iOS 16: Privacy
Privacy has been an increasingly vital concern in recent years, and Android 13 and iOS 16 have advanced. Android 13 features a new privacy dashboard that allows users to see which apps can access their location, microphone, and camera and an easy option to revoke these permissions.
iOS 16 has a new privacy dashboard that displays the apps that have accessed your location, camera, microphone, and contacts. In addition, Apple has launched a new tool called App Privacy Report, which displays how frequently apps utilize your data and who they share it with.
Android 13 vs iOS 16: Smart drag-and-drop feature
Apple’s iOS 16 is playing more than catch-up regarding image identification, compared to Google’s image recognition prowess, which was made possible by Google Photos. Apple’s new intelligent drag-and-drop Visual Look Up tool appears to be from another planet, and it is something we wanted Android to have the instant Apple revealed it. You can select a random subject or object from any photo displayed on your screen, tap and hold it, and then drag it into another program as a single object. Apple has included the ability to copy live text from videos. This allows you to hold and choose text in paused video frames so that it can be copied or shared.
Even though Google has not included these functionalities in Android 13, the firm currently offers similar text-related capabilities. When you access the Recents overview, you can tap and hold the text you wish to remove or select the Select option in the lower-right corner. While Google was the first to implement this function, it is less reliable than Apple’s. It frequently recognizes Instagram photos with text as images from which you cannot extract text and must instead publish as cropped screenshots. Moreover, you cannot extract text from YouTube videos. DRM-protected apps like Netflix, Disney+, and Amazon Prime Video are excluded from the equation because you cannot view their films’ contents from the Recents screen (or rather, you cannot take a screenshot of the content, which is required for Google’s text recognition to function).
Android 13 vs iOS 16: Digital Wellbeing and Focus
Apple added Focus Mode to iOS 15, and with iOS 16, the company is increasing its efforts. The feature prevents specific apps and individuals from contacting you and your notification shade at particular times, allowing you to focus on your job during the day and converse primarily with family and friends at night. Unfortunately, not all apps have well-defined boundaries. You may use the same Calendar and Mail app for personal and professional activities, and only a portion of your online browsing on your smartphone may be for business. Here comes iOS 16’s Focus filters into play.
Under the Digital Wellbeing banner, Google has not changed Android 13’s focus and dwindling collection of features. Google does not provide alternative focus modes for various situations. It employs a technique that is simpler to comprehend. The business offers a single Focus Mode available via Digital Wellbeing settings. It allows you to choose annoying applications and disable them based on a schedule or manually. During that period, access to restricted apps is denied (unless you allow yourself a five-minute break). For all other situations, you are urged to use Do Not Disturb, which mutes notifications and incoming calls except those you specify. My method may not be as granular as Apple’s, but it is less daunting and complex.
Conclusion
Android 13 vs iOS 16 both have their respective strengths and weaknesses. Android 13 offers more customization options and a refreshed user interface, while iOS 16 prioritizes simplicity and ease of use. Both operating systems have improved privacy and security, and both have many apps available to download. Ultimately, the choice between Android and iOS comes down to personal preference and what features are most important to the individual user.
All products, and company names, logos, and service marks (collectively the "Trademarks") displayed are registered® and/or unregistered
trademarks™ of their respective owners.
The authors of this web site are not sponsored by or affiliated with any of the third-party trade mark or third-party registered trade mark owners,
and make no representations about them, their owners, their products or services.
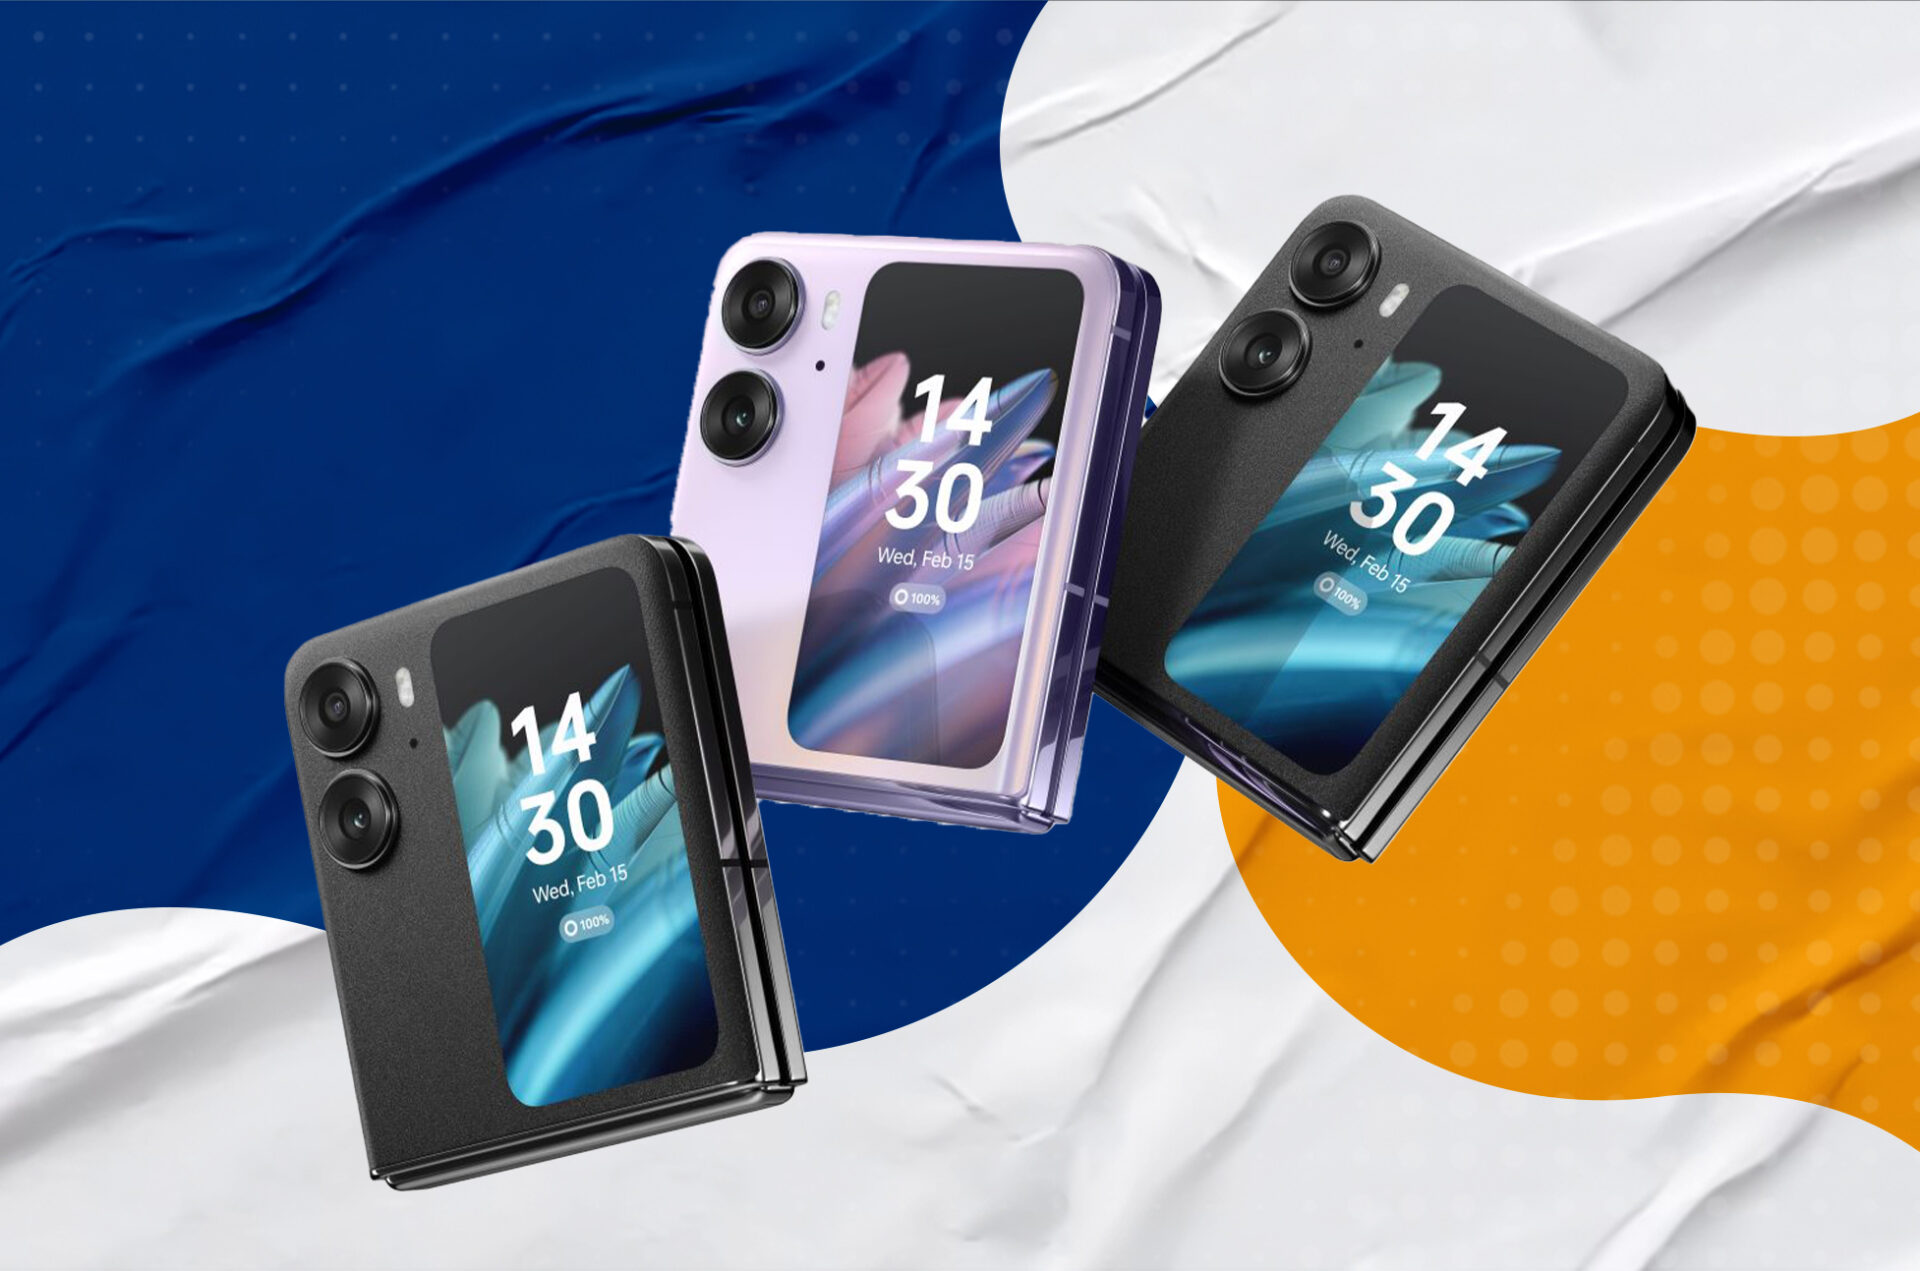
Oppo’s creative designs and cutting-edge technologies have made waves in the smartphone industry. The Oppo Find N2 Flip, one of its most recent models, has been generating waves in China since its release last year. The good news is that Oppo has announced that the Find N2 Flip will be released outside of China and into the worldwide market.
Following a few attempts at foldable, the newest addition to Oppo’s Find N series establishes the company as one of the most innovative makers of flexible smartphones. The new Oppo Find N2 Flip was unveiled in December last year for the Chinese market. But, at an event in London, the firm said it would also be available in other global markets.
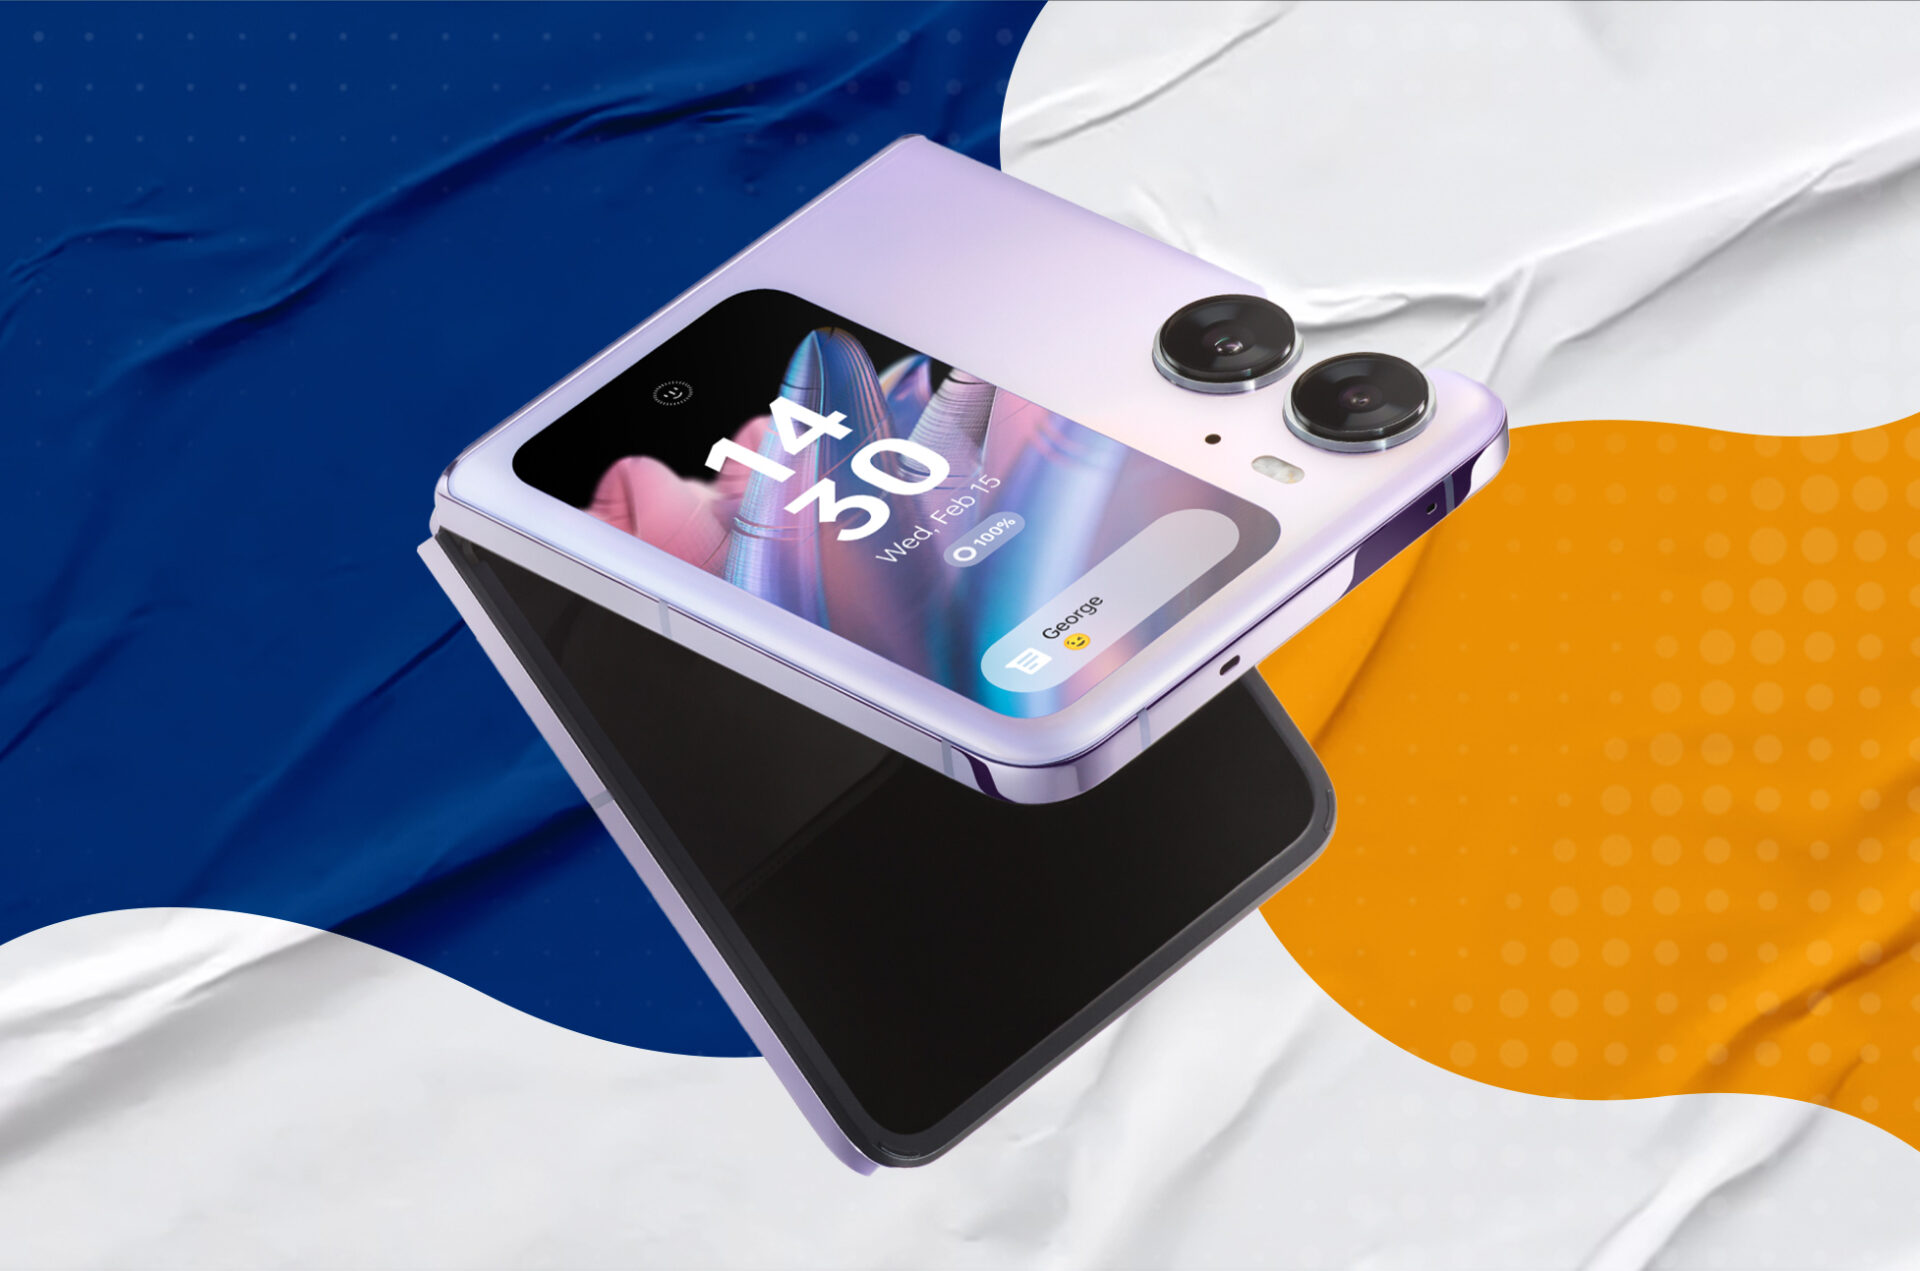
The name of the Oppo Find N2 Flip reveals that this smartphone flips vertically, as opposed to the tablet-like appearance of its predecessors. Yet, there are similarities, such as its tight folding design that allows less dust to gather on display than competing devices.
Oppo Find N2 Flip Pros and Cons
PROS
CONS
Fold up for portability
Wide-angle camera quality is bad
No space between sections
The cover display lacks utility
Huge cover screen
Absence of wireless charging
Primary camera captures atmospheric images
One-hour battery recharge
Oppo Find N2 Flip Build and Design
The Find N2 Flip is somewhat thicker and heavier than the Samsung Galaxy Z Flip 4, but the look is similar. Holding them side-by-side won’t reveal their size and weight discrepancies. Samsung is nearly associated with folding smartphones, making it the phone Oppo must surpass.
The Found N2 Flip’s curved glass and compact metal chassis make it more difficult to open than the Z Flip 4, which has more grip. It’s harder to hold than the Samsung phone with broad, flat edges. It opens easily. It can be held at angles up to 120 degrees, which is useful when using the camera to get different views or function as a tripod.
Oppo Find N2 Flip Camera
Find N2 Flip features a 50-megapixel primary camera, an 8MP wide-angle camera, and a 32MP selfie camera at the top of the unfurled screen. Hasselblad handles software and color reproduction, while Oppo handles photography with its MariSilicon X image chip.
The primary camera caught a nice ambiance, and the colors were bright and not overly saturated but not natural. The 2x zoom mode is consistent. Portrait mode’s edge detection lets you approach near without losing focus. The wide-angle camera is disappointing, and some main camera shots show edge enhancement, indicating the software is trying hard.
Selfies benefit from the large cover screen. It’s simple to use the 50MP primary camera, which has more bright colors and detail than the 32MP selfie camera, but it’s a pity all the controls are on the main viewfinder screen instead of the cover screen.
The Find N2 Flip’s primary camera is excellent for taking photographs of friends and activities and sharing them on social media. The 2x zoom is limited compared to the iPhone 14 Pro, and the wide-angle camera is weaker than the OnePlus 11. The Find N2 Flip’s primary camera and large cover screen make it an excellent selfie phone.
Oppo Find N2 Flip Specs and Battery
MediaTek Dimensity 9000+ CPU, 8GB Memory, and 256GB storage power the Oppo Find N2 Flip. It supports 5G, two SIM cards, and NFC for mobile payments. The Dimensity 9000+ was revealed in June 2022, although the Find N2 Flip is its most prominent release. The unfurled 6.8-inch, 120Hz primary screen displays Android 13 with ColorOS 13.
4,300mAh dual-cell batteries power the Find N2 Flip. Good battery life. The battery lasts roughly 1.5 days in our tests. Moderate use—four to five hours of screen time without games—is that.
The Found N2 Flip has better battery life than the Galaxy Z Flip 4, which has a smaller battery and seldom lasts a whole day. Oppo used a split dual-cell architecture, SIM tray relocation, and power socket connections to fit a bigger battery inside the small, light phone.
Oppo’s 44W SuperVOOC wired charger charges it. It should reach 100% after 60 minutes. This is faster than Samsung’s 25W wired charging on the Galaxy Z Flip 4 but slower than SuperVOOC on phones like the OnePlus 11. Samsung flip phones offer wireless charging. However, this phone does not.
Oppo Find N2 Flip Price and Availability
North America won’t receive the Oppo Find N2 Flip’s worldwide launch. The phone will cost 849 British pounds, or $1,027, in the U.K. The Samsung Galaxy Z Flip 4 costs 1,000 pounds in the UK, making this a great deal. This means it considerably undercuts the iPhone 14 Pro and Samsung S23 Plus, viable alternatives to the Find N2 Flip, and comes close to matching the OnePlus 11 and Google Pixel 7 Pro.
These phones have better cameras, designs, and software, notably the iPhone and Pixel phones, but they don’t fold. The Galaxy Z Flip 4 faces the Find N2 Flip’s not-so-secret weapon. But Motorola produced the Razr (2022) with a 2.7-inch cover screen and the Qualcomm Snapdragon 8+ Gen 1 CPU for 950 pounds. The battery is just 3,500mAh, and Android 12 is loaded.
Unlocking Oppo N2 Flip
If you’ve obtained a new Oppo N2 Flip, but it’s currently unlocked, you may be wondering how to unlock it so you can use it with your preferred carrier. Fortunately, unlocking your Oppo Find N2 Flip is a straightforward process. Just go to this link: https://www.unlockbase.com/unlock-phone/oppo/find-n2-flip/ And follow the steps below!
Once your Oppo Find N2 Flip is unlocked, you’ll be able to use it with any carrier that supports the device. This means that you’ll have more flexibility when choosing a mobile plan, and you may be able to save money on your monthly bill.
Conclusion
The Oppo Find N2 Flip is a fantastic handset that blends cutting-edge technology with a distinctive and cutting-edge design. Its release outside of China is sure to delight smartphone fans throughout the globe who want something unique.
All products, and company names, logos, and service marks (collectively the "Trademarks") displayed are registered® and/or unregistered
trademarks™ of their respective owners.
The authors of this web site are not sponsored by or affiliated with any of the third-party trade mark or third-party registered trade mark owners,
and make no representations about them, their owners, their products or services.
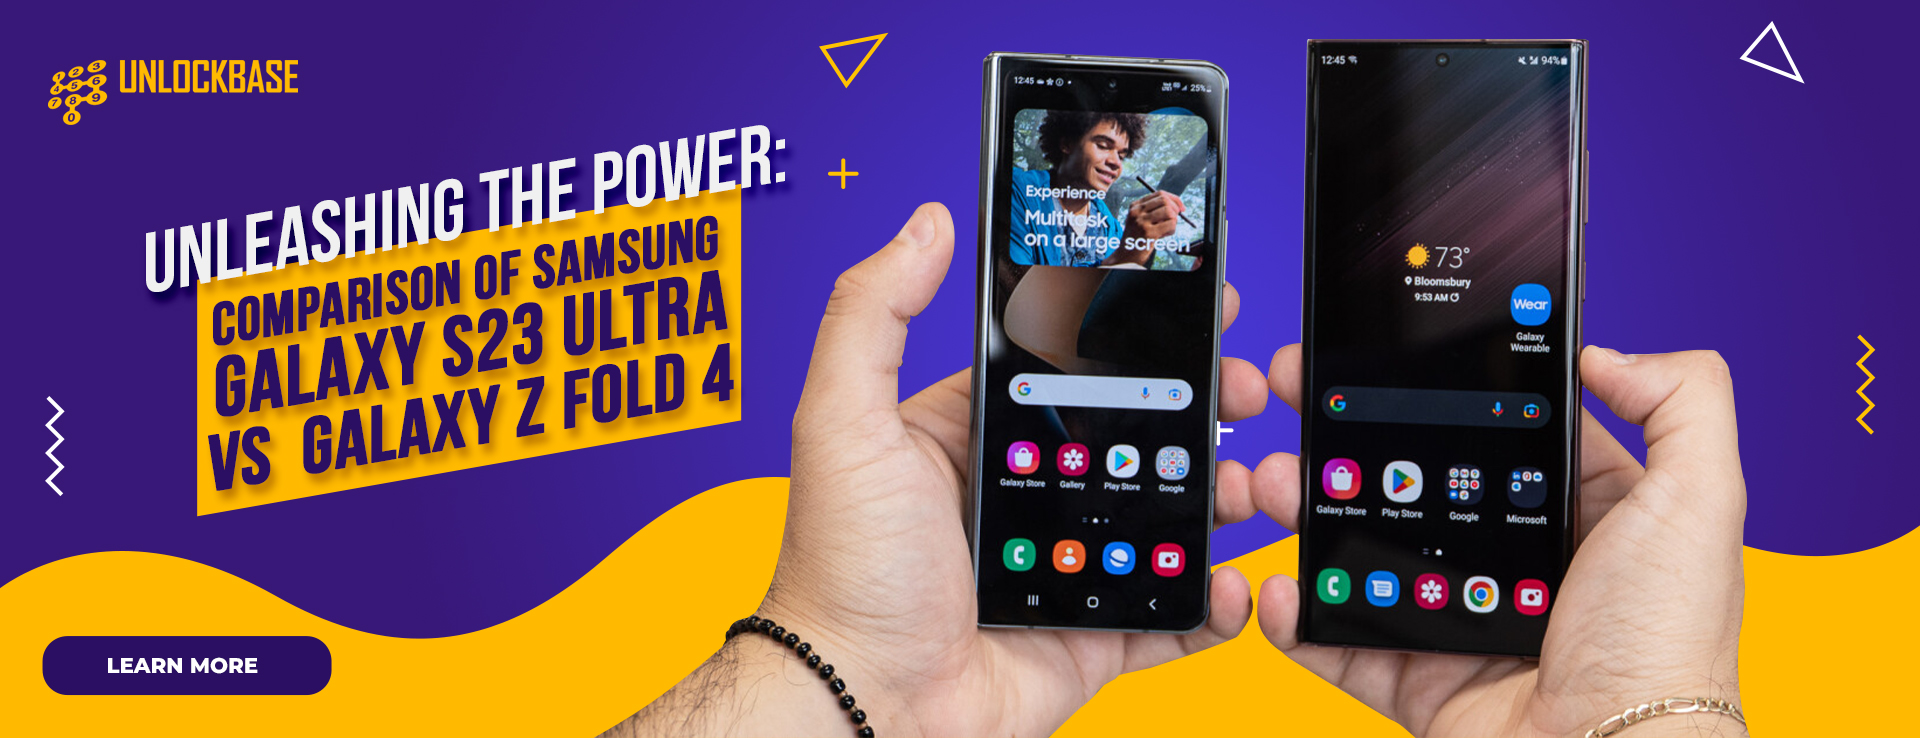
Galaxy Fold 4 vs S23 Ultra: For many years, Samsung has dominated the smartphone market. They keep raising the bar for what mobile technology is capable of with each new release. Two of the most eagerly anticipated smartphones of the year 2022 and 2023 are the Samsung Galaxy S23 Ultra and the Galaxy Z Fold 4, and for a good reason. To assist you in selecting the phone that is best for you, we’ll compare the features and characteristics of these two phones in this article.
Galaxy Fold 4 vs S23 Ultra
Samsung Galaxy S23 Ultra
Samsung Galaxy Z Fold 4
Pros: 1. Less prone to damage 2. Better camera system 3. More conventional design 4. Bigger battery
Pros: 1. Foldable design 2. Incredible screen 3. Still very powerful
Cons:
1. Not as many screen 2. Hard to use with just one hand
Cons:
1. Selfie camera isn’t great 2. S-Pen not included 3. Extremely expensive
Price: $1200
Price: $1800
All major US carriers carry the Galaxy Fold 4 vs S23 Ultra, which is expensive. The Galaxy S23’s 8GB RAM/256GB storage variant costs $1,200, while 12GB RAM/512GB or 1TB storage models cost even more. For 12GB of RAM and 256 GB of storage, the Z Fold 4 costs $1,800. Both phones support 5G (sub-6 and mmWave), so you can get the fastest speeds in your region. Both phones are currently the most potent 5G phones.
Hardware/design
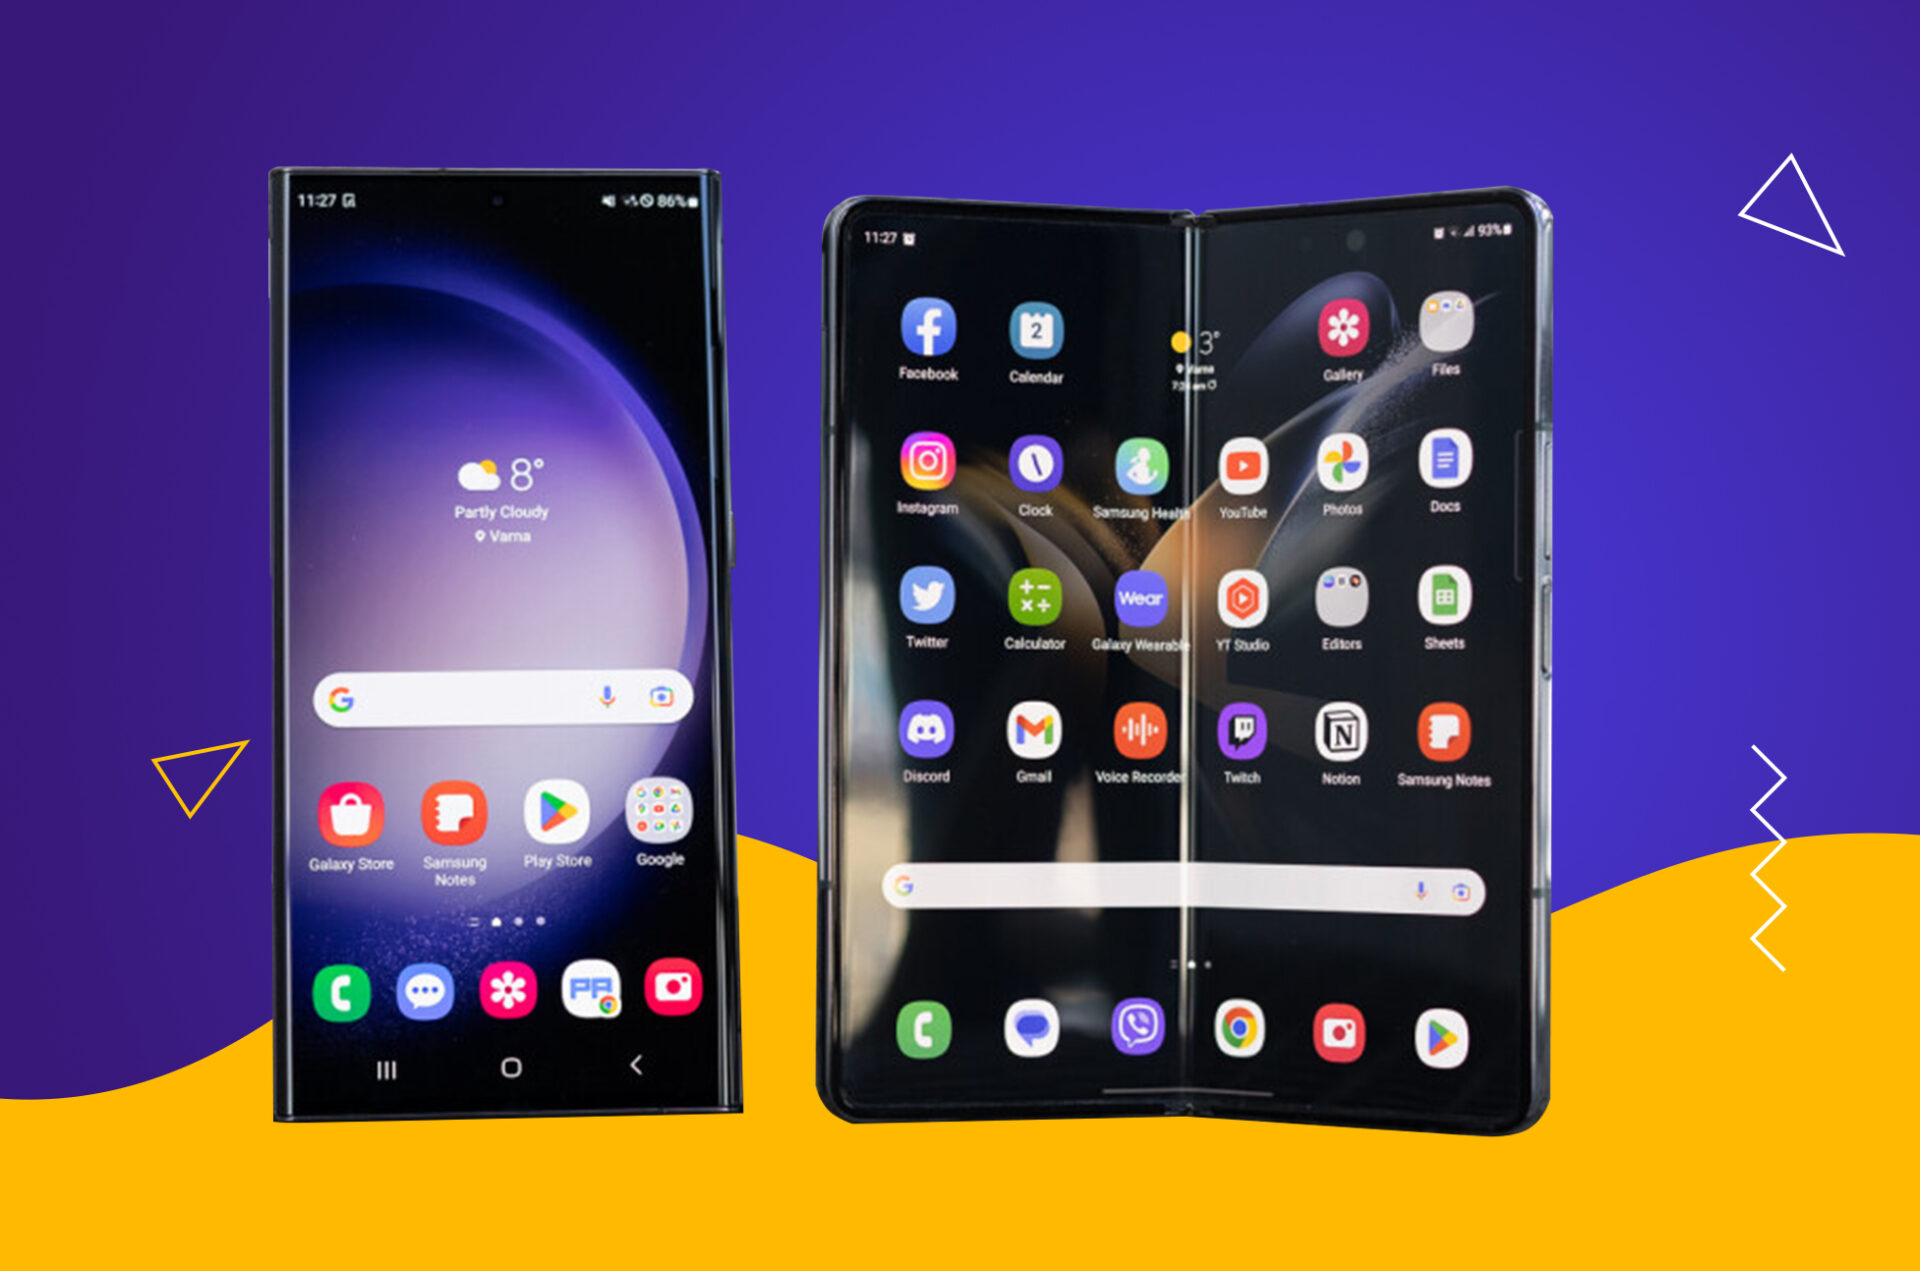
Due to their different form factors, the Galaxy Fold 4 vs S23 Ultra varies most in design.
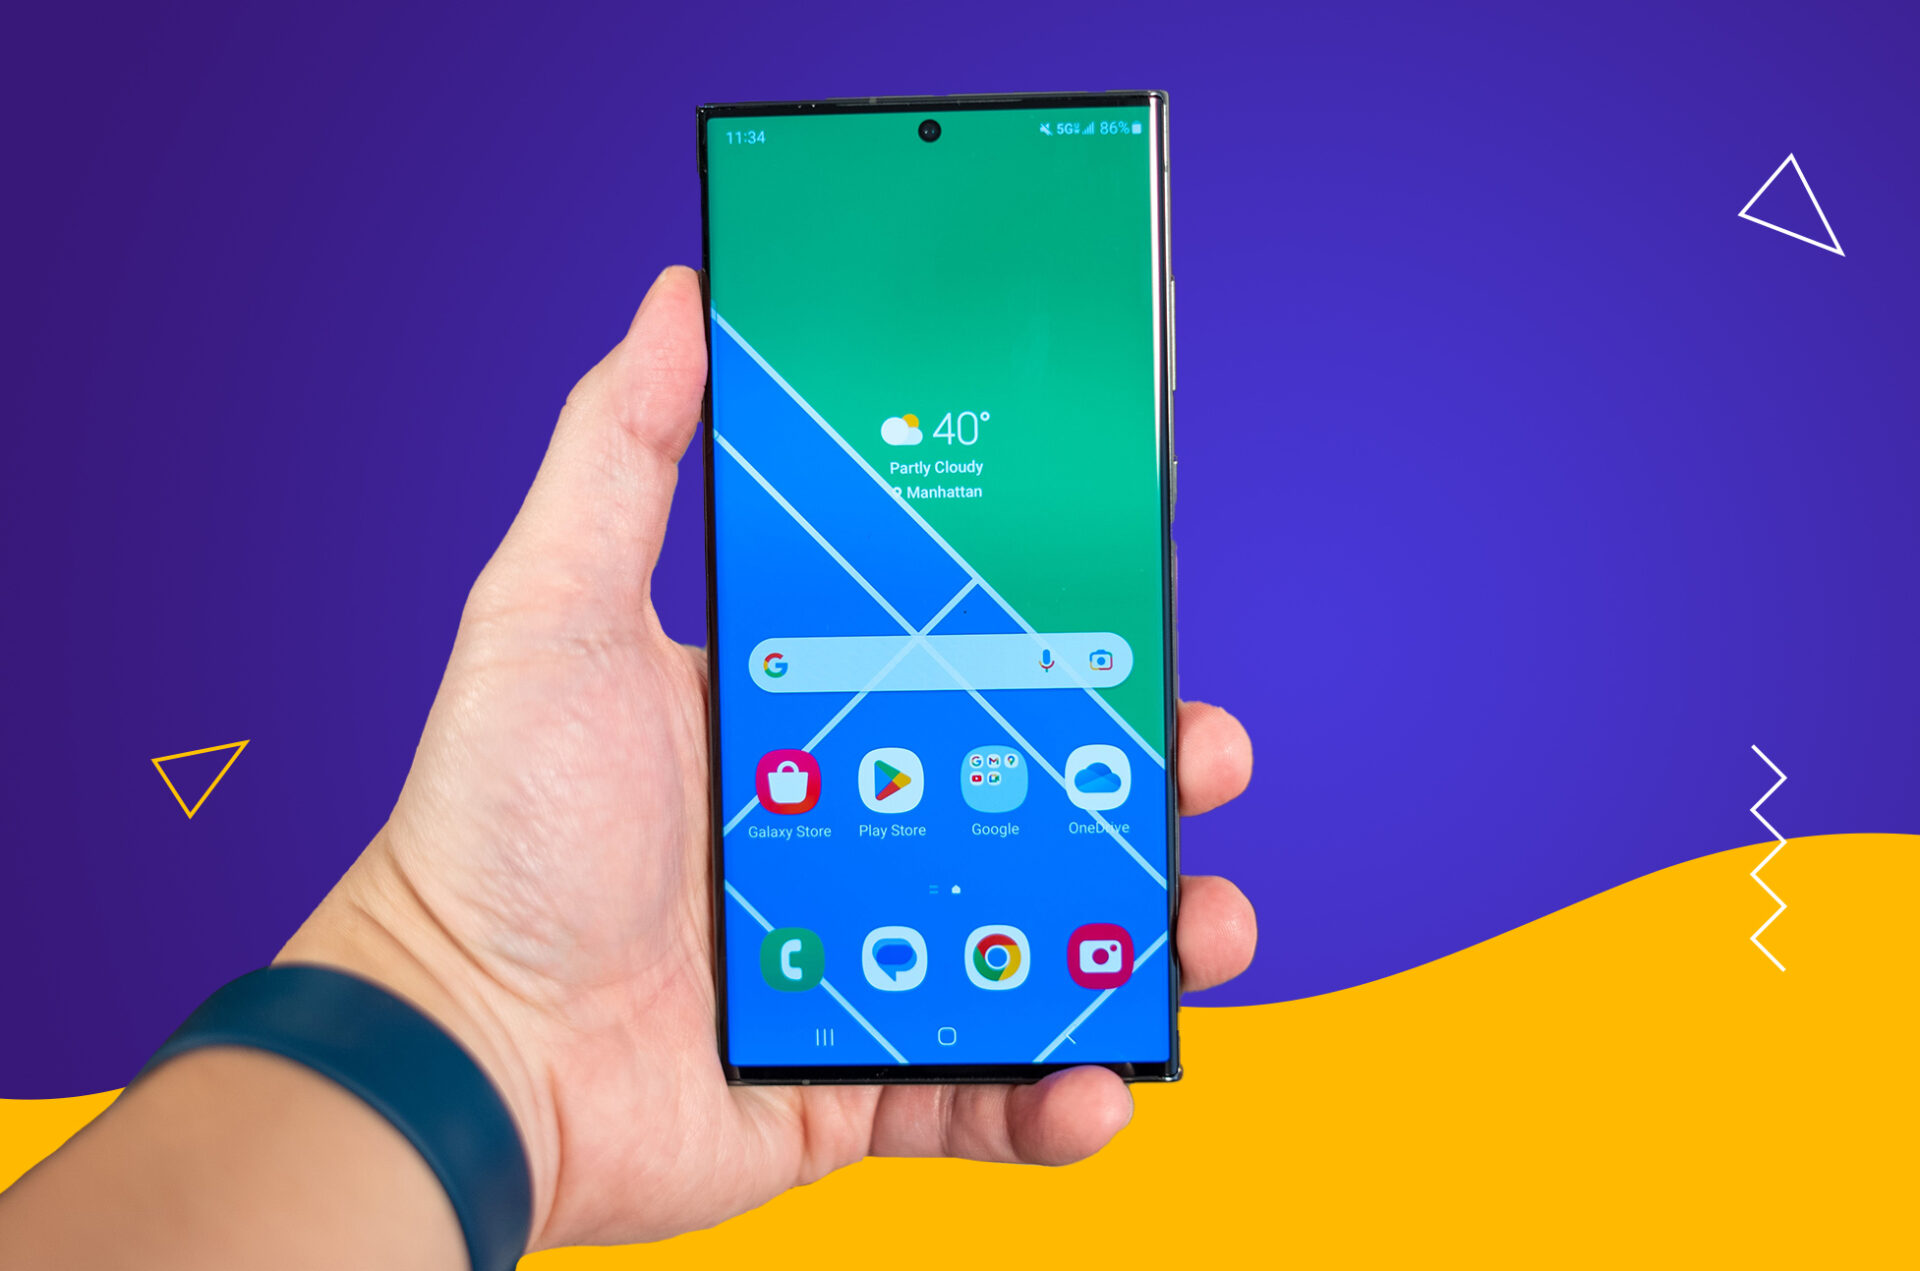
The S23 Ultra resembles a large smartphone.
The Samsung Galaxy S23 Ultra’s 6.8-inch AMOLED QHD+ display feels vast and looks excellent, owing to its brightness and contrast. Its adjustable refresh rate ranges from 1Hz to 120Hz, making it smooth and clear when needed and more energy efficient when the phone’s screen is idle. It’s one of the most excellent screens for a regular phone, but it’s not as revolutionary as the Z Fold 4.
The Fold 4 includes two significant displays: a smartphone-like outer display that you can use while the phone is folded up and a tablet-like inner display. If you can get accustomed to the Z Fold 4’s thickness, the outer display’s 6.2-inch width makes it simpler to operate one-handed than the S23 Ultra’s.
The Fold’s inner display, which unfolds into a 7.6-inch screen that appears like two phone displays, is its best feature. It’s large and multitasking-friendly, yet delicate.
A foldable phone is half opened. It’s not constructed of Gorilla Glass Victus+ like the out display or the Galaxy S23 Ultra. Thus, it will be less durable. Due to the softer material, the interior display scratches and scuffs easily. Buyers should be aware of this.
Given its massive hinge, the Z Fold 4’s IPX8 dust certification is lower than the S23 Ultra’s IP68. Samsung’s Z Fold hinge design is the greatest yet. Samsung’s S-Pen may take notes, manage applications, draw, and more on both phones. The Z Fold 4 needs you to purchase an S-Pen, whereas the Galaxy S23 Ultra has one that fits perfectly inside the phone. The Galaxy Z Fold 4 needs a nice S-Pen case.
Software/performance
Galaxy Fold 4 vs S23 Ultra. The S22 Ultra utilizes Snapdragon 8 Gen 2, whereas the Galaxy Z Fold 4 uses Snapdragon 8+ Gen 1. On paper, the Gen 2 powering the S23 Ultra wins. However, the chipsets are so powerful that you won’t notice any difference in daily tasks. Thus, both phones can handle everything. Last year, the S22 Ultra ran hotter than the Z Fold 4 during intense workloads. We need to spend more time with the S23 Ultra to know whether this is true with the new chipset, but we’re hopeful the Snapdragon 8 Gen 2 can manage thermals better.
Samsung’s One UI 5, based on Android 13, was added to the Galaxy Z Fold 4 after it debuted with Android 12L. The S23 Ultra starts with One Ui 5.1/Android 13; both phones have major software upgrades. Both phones will be maintained for four major OS upgrades and five years of security patches. Since it launched in 2023, the Galaxy S23 Ultra will get one more OS upgrade than the Z Fold 4.
Cameras
Galaxy Fold 4 vs S23 Ultra. The Galaxy Z Field 4 is the first Samsung foldable with a triple camera system on the rear. The Galaxy Produces more accurate +’s rear camera returns. You can use the outside display as a selfie viewfinder by unfolding the phone, and it takes incredible shots in most lighting circumstances. The Z Fold 4’s 12MP f/2.2 ultra-wide and 10MP f/2.4 telephoto cameras complement the outstanding hardware.
Flex Mode is the Fold 4’s finest feature. The hinge holds most angles so that you can use the phone hands-free anywhere. Afterward, you may use hand gestures to capture photos of yourself, your friends, and your surroundings.
The Galaxy S23 Ultra’s 200MP primary sensor (up from 108MP last year) will shoot enormous photographs. The Galaxy S22 Ultra’s camera was your favorite feature last year, and the S23 Ultra appears to improve on that.
The S23 Ultra takes better portraits than the Z Fold 4 because of its two zoom lenses. The 3X lens provides realistic bokeh, but the 10X optical zoom may let you shoot some of the best smartphone photos.
Overall, dedicated phone photographers will prefer the S23 Ultra, but both phones have superb camera systems that most people will be delighted with.
Battery/charging
Galaxy Fold 4 vs S23 Ultra. The Samsung S23 Ultra’s 5,000mAh battery is similar to last year’s S22 Ultra, but it’s okay. Given how much premium phone like this uses, most ordinary users should be able to go a whole day between charges.
Usage determines battery life, making the Z Fold 4 difficult to evaluate. Despite its 4,400mAh battery, we always felt it was adequate throughout our evaluation. It may be low if you utilize that giant interior screen all day. Its battery life should satisfy most folks.
Both smartphones charge wirelessly at 15W. However, the Galaxy S23 Ultra can charge wired at 45W and the Z Fold 4 at 25W.
Unlocking S23 Ultra and Galaxy and Galaxy Z Fold 4
To carrier unlock your Samsung S23 Ultra and Galaxy and Galaxy Z Fold 4; please follow the procedures listed below:
Anyone who wants a powerful smartphone for everyday life would love both phones. Both gadgets have enough power to satisfy your needs. Thus, your model choice depends on your budget and taste. Galaxy S23 Ultra is cheaper and more straightforward. The Samsung Galaxy S23 Ultra is a good choice if you don’t need a tablet but want a powerful phone. If you want a tablet-like experience with you at all times, the Z Fold 4 may be worth it if you can afford it. If you enjoy multitasking with as much screen real estate as possible or appreciate the fancy element of the folding phone design, the Galaxy Z Fold 4 may be more fun and less conventional. If you have any questions, let us know in the comment section below!
All products, and company names, logos, and service marks (collectively the "Trademarks") displayed are registered® and/or unregistered
trademarks™ of their respective owners.
The authors of this web site are not sponsored by or affiliated with any of the third-party trade mark or third-party registered trade mark owners,
and make no representations about them, their owners, their products or services.
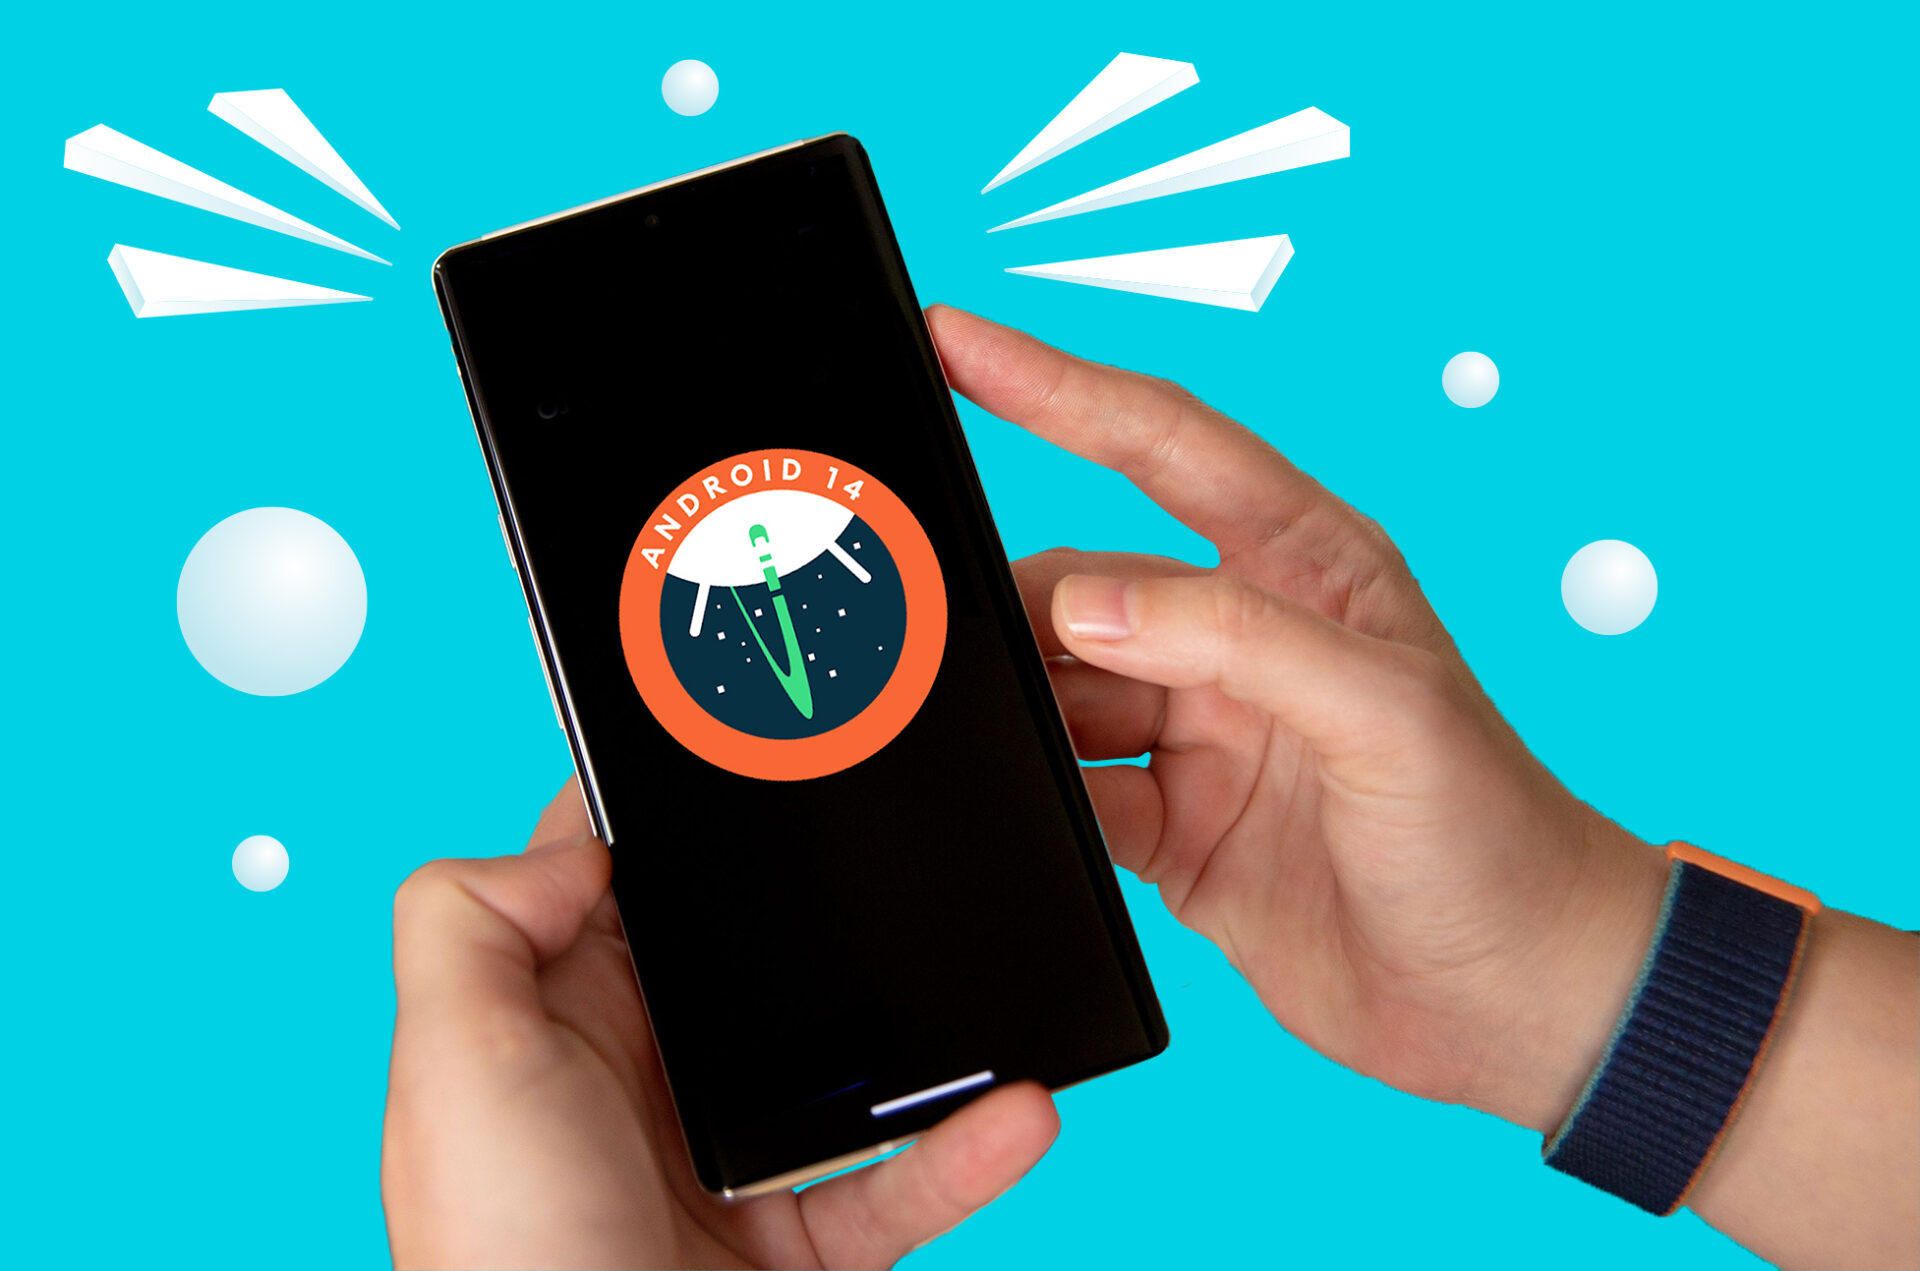
Android 14 is the most recent version of Google’s popular Android operating system. This next version of Android is expected to offer a variety of new features, enhancements, and optimizations to its already robust feature set. Android 14 is poised to take the smartphone industry by storm with its clean and user-friendly interface, powerful capabilities, and unrivaled customization choices. This post will provide an overview of Android 14’s new features and modifications. Android 14 has something for everyone, whether you’re an Android veteran or fresh to the platform, so let’s get started!
Android 14 Name and Launch Date
Android 14 is expected to reach the platform stability milestone in June, with developers having several weeks to test their apps before the stable release. Based on past releases, a Q3 to early Q4 release is likely, although OEMs like Samsung and Xiaomi may take longer to release it with their own software skins. No official release date has been announced yet.
Android 14 on Accessibility Features
Over the years, Google has demonstrated a commitment to accessibility with the introduction of various features in its Android operating system. The latest version, Android 13, introduced a new reading mode for users with visual impairments, native support for braille displays, and audio descriptions. Additionally, Android 12 made advancements in screen magnification and added the ability to control the screen through facial gestures.
Android 14: Larger Fonts
One of the most significant features of Android 14 is the increased font size options. While Android has long supported larger fonts, the new version allows users to scale font sizes up to 200%, compared to a maximum of 130% in Android 13 on Pixels. To ensure readability, Google has implemented non-linear font scaling, so that text will not become excessively large. For example, while headings may not see a size increase, smaller text beneath the heading may grow larger.
Android 14: Advancements in Language
In addition to larger font sizes, Android 14 introduces improvements related to language support. The Grammatical Inflection API has been improved to better support gendered languages such as French and German. Additionally, app developers can now have greater control over language options with the introduction of more granular per-app language controls. This allows them to customize the language list for specific regions, run A/B experiments, and provide updated locales through server-side localization pushes within their app.
Android 14 on Battery Improvements and Features
In an effort to enhance battery performance, Android 14 introduces a number of changes. Although these changes are not as drastic as those seen in Android Marshmallow’s Doze Mode or an extreme battery saver, they are expected to result in significant battery life improvements due to their under-the-hood nature.
Android 14: New Alarm Permission
Google has introduced a “schedule exact alarm” permission in Android 14, which requires all newly installed apps that are not clocks or calendars to obtain permission from users before accessing this functionality. The reason for this change is that precise alarm functionality has the potential to impact battery life and other system resources.
Android 14: Returning of a Familiar Stat
We are pleased to announce that a previously available feature, the “screen time since last full charge” option, has returned. This option is once again accessible from the battery settings menu, having been temporarily removed in Android 12 in favor of providing battery usage information for the last 24 hours. The return of this feature is useful for those who desire a more precise understanding of the battery life of their device.
Android 14 on Privacy Improvements and Modifications
Although Android 14 has a relatively limited number of privacy and security-related features compared to previous releases, there is still a significant change that may spark considerable debate.
Farewell to installing extremely outdated apps
One of the major differences between Android 14 and Android 13 is that the new update will now restrict the installation of older Android applications. Google explains that this change is aimed toward apps developed for Android 5.1 Lollipop APIs and earlier. This is due to the fact that malware often targets older API levels that lack modern security and privacy measures.
Consequently, this adjustment will prevent the installation of many outdated apps, such as old games and niche applications. However, if you upgrade your device to Android 14, the older apps will still remain on it. This will not be applicable to devices that come with Android 14 pre-installed.
Additional modifications related to security
In addition to the previously mentioned change, Google is also taking steps to improve security against malware and exploits by implementing modifications to the intents system and the dynamic code loading process. These changes are not directly visible to users, however, they should contribute to a more comprehensive defense mechanism against malware and vulnerabilities.
Rumored and expected other Android 14 features
The above-mentioned features and changes are simply those that Google has officially acknowledged as part of the initial developer preview release. However, there are additional Android 14 features that have either been formally confirmed previously or are expected based on hints present in Google’s codebase. The aforementioned items are simply the features and changes that Google has officially acknowledged as part of the initial developer preview release. Nonetheless, there are some Android 14 features that have either been formally confirmed or are expected based on hints in Google’s codebase.
Cloned Application
Some original equipment manufacturers (OEMs) offer the ability to clone an application, which is beneficial for using a single app with multiple accounts. By cloning the app, users can sign into a secondary account within the clone and access either account as desired.
There are indications that Google may be developing app cloning for Android 14, allowing users to clone applications without the need to purchase a device from an OEM that supports this feature. As it would be available on all Android phones. While it is not certain if this feature will be included in the final release, it appears to be in progress.
Satellite communication
Several companies including Qualcomm, Huawei, and T-Mobile have announced the integration of satellite communication capabilities in their products and services in the past six months. Google is also bringing native support for satellite communication to Android 14. This was announced in September 2022 through a tweet by Google executive Hiroshi Lockheimer.
However, the company did not provide details on the specific capabilities, such as support for two-way communications and multimedia formats. Nevertheless, native support should facilitate the integration of this technology by smartphone manufacturers and service providers. Whether the 2023 Pixel devices will have this feature remains unknown and will have to be confirmed at a later time.
Bloatware Detector
Bloatware is a significant issue, particularly with carriers who often install excessive software without the user’s knowledge. Google aims to address this problem with a feature being developed for Android 14, currently known as “Apps installed in the background.” This feature will provide a comprehensive list of applications that have been secretly downloaded and installed, and enable the user to quickly remove them.
The feature requires activation through hidden developer flags, so it is uncertain if it will be included in the stable Android 14 release. Nevertheless, it is hoped that this feature will be made available in the final release.
Merged Health Connect
The Health Connect application serves as a centralized platform to gather health data from various health and fitness applications. It is compatible with health/fitness data from prominent companies such as Samsung, Fitbit, and Peloton.
Currently, the application is available for download, however, Rahman has discovered indications that Google may include it within Android 14 as a built-in feature, either as a standalone application or through Project Mainline. This suggests that users may not have to download the application in the upcoming version of Android.
Conclusion
Android 14 promises to provide a slew of new features and enhancements to improve the overall user experience. Android 14 is shaping up to be a substantial release, with native support for satellite communication, the option to regulate background app installations, and the inclusion of the Health Connect app. While some capabilities may necessitate activation via hidden developer flags, their inclusion will help to streamline and enhance the use of Android devices. It will be intriguing to see what other new features and enhancements are added to Android 14 as development progresses.
All products, and company names, logos, and service marks (collectively the "Trademarks") displayed are registered® and/or unregistered
trademarks™ of their respective owners.
The authors of this web site are not sponsored by or affiliated with any of the third-party trade mark or third-party registered trade mark owners,
and make no representations about them, their owners, their products or services.
Samsung has always been an innovator in the smartphone market, and the new Samsung S23 Ultra is no exception. The S23 Ultra promises a unique smartphone experience with its robust hardware and cutting-edge features. The announcement of Samsung’s best smartphone to date has finally occurred. The new Samsung Galaxy S23 Ultra is here.
The Samsung Galaxy S23 Ultra, released alongside the standard Galaxy S23 and Galaxy S23 Plus, is the most intriguing handset of the three and the only one to receive exciting enhancements.
Samsung S23 Ultra Camera
The Galaxy S23 Ultra features an incredibly crisp 200-megapixel ISOCELL HP2 sensor. It is also adaptable, as it is capable of 16-in-1 binning for 12-megapixel photos and 4-in-1 binning for high-resolution 50-megapixel photographs. In addition, it offers a particular Expert RAW app for more advanced tools.
In addition, a new Astro Hyperlapse video option is included. In addition, Adaptive VDIS for better video stabilization. The primary camera is accompanied by a 10-megapixel 3x telephoto lens, a 12-megapixel ultra-wide lens with autofocus, and a 10-megapixel periscope lens with a 10-times optical zoom.
Samsung S23 Ultra Build and Display
Additionally, its screen is the largest and sharpest of the three. It features a 6.8-inch Dynamic AMOLED 2x display with a QHD+ pixel resolution, 1,750-nit peak brightness, and an adjustable refresh rate ranging from 1Hz to 120Hz.
The Samsung Ultra variant retains the S Pen and integrated slot from the previous year’s model. Therefore, enthusiasts of stylus input and the numerous S Pen functions should feel at home here.
Samsung S23 Ultra Battery and Performance
The Galaxy S23 Ultra features a supercharged Snapdragon 8 Gen 2 processor, but nearly everything else has been updated compared to its predecessors.
The battery capacity remains the same at 5,000mAh, and charging remains at 45W, which is significantly lower than other premium smartphones we’ve seen today.
Or, you can use the link below to access a comprehensive, illustrated tutorial showing you how to unlock your phone in no time. Relax! Unlocking a Samsung Galaxy S22 is the same as unlocking a Samsung S23 Ultra!
The Samsung S23 Ultra is a premium smartphone with the most advanced technology. The Samsung S23 Ultra is a terrific choice whether you’re a power user who requires a device that can perform demanding tasks or someone who wants a smartphone that can shoot stunning photographs and movies. If you have any questions, let us know in the comment section below!
All products, and company names, logos, and service marks (collectively the "Trademarks") displayed are registered® and/or unregistered
trademarks™ of their respective owners.
The authors of this web site are not sponsored by or affiliated with any of the third-party trade mark or third-party registered trade mark owners,
and make no representations about them, their owners, their products or services.