Important: This video guide is about how to enable ADB (Android Debug Bridge) on Samsung phones that are running Android 5.0 and up (also known as Android Lollipop). To check your phone’s android version, go to Settings > About Phone > Android Version.
It’s always a requirement to allow USB debugging on your phone before we proceed into the unlocking process. It’s because this is the only way possible for our remote unlock team to successfully conduct a USB Cable unlock on your phone.
By connecting your phone to a computer, you can make changes and push commands on your phone from your computer.
Most importantly, our Cable Unlock software can only calculate your phone’s unlock code when it can communicate to your phone via the computer. You will need to install it on your computer and have your phone enable the ADB for the cable unlock to be successful.
Below is a 1-minute video that supplements this guide:
Step by step images on how to enable ADB Samsung Galaxy Android 5.0
Step 1. First, download and install the driver pack from our website.
Open the zip file and extract it. Drag the Samsung folder to the desktop.
Double click on it and start the installation process.
Step 2. Enable USB debugging on the phone.
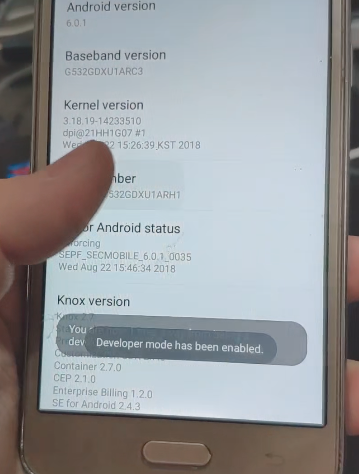
On your phone, go to Settings > About Device > Software Information > Build Number
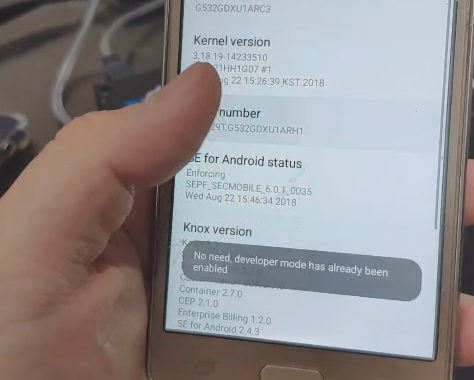
Tap “Build number” at least 7 times until you see “Developer mode has been turned on” or it says “You are now 1 step away from becoming a developer”.
Press the return/back button twice.
Scroll down and go to “Developer options”.
Scroll down and turn on “USB Debugging”.You will be prompted with the question “Allow USBdebugging?”, just tap “OK”.
Step 3. Connect the phone to computer via USB cable.
Plug one end of the USB cable to the computer’s USB port and the other end to the phone. When prompted, check the checkbox beside “Always allow from this computer”, then tap “OK”.
NOTE: To avoid connectivity problems, connect it directly to the computer’s USB port. Do not use a USB hub, USB extension, and if using a desktop computer, use the USB ports on the back.
And that’s it, your phone is now ready ADB enabled and it’s ready for the next step of the unlock process. If you have questions about this guide, we can start the conversation at the comment box below!
If you think this guide helped you immensely, please return us the favor and share this with your friends! Just click on the share button for Facebook or Twitter at the end of this post. Follow us on FB or Twitter for more guides, infographics, and the latest phone reviews!
All products, and company names, logos, and service marks (collectively the "Trademarks") displayed are registered® and/or unregistered
trademarks™ of their respective owners.
The authors of this web site are not sponsored by or affiliated with any of the third-party trade mark or third-party registered trade mark owners,
and make no representations about them, their owners, their products or services.
Did you know that you can use a Z3X Box to unlock Samsung Galaxy J1?
And there are plenty of other Samsung phones you can unlock with it? But in this guide, we will cover how you can do it with the 2016 model Samsung Galaxy J1. If you already have configured the Z3 box and have installed the necessary drivers and software, you’re ready for this tutorial!
On the other hand, if you think you need professional help, you can contact our remote unlock team for help.
Below is the video guide created for this article:
The following steps have screenshots from the phone and the computer to give you a visual guide on how to navigate through each device.
Step 1. Enable USB Debugging on Samsung Galaxy J1.
On the phone, go to “Settings” or tap the gear icon on the notifications bar.
Scroll all the way down and tap “About device”
Scroll down and tap “Software info”
Tap the “Build number” 7 times or until it says “Developer mode has been enabled!”
Press “Back” or “<” two times.
Scroll down and tap “Developer options”
Turn on Developer options by sliding the button right to turn it on.
Scroll down and slide the enable button right for “USB debugging”
You will be prompted with a question box “Allow USB Debugging?”
Tap “OK”
Step 2. Connect Z3X box to the computer via USB.
Step 3: Install Samsung Tool Pro to your computer.
Download the Samsung USB Unlock Drivers from this page on our website.
Open the downloaded file. Extract the file, and drag the Samsung folder to the desktop.
Click open the folder and you will be prompted with the box for the installation process.
Step 4. Connect your phone to the computer via USB.
Press the “Windows” and “R” key at the same time on your keyboard.
In the “Run” box that will open on the lower left-hand side, type “compmgmt.msc”.
A window will open, click on “Device Manager” on the upper left corner.
Click the dropdown arrow in “Modems” and you should see your device “SamsungJ1”.
Close window.
Step 5. Run the recently installed “Samsung Tool Pro” software.
A box will open asking permission, just click “Yes”.
Wait for the program to open.
From the left-hand side, you will see a list, click on your phone’s correct model number.
*Confirm your model number: On your phone, go to Settings > About Device > Model Number
Step 6. Generating the unlock code.
From the uppermost, you will see several tabs, click on the “Unlock” tab.
On the right-hand side, you will see options, click on “ReadCodes,” it has a magnifying glass next to it.
Step 7. Entering the unlock code.
Wait a few seconds, and now look at your phone. On its screen you will see a prompt that says, “Allow USB debugging?”, tap the checkbox “Always allow this PC” and click on “OK”.
On your computer screen, the program will calculate the code. Just wait a few more seconds.
After a few minutes, you should find the unlock code, which is “NET lock“.
Restart your phone. (It should still be connected to your computer).
Once it boots up, it will prompt you to enter the “SIM network unlock PIN” this means it’s asking for the unlock code.
Enter the code you got for “NET lock”.
Tap on the “UNLOCK” option.
Congrats, your phone is now unlocked! You should see signal bars coming in from your new service provider!
That’s it for this guide! If you followed the steps properly, your phone should be successfully unlocked. If you have questions about this guide, we can start the conversation at the comment box below!
It’s very easy, you don’t have to be an expert to do it, but still, if you think you’ll need professional help, let the pros from our very own remote unlock team help you out. Tell us how we can help you by giving us a chat!
If you think this guide helped you immensely, please return us the favor and share this with your friends! Just click on the share button for Facebook or Twitter at the end of this post. Follow us on FB or Twitter for more guides, infographics, and the latest phone reviews!
All products, and company names, logos, and service marks (collectively the "Trademarks") displayed are registered® and/or unregistered
trademarks™ of their respective owners.
The authors of this web site are not sponsored by or affiliated with any of the third-party trade mark or third-party registered trade mark owners,
and make no representations about them, their owners, their products or services.
There is a YouTube video below that supplements this guide:
In order for our team to conduct a remote unlock session successfully, we first need you to connect your phone to the computer via USB. However, simply connecting your phone to the computer will not do it.
You need to have your phone “communicate” to the computer so we can alter the sim lock settings through your computer.
It may sound like USB Debugging is very technical but it’s very easy! Here’s a quick guide that we made into an infographic so you can scroll and see what to do conveniently.
Let’s do it!
Step 1. On your phone, go to Settings > General
Step 2. Scroll down and go to Software Info
Step 3. Tap on Build Number seven (7) times
Step 4. If prompted for your PIN, enter your PIN and press Back “ < ” twice.
Step 5. Tap “Developer options“
Step 6. You will be prompted with a “Warning” box, just tap on the empty button and tap OK.
Step 7. Turn on “USB debugging” by dragging the button on one side.
Step 8. You will be prompted with the question “Allow USB Debugging?” Tap OK.
Step 9. Connect your phone to the computer using a USB cable.
Step 10. You will be prompted with the question “Allow USB Debugging?” Tap the empty button and tap OK.
And we are done! If you think this has helped you immensely, return the favor and give us a shoutout or share this on Facebook or Twitter with your friends!
If you have a phone that you wish to sim unlock or carrier unlock, drop us a message and tell us how we can help you! We’ve unlocked over 8 million phones at the fastest turnaround time! Perfect for traveling or when you need it done fast.
Got any questions for us? Comment it down below and let’s talk about it!
All products, and company names, logos, and service marks (collectively the "Trademarks") displayed are registered® and/or unregistered
trademarks™ of their respective owners.
The authors of this web site are not sponsored by or affiliated with any of the third-party trade mark or third-party registered trade mark owners,
and make no representations about them, their owners, their products or services.
Do you want to unlock your phone using the Z3X Box but don’t know where to start? Well, here’s a complete guide that will help you do all the things you need to do to unlock your phone using this method successfully!
WARNING: WE WILL BE ROOTING THE PHONE AND THIS VOIDS THE WARRANTY IF YOU STILL HAVE ONE. THIS ALSO DISABLES KNOX AND ITS FEATURES. YOU WON’T BE ABLE TO USE THEM ANYMORE (LIKE SECURE FOLDER) EVEN IF THE FIRMWARE HAS BEEN RESTORED.
TLDR; below is a YouTube video that supplements this guide but all the downloadable materials are in this written guide.
Note: This guide already assumes that you have already installed Z3X Shell, activated the box, and have installed Samsung Tool Pro.
If you don’t already have a Z3X box and you want to unlock your phone, UnlockBase has a white glove unlock program where one of our technicians unlocks your phone remotely over the internet (for a fee). Through this guide you will; (1) know what files needed to be downloaded, (2) know how to root your Samsung phone safely, and (3) unlock your phone through the Samsung Tool Pro software for the Z3X.
TWRP 3.2.3-1 – This will allow us to flash Magisk so we can root the phone.
Magisk Manager – This software that does the actual rooting.
Preparation
Turn off the phone. Remove all SIM cards. Leave the microSD inside. If no microSD, insert one. (We’ll need that later).
Turn the phone back on.
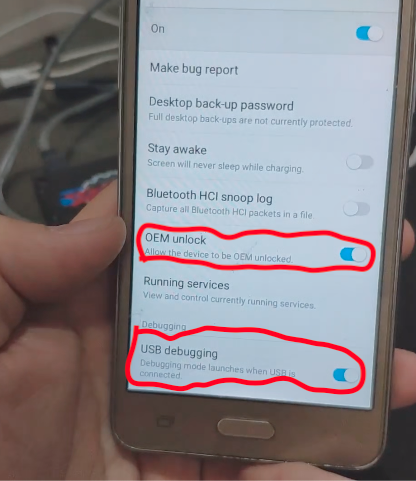
Activate both USB Debugging and OEM Unlock
Go to Settings.
Go to “About Phone”
Tap “Software Info”
Tape Build Number 7 times, until it says “Developer mode has been enabled”, or “Developer mode has been enabled.”
Go back twice.
Go to “Developer Options”.
Enable both “OEM Unlock” and “USB Debugging”.
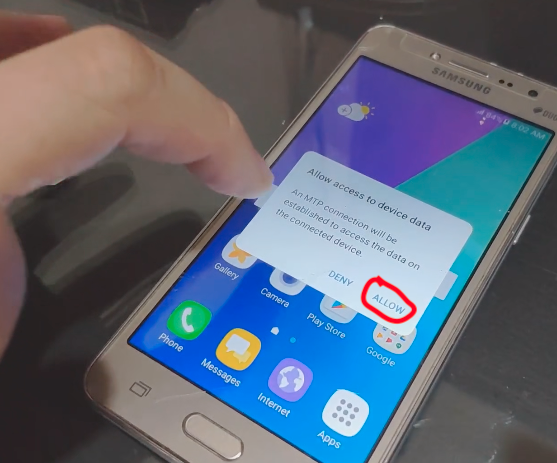
When prompted “Allow access to device data.” Tap “Allow”.
Copy “Magisk-vXXX.zip (XXX means version number of Magisk), to the phone’s SD card.
If connected, disconnect the phone from the computer.
Loading TWRP recovery.
Turn the phone off. Then press volume down (-), home, and power.
If you see “Warning”, press Volume up.
If you see the Samsung logo. Pull the battery out, put it back in, and keep trying until you get to the “Warning” screen.
Connect the phone to the computer.
Connect the Z3X Box to the computer.
Launch SamungToolPro
Go to “Flash” tab, on the top.
Click on “PDA” on the left side.
Navigate where you downloaded TWRP (twrp_3.2.3-1_sm-g532.tar).
Click “Flash”.
As soon as the phone reboots, IMMEDIATELY pull the battery out. Then disconnect the cable.
Put the battery back on, and then press Volume Up (+), Home and Power.
If you see a red text on the top saying “RECOVERY IS NOT SEADROID ENFORCING”, you just wait.If not, pull the battery out, reinsert and try pressing Volume Up (+), Home and Power. Keep trying until you see the red text on top.
Once booted into TWRP, swipe “Swipe to Allow Modifications.”
Rooting the phone.
On TWRP, tap “Install”.
Tap “Select Storage”.
Tap “Micro SD card”.
Tap “OK”
Select “Magisk-vXXX.zip” (XXX means the version number of Magisk).
Swipe “swipe to confirm Flash” to start flashing Magisk.
Wait for it to flash. Ignore the red errors).
Once done, tap “Reboot System”.
When prompted (and didn’t automatically reboot), tap “Do Not Install”.
If you see the yellow text “Set Warranty Bit: kernel(0)”. You did everything correctly, so far.
Plug the phone into the computer.
When prompted “Allow access to device data.” Tap “Allow”.
Go where you downloaded Magisk (Magisk-vXXX.zip) (XXX means the version of Magisk), and open it.
Extract “Magisk.apk” under the “common” directory, anywhere (just remember where you extracted it).
Copy the extracted “Magisk.apk” to your phone’s SD card.
Navigate to and install the “magisk.apk” on your phone.When prompted, tap “Settings”, and enable “Unknown Sources”.
Once done, click “Open”.
If both “Magisk”, and “Magisk Manager” has a green check. We are now ready to proceed to the next step.
Unlocking the phone.
Go back to SamsungToolPro
Click on “Model” tab on the top. Type in “G532G” “G532M” or “G532F”, without the quotation marks. Select your model from the list, and then click “Select” on the bottom.
Click the “Unlock” tab on the top.
Click on “Read Phone Info” on the right.
On the right side of “ADB”, click the arrow and select the only option there. (That’s your phone.)
Unlock your phone’s screen.
Click “Unlock”.
When prompted to allow USB debugging, check “Always allow from this computer”, and then tap “OK”.
Wait for the phone to ask for Superuser permission or access. Tap “Grant” or “OK”
Once done, the phone should reboot. Your phone is now SIM unlocked at this point.
Once booted. Turn it off.
Put your SIM card. And turn the phone back on.
Use the phone normally.
Now your phone is unlocked! You should be able to use a different carrier’s service without any problems. If you have any questions, let’s talk about them in the comments section!
All products, and company names, logos, and service marks (collectively the "Trademarks") displayed are registered® and/or unregistered
trademarks™ of their respective owners.
The authors of this web site are not sponsored by or affiliated with any of the third-party trade mark or third-party registered trade mark owners,
and make no representations about them, their owners, their products or services.
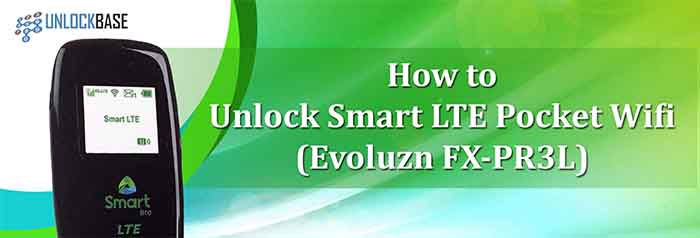
This guide will help you unlock your Evoluzn FX-PR3L; which will allow you to use any SIM cards, provided that both the device and network (carrier) use the same frequencies. Note that this does not require disassembling the device. This guide will work up and beyond firmware V13.
For those who want a video version of this guide, please watch below.
Download Software to Unlock the Smart LTE Pocket WiFi (Evoluzn FX-PR3L)
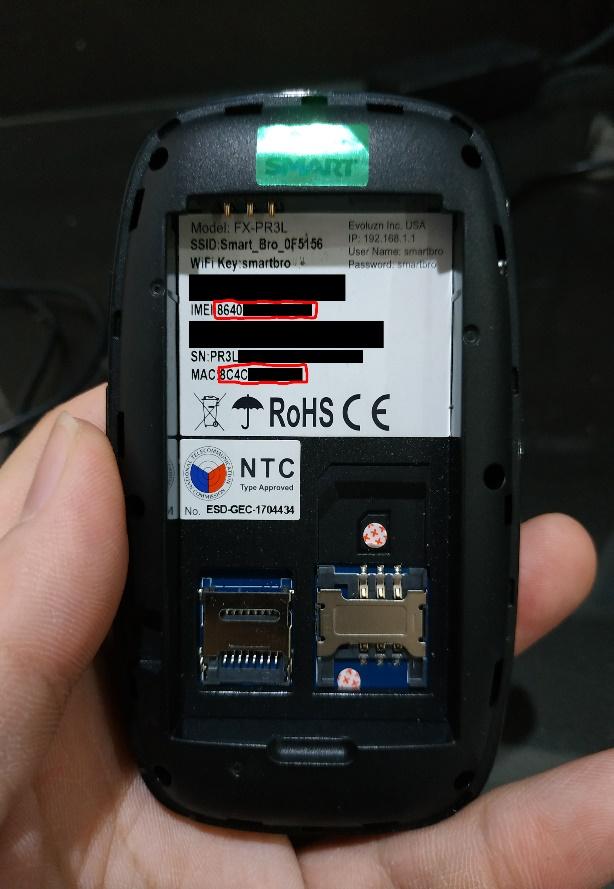
Write down or take a photo of the IMEI and the MAC address of your device, you will need this later. To see the IMEI and the MAC address, remove the back cover of the device and lightly remove the battery. You will see them in the battery’s housing, like the one pictured below:
Download and extract the files you will need in order to do this tutorial. This contains six folders, Starting from “Step 1” all the way through “Step 6″.
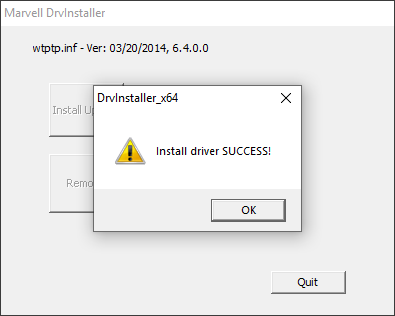
Installing the WTPTP Driver.
Step 1 is a basic installation of the WTPTP Driver in your computer.
On your computer, navigate to the “Step 1” folder.
Launch ‘DrvInstaller” if you are on a computer with 32-Bit/x86 Windows, or “DrvInstaller_x64”, if you are on a 64-Bit/x64 Windows. (If you don’t know. Press Windows + R and type in “msinfo32”
If prompted with “Do you want to allow this app from an unknown publisher to make changes to your device?”. Click “Yes”.
Click on “Install Update”
Once done, you should see this dialog box saying that the driver installation is a success. If you see any error, click on “remove” and then click on “install update” again. If that doesn’t solve it, try to reboot your computer and re-do the whole process.
Close by pressing “Quit”.
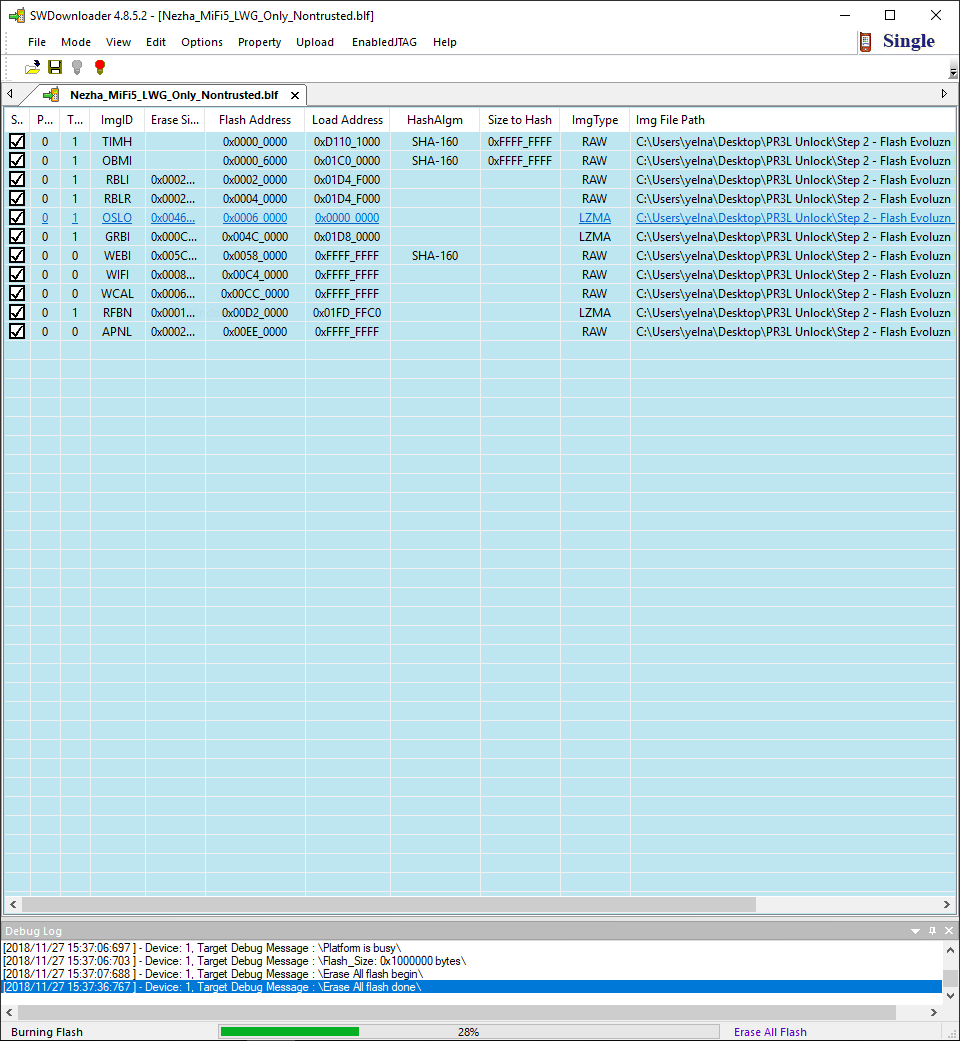
Flashing the FX-PR2L firmware.
Step 2 involves flashing a different firmware on the device. This is necessary for us to successfully unlock it. Don’t worry, we are going to flash the original firmware back once the unlock process is complete.
Remove and disconnect everything on your Evoluzn FX-PR3L device. If it’s connected via USB, disconnect. Remove both SIM and battery.
Go to the “Step 2” folder, and run the “SWDownloader” program.
Click on “File”, then “Open”.
Navigate to the “SWD” folder, (if you don’t see it, it’s located on the “Step 2” folder).
Then select “Nezha_MiFi5_LWG_Only_Nontrusted.blf” file.
Click on the green lightbulb icon.
Connect the FX-PR3L Pocket WiFi via micro USB cable and plug it into the computer’s USB port.
As fast as you can, insert the battery, then hold the power button. Until you see “welcome to Smart”, then the arrow button.
You should see flashing green progress bar on the bottom of SWDownloader.
Once done, there should be a dialog box, saying so. Press “OK”.
Quit out of “SWDownloader”, by clicking X on the top right.
Disconnect the micro USB cable, and remove the battery.
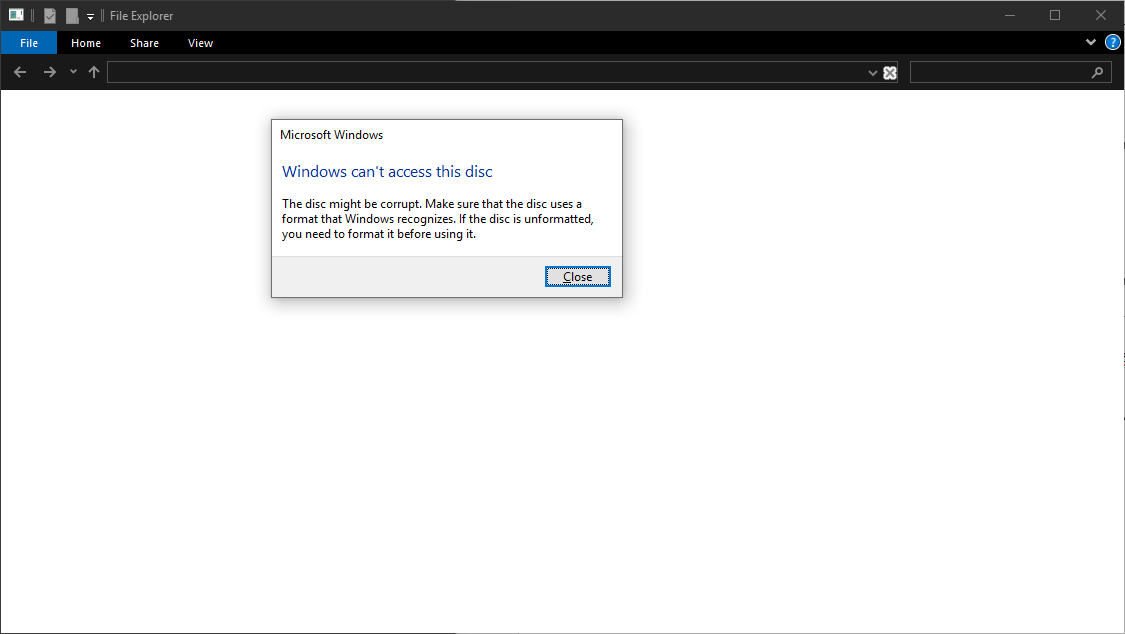
Reinstall the battery, turn it on, and plug the cable back in. On the device, it only shows a white screen. But that’s ok.
When you see a dialog box that says the disk can’t be read, just click “Close”.
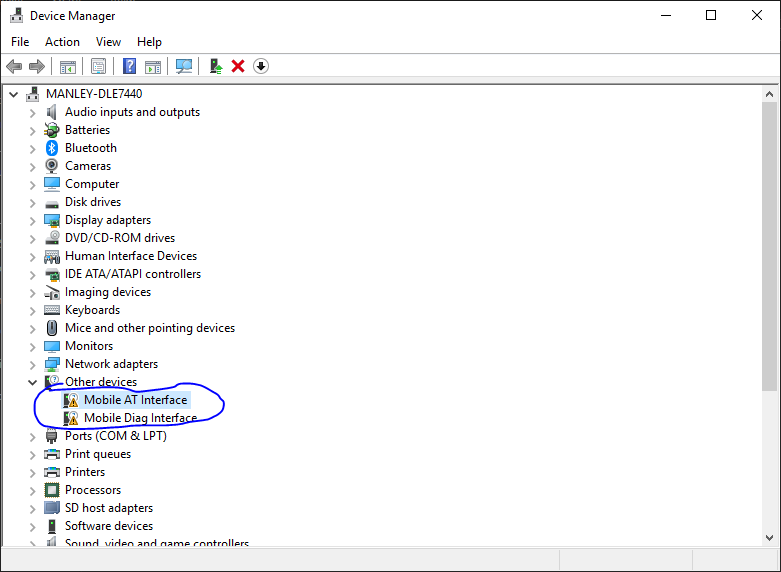
Installing the Marvell Drivers
Open “Device Manager” (Press CTRL+R) then type “compmgmt.msc”. then click on “Device Manager” on the left pane.
Double click on “Mobile AT Interface” (under “Other devices”), and click on “Update Driver”.
Click on “Browse my computer for driver software.”
Click on “Let me pick from a list of available drivers on my computer.”
Double click on “Show All Devices”.
Click on “Have Disk…”
Click on “Browse”.
Navigate to the “Step 3” folder, and double-click on “MSUBSer”
Click “OK”.
Click on “Marvell AT Interface”, then click on “Next”.
It should tell you that you the driver has been successfully installed. Click “OK”.
Do the same steps above for the “Mobile Diag Interface”. But choose “Marvell DIAG USB Device Version: 2.0.0.1 [10/11/2012]”.
Close out of Device manager.
Rewriting the IMEI, MAC, and Serial to the FX-PR3L Pocket WiFi.
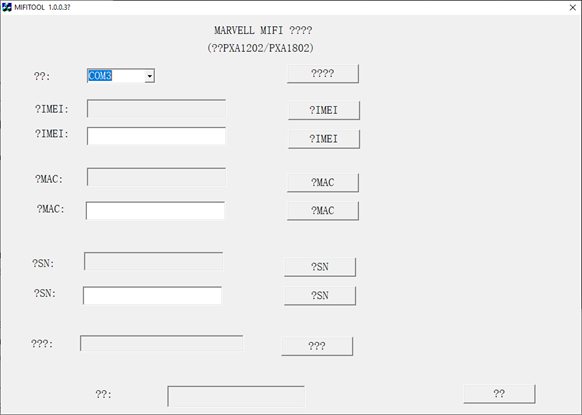
Navigate to “Step 4” folder. Then run ‘MIFITOOL1.0.0.3.”
Click the first bottom “????”. This should locate where your Pocket WiFi is. For me, it’s located on COM3, but yours may vary.
Click on the first “?IMEI” button.
Type your IMEI number from that picture you took or wrote down earlier.
Press the second “?IMEI” button, twice (just to be sure).
Press the first “?IMEI” button again, to ensure the IMEI you entered has been written.
Click the first “?MAC” button.
Type in the MAC address from the picture you took or wrote down earlier.
Click on the second “?MAC” button, twice (just to be sure).
Click on the first “?MAC” button, to ensure the IMEI you entered has been written.
Type in the serial number you wrote down or took pictures of earlier.
Click on the second “?SN” button, twice (just to be sure).
Don’t bother clicking the first “?SN” button, as it will freeze up the program.
Close out of the MiFi Tool by clicking X on the top right, or by clicking the very last button “??”.
Flashing the FX-PR3L V9.0 firmware.
Disconnect the micro USB cable.
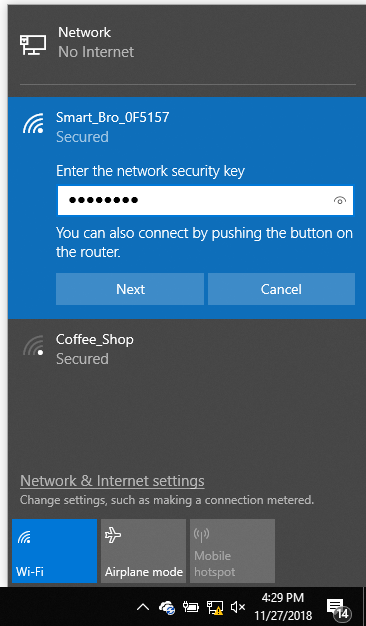
Connect to the Pocket WiFi via WiFi.
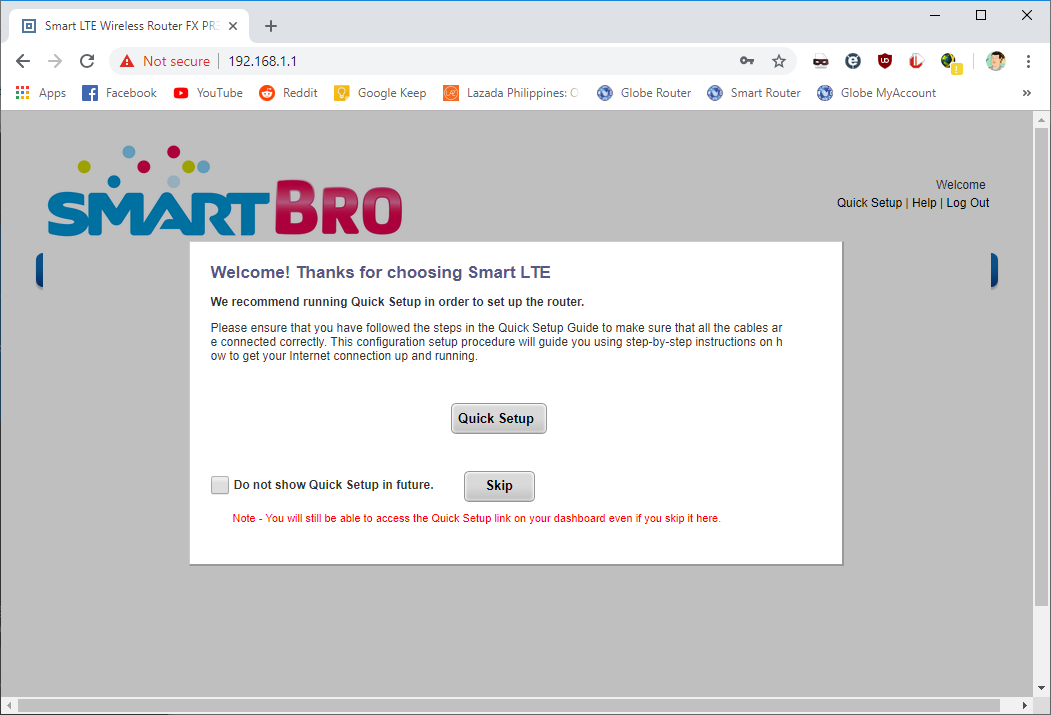
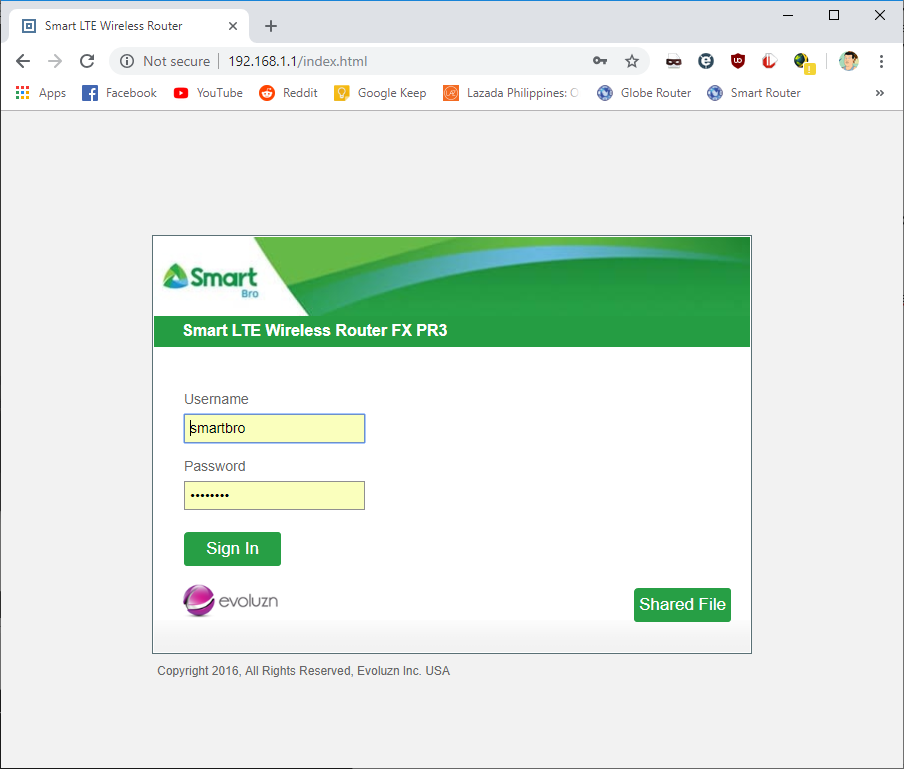
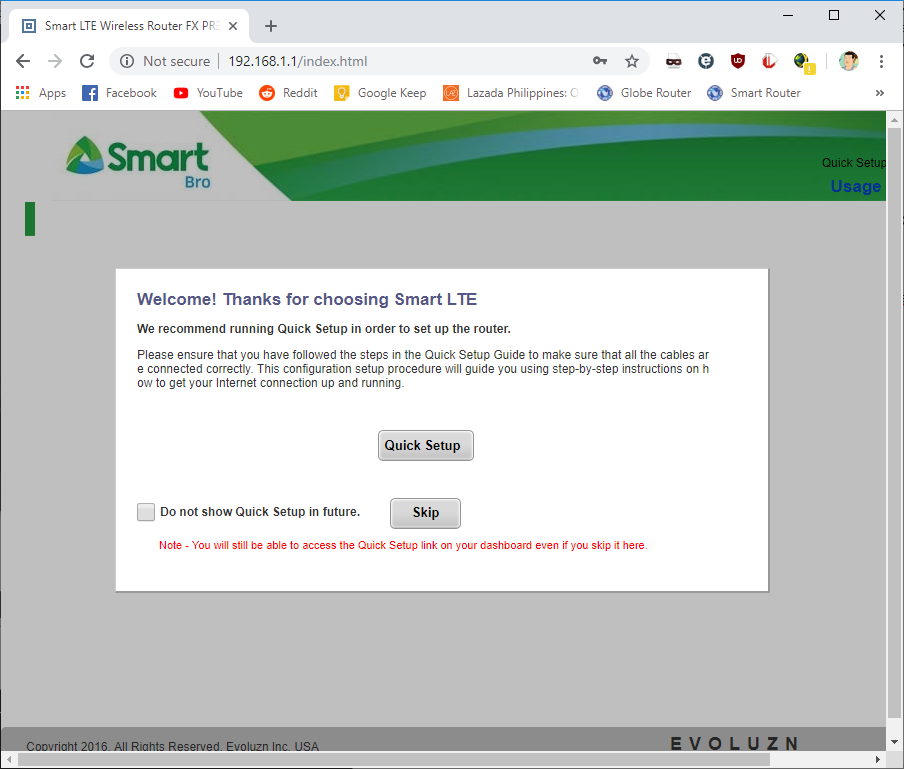
Open the browser, and go to 192.168.1.1.
Type in “smartbro” for both user and password.
Click “Skip”.
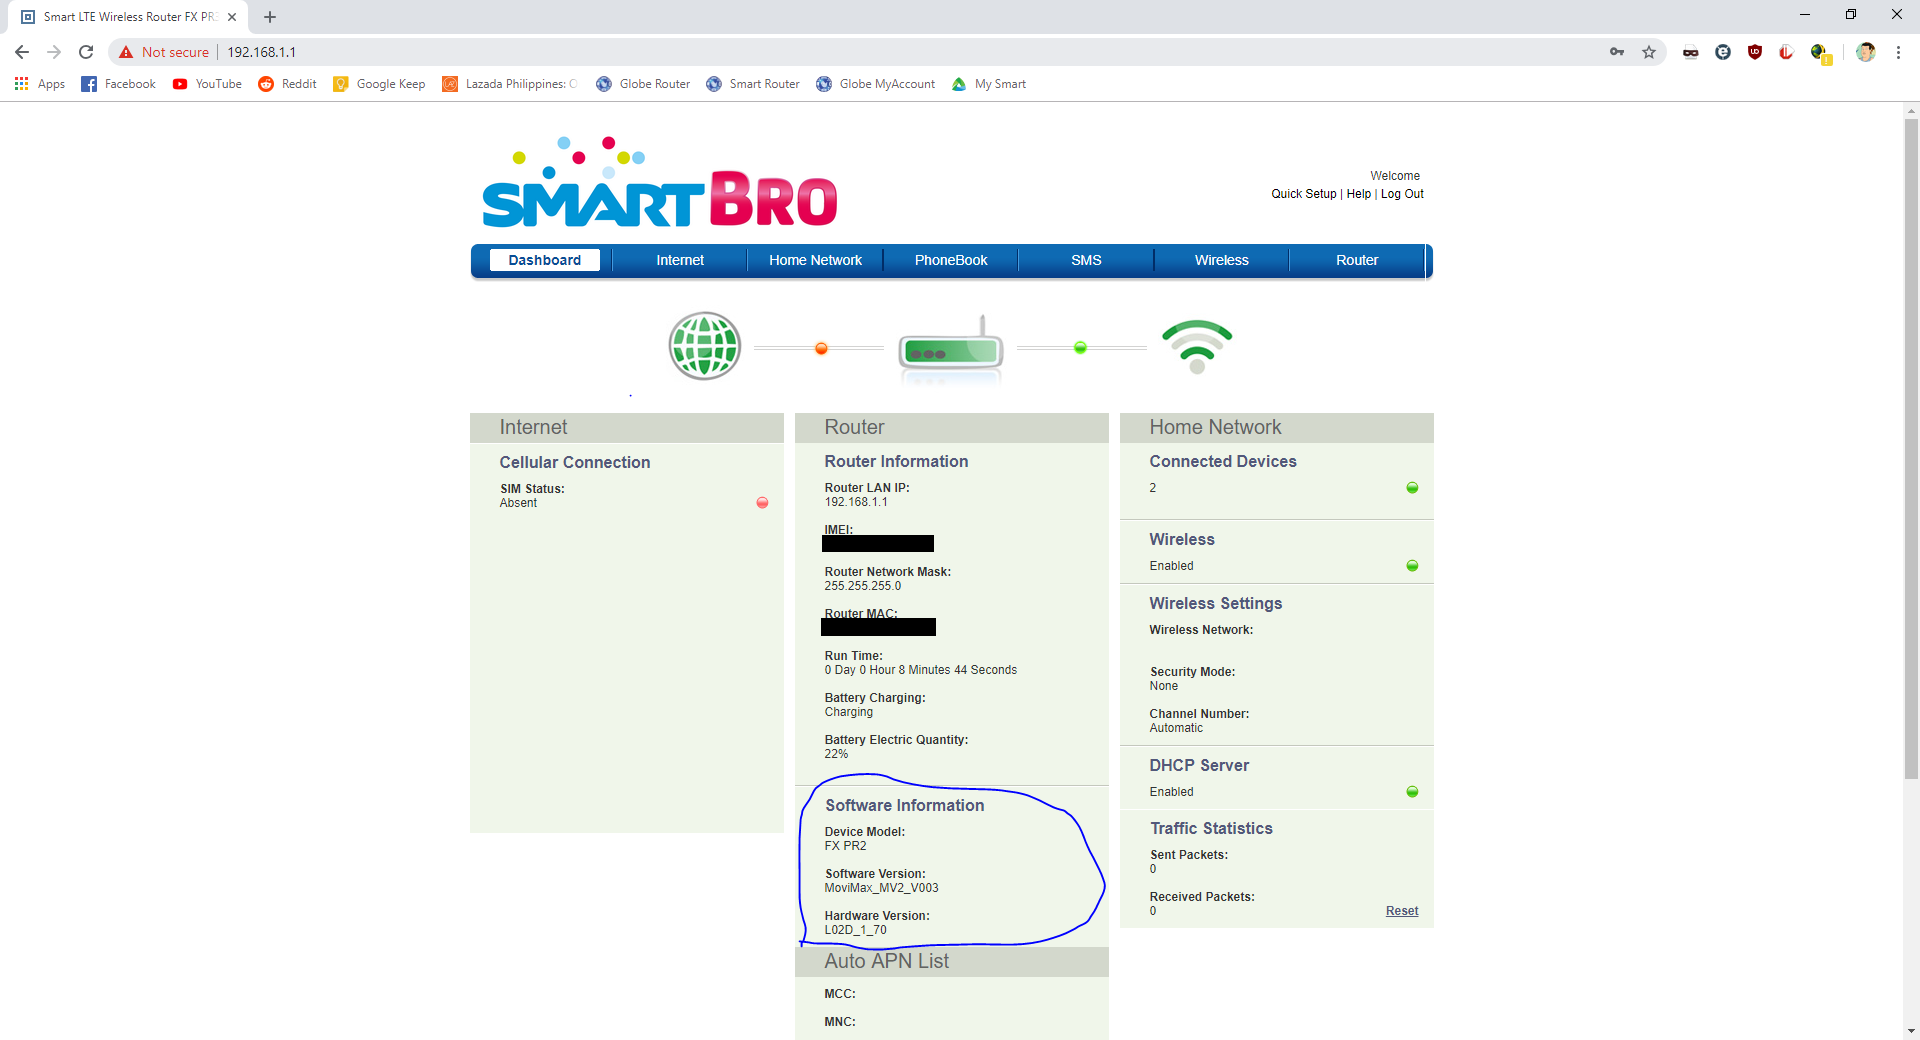
Click on “Software Information”.
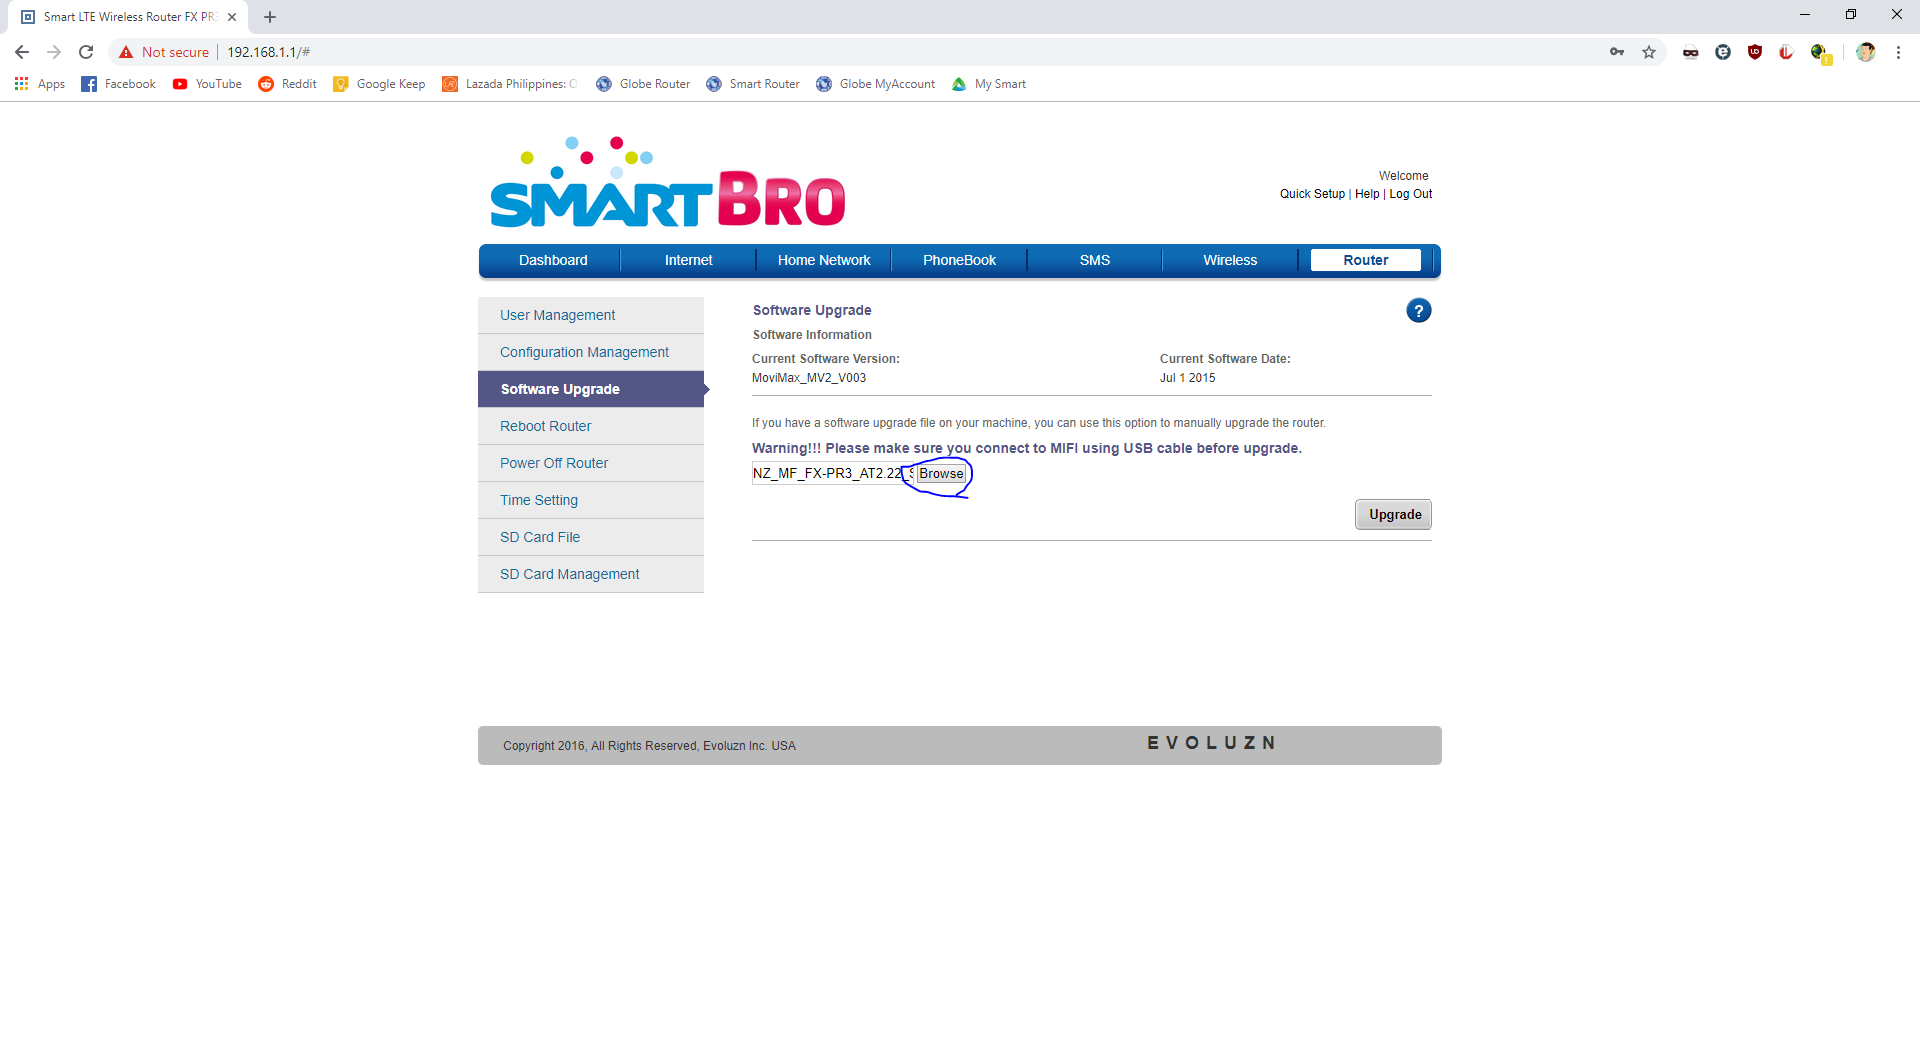
Click “Browse”.
Navigate to “Step 5” folder, and select “NZ_MF_FX-PR3_AT2.22_SB_V09.bin” file.
Click “Upgrade”.
It will now flash the FX-PR3L V9.0 firmware, and Pocket WiFi will reboot once done.
Entering the unlock code
Remove cover, remove the battery, insert a SIM (any SIM but none from Smart, Sun, and TNT).\
Insert SIM and battery. Put cover. Turn the Pocket WiFi on.
It should say “PH-NET PIN”.
Connect to Pocket WiFi via WiFi. The password is “smartbro”.
Open the browser, and go to 192.168.1.1.
Type in “smartbro” for both user and password.
Click “Skip”.
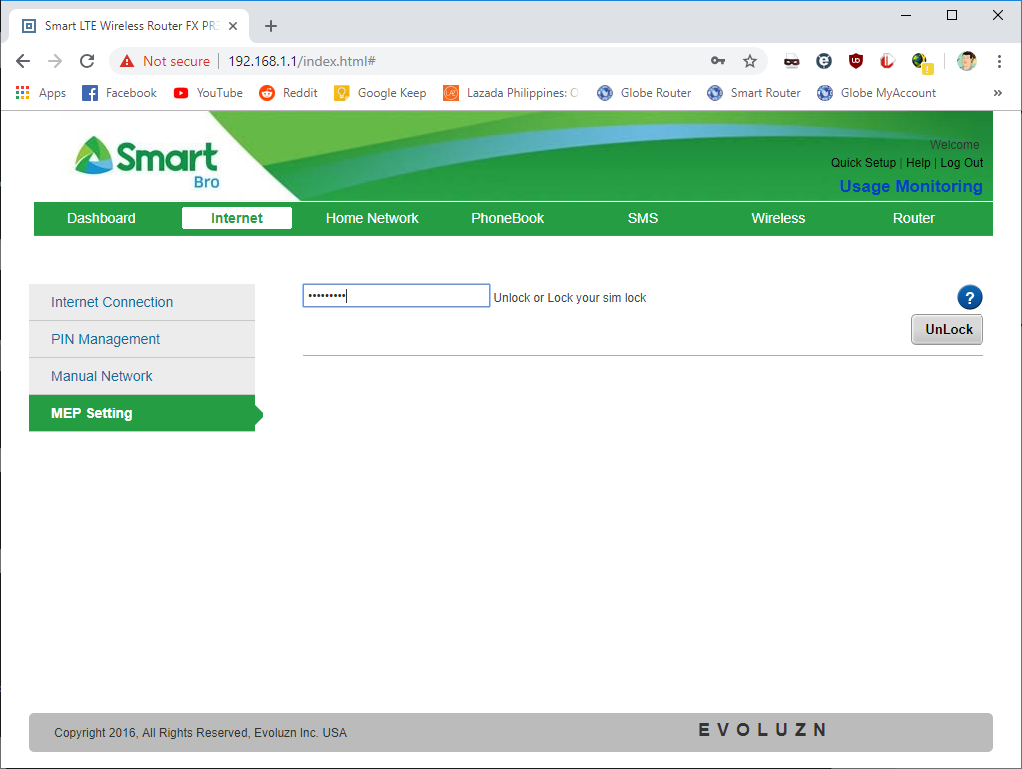
Under “Cellular Connection”, click on “required”.
Type in “@2N@t1Tr3”.
Click on “UnLock” once. UnLock should now turn into “Lock”.
The Pocket WiFi should now reboot.
Congratulations! Your PocketWiFI is now unlocked!
You can now change and customize its network name (SSID) and password. If you want to update the firmware, download the “Smart Bro Pocket WiFi” app. It should automatically download the latest firmware when signed into the app. Updating the software doesn’t change the unlocked status of your device. We uploaded the latest firmware, firmware V14, and the unlock still persists.
Any questions? Feel free to fire away on the comments section below!
All products, and company names, logos, and service marks (collectively the "Trademarks") displayed are registered® and/or unregistered
trademarks™ of their respective owners.
The authors of this web site are not sponsored by or affiliated with any of the third-party trade mark or third-party registered trade mark owners,
and make no representations about them, their owners, their products or services.
Today we released a new update of our unique UnlockBase Cell Phone Unlock Software that added a massive list of new supported model of Samsung as well as a totally new Brand supported: now you can Direct Unlock using Original USB Cable most of the latest LG Cell Phone. Finally we fixed a minor bug by removing the UnlockBase logo Icon of the Unbraded Software, so now it’s 100% Brand Free for all our reseller.
List of LG Cell Phone supported for Direct Unlock:
LG AKA 4G LTE F520K, AKA 4G LTE F520L, AKA 4G LTE F520S,
LG AKA 4G LTE H788, AKA 4G LTE H788N, AKA 4G LTE H788SG,
LG AKA 4G LTE H788TR, AKA 4G TD-LTE H778, AKA 4G TD-LTE H779,
LG Escape 2 H443, Escape 2 H445, Escape P870, Escape P870H,
LG Escape P870P, F60 D390, F60 D390AR, F60 D390N, F60 D390NS,
LG F60 MetroPCS MS395, F70 D315, F70 D315H, F70 D315I,
LG F70 D315K, F70 D315S, G Flex 2 H955, G Flex 2 H955A,
LG G Flex 2 H955AR, G Flex 2 H955HK, G Flex 2 H955P,
LG G Flex 2 H955TR, G Flex 2 H959, G Flex D950, G Flex D950G,
LG G Flex D950P, G Flex D950W, G Flex D951, G Flex D955,
LG G Flex D956, G Flex D957, G Flex D958, G Flex D959,
LG G Flex D959BK, G Flex D959TS, G Pad 2 V497, G Pad 7.0 LTE V410,
LG G Pad 8.0 4G LTE V490, G Pad F 8.0 V495, G Pad F 8.0 V496,
LG G Pro 2 D837, G Pro 2 D838, G Pro 2 LTE-A D830, G Pro 2 LTE-A F350K,
LG G Pro 2 LTE-A F350L, G Pro 2 LTE-A F350S, G Stylo H634, G Stylo H636,
LG G Vista D631, G2 3G D806, G2 4G LTE D805, G2 D800, G2 D800P, G2 D800T,
LG G2 D801, G2 D801BK, G2 D801HW, G2 D801Z, G2 D802, G2 D802T, G2 D802TA,
LG G2 D802TR, G2 D803, G2 L-01F L01F, G2 Lite Dual D295, G2 LTE-A F320K,
LG G2 LTE-A F320L, G2 LTE-A F320S, G2 Mini 3G D610, G2 Mini 3G D610AR,
LG G2 Mini D620FR, G2 Mini D620K, G2 Mini D620R, G2 Mini Dual D618,
LG G2 Mini LTE Dual D620, G3 Beat D722AR, G3 Beat D722P, G3 Beat D722PA,
LG G3 Beat D723, G3 Beat D723TR, G3 Beat Dual TD-LTE D728, G3 Beat Dual TD-LTE D729,
LG G3 Beat LTE D722J, G3 Beat LTE-A F470K, G3 Beat LTE-A F470L, G3 Beat LTE-A F470S,
LG G3 Beat TD-LTE D722K, G3 Cat.6 F460L, G3 D850, G3 D850PR, G3 D851, G3 D851TN,
LG G3 D851WH, G3 D852, G3 D852G, G3 D855, G3 D855AR, G3 D855K, G3 D855P, G3 D855TR,
LG G3 D855V, G3 Dual D858, G3 Dual LTE D856, G3 Dual LTE D857, G3 Dual LTE D858HK,
LG G3 Dual TD-LTE D859, G3 F460K, G3 F460S, G3 S D722, G3 S D722V, G3 S D724,
LG G3 S D725PR, G3 Vigor 4G LTE D727, G3 Vigor D725, G4 Beat Dual H736,
LG G4 Beat Dual H736P, G4 Beat LTE H735L, G4 Beat LTE H735T, G4 Beat LTE H735TR,
LG G4 Dual H818, G4 Dual H818N, G4 Dual H818P, G4 Dual H818PA, G4 H812, G4 H815,
LG G4 H815AR, G4 H815K, G4 H815L, G4 H815LA, G4 H815P, G4 H815T, G4 H815TR,
LG G4 LTE-A H810, G4 Stylus Dual H630D, G4 Stylus H630, G4 Stylus H630I,
LG G4 Stylus LTE H635, G4 Stylus LTE H635A, G4 Stylus LTE H635AR, G4 Stylus LTE H635C,
LG G4 Stylus LTE H635CX, G4 TD-LTE H819, G4s Dual H734, G4s H735, G4s H735AR,
LG G4s H735MT, G4s H735P, Gx2 F430K, Gx2 F430L, Gx2 F430S, Joy H220, Joy H221,
LG Joy H221F, Joy H221G, Joy H222, Joy H222F, Joy H222G, Joy H222TTV, Joy H222TV,
LG Kite H221AR, L Fino D290, L Fino D290AR, L Fino D290G, L Fino D290J, L Fino D290N,
LG L Fino D290TR, L Fino D295F, L35 D150, L35 Dual D157, L35 Dual D157F, L40 D160,
LG L40 D160F, L40 D160G, L40 D160GO, L40 D160J, L40 D160TR, L40 D165, L40 D165AR,
LG L40 D165F, L40 D165G, L40 Dual D170, L40 Dual D175F, L70 D320, L70 D320AG,
LG L70 D320AR, L70 D320F, L70 D320F8, L70 D320G8, L70 D320J8, L70 D320N, L70 D320TR,
LG L70 D325F, L70 D325F8, L70 D325G8, L70 D329, L70 Dual D325, L70 MS323, L80 D370,
LG L80 D370TR, L80 D373, L80 D373EU, L80 D375AR, L80 Dual D375, L80 Dual D380,
LG L80 Dual D385, L90 D400, L90 D400H, L90 D400HN, L90 D400N, L90 D400TR, L90 D405,
LG L90 D405H, L90 D405N, L90 D405TR, L90 D410H, L90 D410HN, L90 D410N, L90 D415,
LG L90 D415BK, L90 D415RD, L90 DUAL D410, Leon 4G LTE H340, Leon 4G LTE H340AR,
LG Leon 4G LTE H340G, Leon 4G LTE H340H, Leon H342, Leon H342F, Leon H342FT,
LG Leon H342I, Leon LTE H340F, Leon LTE H340N, Leon LTE H340Y, Optimus L65 D280,
LG My Touch E739KWDU, Nexus 4 E960, Nexus 5 LTE D821, Nexus 5 NA TD-LTE D820,
LG Optimus F3 4G LTE MS659, Optimus F3 4G LTE P655H, Optimus F3 P655K, Optimus F3 P659,
LG Optimus F3 P659BK, Optimus F3 P659BKGO, Optimus F5 P875, Optimus F5 P875H,
LG Optimus F6 D500, Optimus F6 D500BK, Optimus F6 D500BKGO1, Optimus F6 D505,
LG Optimus F6 MS500, Optimus G 4G LTE E970, Optimus G 4G LTE E976, Optimus G 4G LTE E977,
LG Optimus G E970P, Optimus G E971, Optimus G E973, Optimus G E975, Optimus G E975G,
LG Optimus G E975K, Optimus G E975R, Optimus G E975T, Optimus G E975W, Optimus G E980P,
LG Optimus G E981H, Optimus G E987, Optimus G F180K, Optimus G F180L, Optimus G F180S,
LG Optimus G Pro 5.5 4G LTE E980, Optimus G Pro 5.5 4G LTE E980H, Optimus G Pro 5.5 4G LTE E988,
LG Optimus G Pro 5.5 E985, Optimus G Pro 5.5 E985T, Optimus G Pro 5.5 E989, Optimus G Pro E986,
LG Optimus G Pro F240K, Optimus G Pro F240L, Optimus G Pro F240S, Optimus L65 D280AR,
LG Optimus L65 D280F, Optimus L65 D280G, Optimus L65 D280N, Optimus L65 D280NR, Optimus L65 D280TR,
LG Optimus L65 D285F, Optimus L65 D285G, Optimus L65 Dual D285, Optimus L70 D321, Optimus L9 D605,
LG Optimus LTE II F160K, Optimus LTE II F160L, Optimus LTE II F160LV, Optimus LTE II F160S,
LG Optimus Vu 2 F200K, Optimus Vu 2 F200L, Optimus Vu 2 F200LS, Optimus Vu 2 F200S, Optimus VU F100L,
LG Optimus VU F100S, Risio LTE H343, Spirit 4G LTE H440, Spirit 4G LTE H440AR, Spirit 4G LTE H440N,
LG Spirit 4G LTE H440V, Spirit 4G LTE H440Y, Spirit LTE Dual H442, Volt 4G Dual H442F
For more details concerning “UnlockBase Exclusive Software” please check:
You can order a license to unlock one cell phone here: https://www.unlockbase.com/cable-unlock/
Or for our Professional Customers directly from the “Cable Unlock” section of your UnlockBase Wholesale account
All products, and company names, logos, and service marks (collectively the "Trademarks") displayed are registered® and/or unregistered
trademarks™ of their respective owners.
The authors of this web site are not sponsored by or affiliated with any of the third-party trade mark or third-party registered trade mark owners,
and make no representations about them, their owners, their products or services.
After our previous exciting update to Unlock Samsung from Sprint USA, we are pleased to inform you about the release of version v1.2.0.4 of the “UnlockBase Cable Unlock Software” adding Fast Direct Unlock (Without Root, Knox Safe) for Exynos Shannon chipset Models (see list below). We have also finally released the “Unbranded” version of our exclusive software for all our resellers. Starting today, all the generated licenses will work on the branded and unbranded versions of our software.
You can order a license to unlock one cell phone here: https://www.unlockbase.com/cable-unlock/
Or for our Professional Customers directly from the “Cable Unlock” section of your UnlockBase Wholesale account.
All products, and company names, logos, and service marks (collectively the "Trademarks") displayed are registered® and/or unregistered
trademarks™ of their respective owners.
The authors of this web site are not sponsored by or affiliated with any of the third-party trade mark or third-party registered trade mark owners,
and make no representations about them, their owners, their products or services.
Today we released the version V1.0.2.3 of the “UnlockBase Cable Unlock Software” adding Direct Unlock support by Cable for Samsung Cell Phone from Sprint USA. These used to be “Hard to Unlock” but only until today! Now you can unlock Samsung from Sprint with our exclusive software using the original USB Cable of your Samsung and a computer running under Window. Cherry on top: NO ROOTING involved in the process! The exact list of supported models from Sprint are showed below:
Samsung Galaxy S4 [SPH-L720],
Samsung Galaxy S5 (Sprint) [SM-G900P],
Samsung Galaxy S6 (Sprint) [SM-G920P],
Samsung Galaxy S6 Edge (Sprint) [SM-G925P],
Samsung Galaxy S6 Edge+ (Sprint) [SM-G928P],
Samsung Galaxy S7 (Sprint) [SM-G930P], HOT
Samsung Galaxy S7 Edge (Sprint) [SM-G935P], HOT
Samsung Galaxy Note 3 (Sprint) [SM-N900P],
Samsung Galaxy Note 4 (Sprint) [SM-N910P],
Samsung Galaxy Note Edge (Sprint) [SM-N915P],
Samsung Galaxy Core Prime (Sprint) [SM-G360P], HOT
Samsung Galaxy Tab 3 [SM-T217S].
For more details about “UnlockBase Exclusive Software” please check:
You can order a license to unlock one cell phone here: https://www.unlockbase.com/cable-unlock/
Or from the section “Cable Unlock” of your UnlockBase Wholesale account…
All products, and company names, logos, and service marks (collectively the "Trademarks") displayed are registered® and/or unregistered
trademarks™ of their respective owners.
The authors of this web site are not sponsored by or affiliated with any of the third-party trade mark or third-party registered trade mark owners,
and make no representations about them, their owners, their products or services.
Today we released an extremely HOT and important update for UnlockBase Cable Unlock Software after adding Direct Unlock support by Cable (using Original USB Cable) for all Samsung Galaxy S6 Edge+ and Samsung Galaxy Note 5. This includes the version locked with “Device Unlock App” from T-Mobile USA (World First). The exact list of supported versions are below:
You can order your license from here: https://www.unlockbase.com/cable-unlock/ or from the section “Cable Unlock” of your UnlockBase Wholesale account. And below you will find Video Proof and Guidelines for these two models:
All products, and company names, logos, and service marks (collectively the "Trademarks") displayed are registered® and/or unregistered
trademarks™ of their respective owners.
The authors of this web site are not sponsored by or affiliated with any of the third-party trade mark or third-party registered trade mark owners,
and make no representations about them, their owners, their products or services.
When you insert a SIM card from a different cellphone operator than the original, your Samsung phone asks for an unlock code and prompts you to enter the “Network blocking control key” or “SIM Network Unlock PIN“. So at this point you decide to go online and receive a cellphone unlock code.
If upon entering your unlock code you receive a message such as:
– “Failed to unlock network”,
– or “Failed to request“,
– or “Your attempt failed“,
– or “Unlock Code Request Unsuccessful“
There are three possible scenarios:
Scenario #1 (in 90% of cases):
You (or the previous owner) entered too many wrong codes, it’s what we call in our industry “Phone Freeze”. (if so, see the solutions below).
Scenario #2 (In 9% of cases):
Non-original ROM. You (or the previous owner) may have installed or flashed your Samsung with a Custom ROM that is not genuine (like Avatar, or Cyanogen MOD to name two), therefore the code provided will not work (if so, see the solutions below).
Scenario #3 (In 1% of cases):
The code is actually wrong. Yes, we do not claim to be perfect, sometimes the computerized processing of orders produces the wrong code or, very rarely, even Samsung or the cellphone operator has supplied a false code base.
Scenario #4 (New since Summer 2015):
Well the last scenario is even worse than the previous one. Since summer 2015 two networks (MetroPCS and T-Mobile in USA) started to release Samsung cell phone coming with an app install by default called “Device Unlock App”. Those are simply not asking for code, and even if you use some secret code to make those ask for a code, they will simply not work. Do not order code if your phone is one of those since the code you will receive will be simply useless.
How to use the code if your Samsung Cell Phone is “FREEZE”
The message “Network unlock failure” or “Phone Freeze” means that someone has already tried to unlock the phone with a bad code, and the number of attempts has exceeded the allocated number of times permitted, (it’s usually a maximum of 3 trials tries for a wrong code). In this case it is very likely that if you bought a used phone, the previous owner attempted to unlock it out with a bad code by visiting an untrustworthy free unlock website.
At UnlockBase, our codes are 100% correct since they come directly from the Samsung factory.
If you choose a manufacturer code, you receive two codes:
Code 1 => NETWORK unlock code or code (called NCK Code).
Code 2 => UNFREEZE (or Defreeze) Key to unlock the test counter (called MCK Key).
The purpose is to “unfreeze” the phone with the code and thereby unlock the phone from the NETWORK.
Methods for removing Samsung Freeze with MCK code
Depending on your model, several methods exist to unfreeze with the MCK code your Samsung:
Unfreeze Solution #1:
Turn off your phone, take out the SIM card and then replace it with a non-compatible SIM card
(if the phone application demands it, type the PIN number of the SIM card).
When the message “Phone Freeze” appears, call for the unfreeze code and confirm with the button “call” or “#” or “OK” (Note: be careful when entering this code, nothing will appear on your mobile screen, this is normal, you must enter this code blind.)
Unfreeze Solution #2:
Again, insert a non-compatible SIM card into your phone (if the phone application demands it type the PIN number of the SIM card). When the message “Phone Freeze” appears, enter the code: #7465625*638*UNFREEZECODE# (and replace UNFREEZECODE by the MCK Code we provide.)
Unfreeze Solution #3:
Insert a non-compatible SIM card into your phone,
(If the phone application demands it, type the PIN number of the SIM card)
Enter the unlock code 1 (NCK / Network): then press OK. Answer the phone “unlocking the failed network”,
Next enter the second code (MCK/Unfreeze), then press OK. Answer the phone “unlocking the failed network”,
Re-enter the unlock code and the phone will be unlocked,
Turn off and restart your Samsung mobile phone.
Unfreeze Solution #4:
Insert a non-compatible SIM card into your phone,
(If the phone application demands it, type the PIN number of the SIM card)
Emergency call only: Press CALL button and enter the unfreeze (MCK Code) directly,
The phone will ask you the code for the network, enter the NETWORK code that was supplied.
Unfreeze Solution #5:
Insert a non-compatible SIM card into your phone, and turn on the phone,
(If the phone application demands it, type the PIN number of the SIM card)
The phone is blocked, Click Call and enter the following code *7465625*638*CODE#
(where CODE is the unlock code of the operator)
The phone does not accept the code and returns the error:
‘Phone Freeze. SIM not available. Please contact your operator‘
Turn off your phone and remove the phone battery
Replace the battery and turn the phone back on
The phone is now unlocked and everything works
Note that there is no trial “tries” limit to enter the unfreeze code, so do not hesitate to keep trying to enter the correct code and then get the ‘unfreeze’ sign with the display inviting you to enter the NETWORK code.
To received the UNFREEZE CODE, make sure you order “FACTORY CODE”
If you choose the operator solution, which is the cheapest solution, you will receive only the unlock code (NCK Code). For the network code + unfreeze code, choose the option ‘factory code’. It’s usually more expensive but it’s also much more reliable and faster.
The Ultimate Solution: Unlocking software + USB cable
As stated earlier, if you flashed your Samsung with a non-original ROM, it is almost certain that the code will not be accepted. In this case you will need to find the original firmware and use Odin to re-flash the firmware with an original Android version, and if possible one that corresponds to the distribution of the original operator. If in spite of all this, your phone does not accept the unlock code, we can provide you with software to unlock your Samsung, provided that the model is compatible (90% of the models to date are supported).
All UnlockBase customers are offered this method after having tried everything else and still fail to enter the provided code. This requires a Windows PC, USB cable and some studying of our tutorial but at UnlockBase we never give up so easily!
All products, and company names, logos, and service marks (collectively the "Trademarks") displayed are registered® and/or unregistered
trademarks™ of their respective owners.
The authors of this web site are not sponsored by or affiliated with any of the third-party trade mark or third-party registered trade mark owners,
and make no representations about them, their owners, their products or services.