
2019
How to Unlock Samsung Galaxy J2 Prime (SM-G532G) Using Z3X Box
Cable Unlock, Samsung
Do you want to unlock your phone using the Z3X Box but don’t know where to start? Well, here’s a complete guide that will help you do all the things you need to do to unlock your phone using this method successfully!
WARNING: WE WILL BE ROOTING THE PHONE AND THIS VOIDS THE WARRANTY IF YOU STILL HAVE ONE. THIS ALSO DISABLES KNOX AND ITS FEATURES. YOU WON’T BE ABLE TO USE THEM ANYMORE (LIKE SECURE FOLDER) EVEN IF THE FIRMWARE HAS BEEN RESTORED.
TLDR; below is a YouTube video that supplements this guide but all the downloadable materials are in this written guide.
Note: This guide already assumes that you have already installed Z3X Shell, activated the box, and have installed Samsung Tool Pro.
If you don’t already have a Z3X box and you want to unlock your phone, UnlockBase has a white glove unlock program where one of our technicians unlocks your phone remotely over the internet (for a fee). Through this guide you will; (1) know what files needed to be downloaded, (2) know how to root your Samsung phone safely, and (3) unlock your phone through the Samsung Tool Pro software for the Z3X.
Without further ado, let’s get started!
Files that to be downloaded:
Samsung Android USB Driver – This will allow the phone to communicate with the computer.
TWRP 3.2.3-1 – This will allow us to flash Magisk so we can root the phone.
Magisk Manager – This software that does the actual rooting.
Preparation
- Turn off the phone. Remove all SIM cards. Leave the microSD inside. If no microSD, insert one. (We’ll need that later).
- Turn the phone back on.
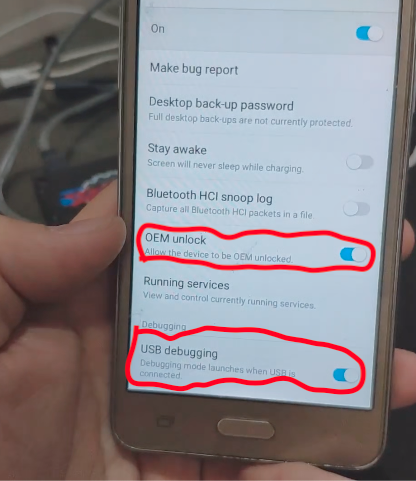
- Activate both USB Debugging and OEM Unlock
- Go to Settings.

- Go to “About Phone”
- Tap “Software Info”
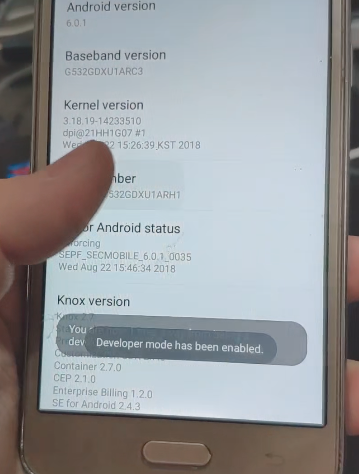
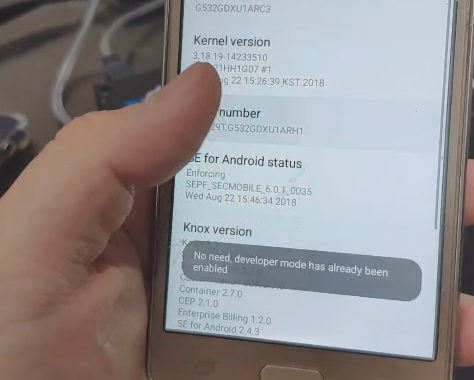
- Tape Build Number 7 times, until it says “Developer mode has been enabled”, or “Developer mode has been enabled.”


- Go back twice.
- Go to “Developer Options”.

- Enable both “OEM Unlock” and “USB Debugging”.

- Go to Settings.
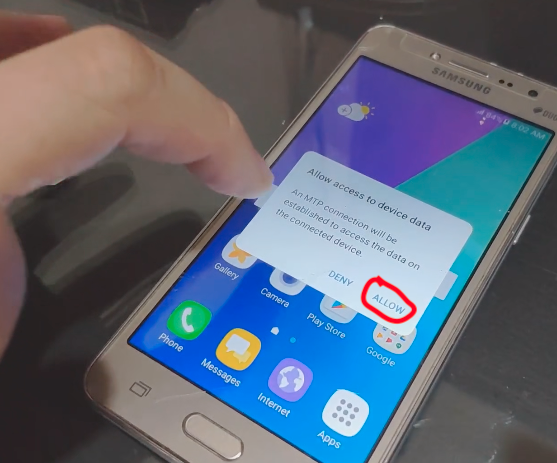
- When prompted “Allow access to device data.” Tap “Allow”.
- Copy “Magisk-vXXX.zip (XXX means version number of Magisk), to the phone’s SD card.


- If connected, disconnect the phone from the computer.


Loading TWRP recovery.
- Turn the phone off. Then press volume down (-), home, and power.

- If you see “Warning”, press Volume up.

- If you see the Samsung logo. Pull the battery out, put it back in, and keep trying until you get to the “Warning” screen.
- Connect the phone to the computer.
- Connect the Z3X Box to the computer.
- Launch SamungToolPro
- Go to “Flash” tab, on the top.

- Click on “PDA” on the left side.

- Navigate where you downloaded TWRP (twrp_3.2.3-1_sm-g532.tar).

- Click “Flash”.

- As soon as the phone reboots, IMMEDIATELY pull the battery out. Then disconnect the cable.
- Put the battery back on, and then press Volume Up (+), Home and Power.

- If you see a red text on the top saying “RECOVERY IS NOT SEADROID ENFORCING”, you just wait.

- Once booted into TWRP, swipe “Swipe to Allow Modifications.”


Rooting the phone.
- On TWRP, tap “Install”.

- Tap “Select Storage”.

- Tap “Micro SD card”.

- Tap “OK”
- Select “Magisk-vXXX.zip” (XXX means the version number of Magisk).

- Swipe “swipe to confirm Flash” to start flashing Magisk.

- Wait for it to flash. Ignore the red errors).

- Once done, tap “Reboot System”.

- When prompted (and didn’t automatically reboot), tap “Do Not Install”.
- If you see the yellow text “Set Warranty Bit: kernel(0)”. You did everything correctly, so far.

- Plug the phone into the computer.
- When prompted “Allow access to device data.” Tap “Allow”.

- Go where you downloaded Magisk (Magisk-vXXX.zip) (XXX means the version of Magisk), and open it.

- Extract “Magisk.apk” under the “common” directory, anywhere (just remember where you extracted it).
- Copy the extracted “Magisk.apk” to your phone’s SD card.
- Navigate to and install the “magisk.apk” on your phone.


- Once done, click “Open”.
- If both “Magisk”, and “Magisk Manager” has a green check. We are now ready to proceed to the next step.


Unlocking the phone.
- Go back to SamsungToolPro
- Click on “Model” tab on the top. Type in “G532G” “G532M” or “G532F”, without the quotation marks. Select your model from the list, and then click “Select” on the bottom.


- Click the “Unlock” tab on the top.

- Click on “Read Phone Info” on the right.

- On the right side of “ADB”, click the arrow and select the only option there. (That’s your phone.)


- Unlock your phone’s screen.

- Click “Unlock”.
- When prompted to allow USB debugging, check “Always allow from this computer”, and then tap “OK”.

- Wait for the phone to ask for Superuser permission or access. Tap “Grant” or “OK”
- Once done, the phone should reboot. Your phone is now SIM unlocked at this point.
- Once booted. Turn it off.
- Put your SIM card. And turn the phone back on.
- Use the phone normally.


Now your phone is unlocked! You should be able to use a different carrier’s service without any problems. If you have any questions, let’s talk about them in the comments section!
All products, and company names, logos, and service marks (collectively the "Trademarks") displayed are registered® and/or unregistered trademarks™ of their respective owners. The authors of this web site are not sponsored by or affiliated with any of the third-party trade mark or third-party registered trade mark owners, and make no representations about them, their owners, their products or services.
Comments are closed.