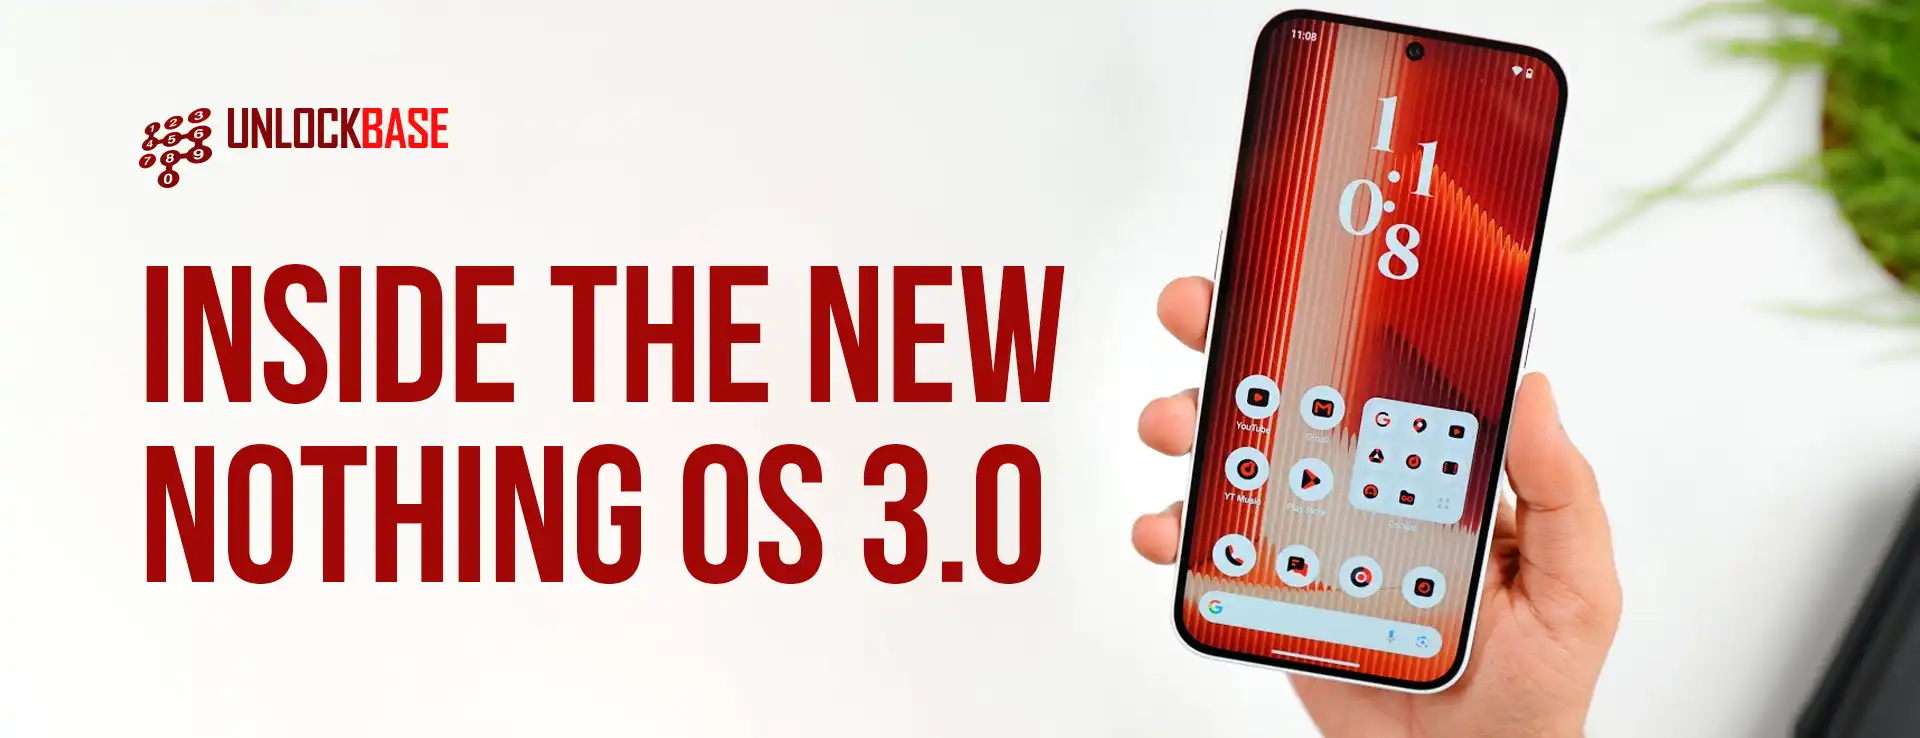
Nothing has built a reputation among Android fans for its distinct design choices, often standing out from the typical Android ecosystem. With the launch of the Nothing OS 3.0 beta, this trend continues. While some aspects, like the unique Glyph Interface, are intriguing, others, like the unconventional ringtones, might be off-putting. However, it’s clear that Nothing is evolving, and with Android 15, it’s starting to capture Carl Pei’s vision since he left OnePlus.
Nothing OS 3.0 Dot-Centric Design: Staying True to Roots
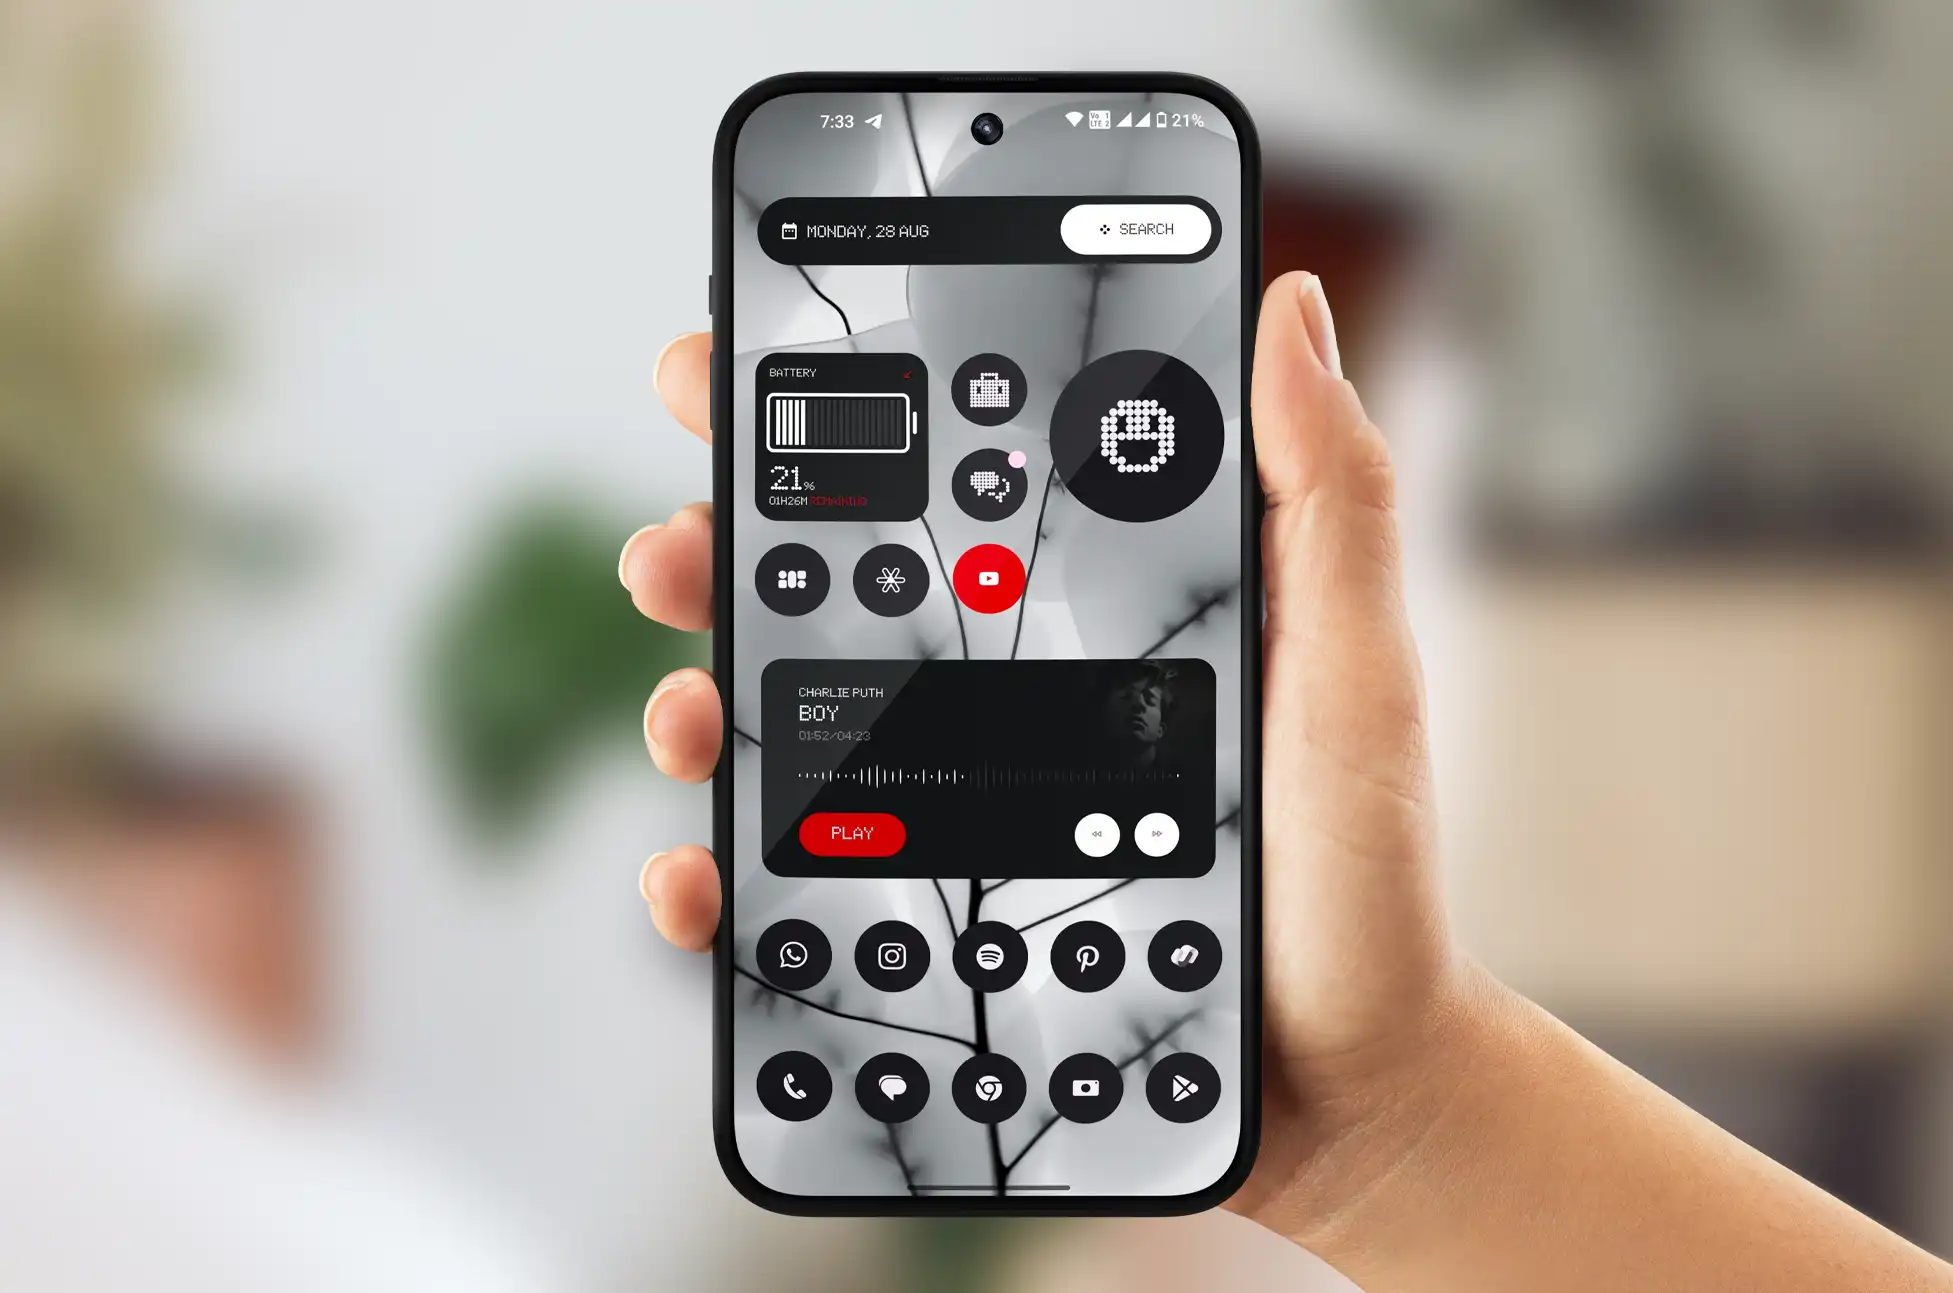
One of the most iconic features of Nothing’s design is its dot-based aesthetic. Fans expressed concerns about losing this style, but they can rest assured that dots are here to stay. While Nothing OS 3.0 may not rely on the classic dot font as heavily, it creatively incorporates dots elsewhere. A new unlock animation uses rippling dots from the fingerprint sensor, and an upgraded weather app introduces dots of varying sizes to depict different weather elements more naturally.
Widgets Embrace the Dot Aesthetic
Several widgets retain the dot motif, including a stick figure pedometer and a screen time widget outlined in dots. The quick camera launcher also employs this style, merging form with function. By the time Nothing OS 3.0 leaves beta at the end of 2024, it will likely strike the right balance of dot-based design elements.
Greater Customization Freedom
Customization is a focal point in the Nothing OS 3.0 beta, offering users more control over their interface. The new lock screen designs include options like a digital clock inspired by the London Underground. Widgets can be arranged to display the weather, battery life, and a compass — although, the default weather widget can feel overly simplified. Adjustments to the lock screen, quick settings, and app drawer allow users to personalize their experience, even if some changes feel reminiscent of iOS 18.
Nothing OS 3.0 Similarities with iOS 18: Pros and Cons
Nothing OS 3.0’s quick settings and Smart Drawer feel somewhat inspired by iOS 18. For instance, the brightness slider now sits at the bottom for easy access. However, the Smart Drawer’s organization isn’t perfect. It sorts apps into categories based on usage, but the organization could be improved, with apps like Gmail ending up in the social folder while Chrome lands in utilities.
A Maturing Operating System
Though it’s still in beta, Nothing OS 3.0 feels like a step closer to Carl Pei’s original vision. The design now feels more mature, maintaining the core elements like the dot-based style and widget-heavy approach while creating a cohesive look and feel. Despite some quirks, such as the app drawer layout, the overall user experience is becoming more polished and intentional.
Exciting Features on the Horizon
Nothing OS 3.0 has more in store, with AI-powered features expected to roll out as part of Android 15. Additionally, future updates will likely include the Nothing Gallery and enhanced weather app. Fans of the Nothing ecosystem will appreciate the familiar aesthetic, while newcomers will find a skin that, while unique, isn’t jarringly different from mainstream Android skins.
Nothing OS 3.0 : Conclusion
If you’re excited to try out Nothing’s new OS, the public beta is now available for Phone 2a users. Phone 2 owners will need to wait until November, while Phone 1 and Phone 2a Plus users can expect to join in December. As the final release approaches, Nothing OS 3.0 is shaping up to be a distinct and competitive option in the Android landscape.
All products, and company names, logos, and service marks (collectively the "Trademarks") displayed are registered® and/or unregistered
trademarks™ of their respective owners.
The authors of this web site are not sponsored by or affiliated with any of the third-party trade mark or third-party registered trade mark owners,
and make no representations about them, their owners, their products or services.
Mint Mobile is a leading provider of cellular networking solutions. Whether you have a Mint Mobile Wireless hotspot, modem, or IoT device, unlocking it can significantly enhance its functionality and value. This guide will walk you through the essentials of unlocking any Mint Mobile phone or device.
Why Unlock Your Mint Mobile Device?
Unlocking your Mint Mobile device offers several advantages:
Carrier Flexibility: Use your device with any compatible network worldwide.
Cost Savings: Take advantage of better data plans from different carriers.
Improved Resale Value: Unlocked devices typically fetch higher prices in the secondary market.
Travel Convenience: Use local SIM cards when traveling internationally to avoid roaming charges.
Methods for Unlocking Mint Mobile Devices
There are several ways to unlock your Mint Mobile device:
1. Carrier Unlock
Pros: Official method, often free if you meet eligibility criteria
Cons: May have strict requirements and longer processing times
Process: Contact your current carrier and request an unlock
Process: Use UNLOCKBASE’s online unlocking service for efficient and professional unlocking
3. Unlock Codes
Pros: Can be quick if you have the correct code
Cons: Finding legitimate codes can be challenging
Process: Enter the unlock code in your device’s settings
4. Firmware Modification (for advanced users)
Pros: Can provide additional features beyond unlocking
Cons: Risk of bricking the device, may void warranty
Process: Flash custom firmware to remove carrier restrictions
Step-by-Step Guide to Unlocking Your Mint Mobile
Identify Your Device:
Find the exact model number and IMEI/MEID number
Choose an Unlocking Method:
Consider factors like cost, time, and technical skill required
Gather Necessary Information:
Your device’s IMEI/MEID, current carrier, and account details
Initiate the Unlock Process:
For UNLOCKBASE: Submit your details on their website
For carrier unlock: Contact your provider
For unlock codes: Purchase or obtain a code from a reliable source
Apply the Unlock:
Follow the provided instructions carefully
Verify the Unlock:
Insert a SIM card from a different carrier and ensure connection
Tips for a Successful Unlock
Backup Your Data: Always back up important information before attempting to unlock
Follow Instructions Carefully: Incorrect steps can lead to device issues
Be Patient: Some unlocking methods may take time to process
Conclusion
Unlocking your Mint Mobile device opens up a world of possibilities. Whether you’re looking to switch carriers, save on data plans, or increase your device’s versatility, unlocking is a valuable step. By following these tips and choosing the right unlocking method for your needs, you’ll be well on your way to enjoying the full potential of your Mint Mobile.
All products, and company names, logos, and service marks (collectively the "Trademarks") displayed are registered® and/or unregistered
trademarks™ of their respective owners.
The authors of this web site are not sponsored by or affiliated with any of the third-party trade mark or third-party registered trade mark owners,
and make no representations about them, their owners, their products or services.
ASelling Tips for iPhone? Are you eyeing the shiny new iPhone 16 but still holding onto your trusty iPhone 15 or an even older model? You’re not alone! Many tech enthusiasts find themselves in this exciting yet slightly daunting position. But fear not – we’ve got you covered with some savvy tips to help you sell your current iPhone like a pro and make that upgrade a reality!
Selling Tips for iPhone : Unlock Your iPhone for a Bigger Payday
Did you know that unlocking your iPhone can significantly boost its resale value? It’s true! An unlocked iPhone gives potential buyers the freedom to use any carrier they want, making your device much more appealing in the second-hand market. Here’s why it’s a game-changer:
Wider audience: Attract buyers from different networks
Higher demand: Unlocked phones are often more sought-after
Better prices: You can typically ask for more money for an unlocked device
To unlock your iPhone, contact your current carrier or use Unlockbase Unlocking services. It’s a small step that can lead to a nice bump in your selling price!
Each option has its pros and cons, so pick the one that aligns with your preferences and selling goals.
Selling Tips for iPhone : Create an Appealing Listing
If you’re selling online, make your listing stand out:
Take clear, well-lit photos from multiple angles
Write a detailed, honest description
Highlight key features and the unlocked status
Mention any warranties or AppleCare+ if still active
A great listing can attract more potential buyers and help you sell your iPhone faster.
By following these tips, you’ll be well on your way to selling your iPhone 15 or older model successfully. Not only will you likely get a better price, but you’ll also ensure a smooth trans
All products, and company names, logos, and service marks (collectively the "Trademarks") displayed are registered® and/or unregistered
trademarks™ of their respective owners.
The authors of this web site are not sponsored by or affiliated with any of the third-party trade mark or third-party registered trade mark owners,
and make no representations about them, their owners, their products or services.
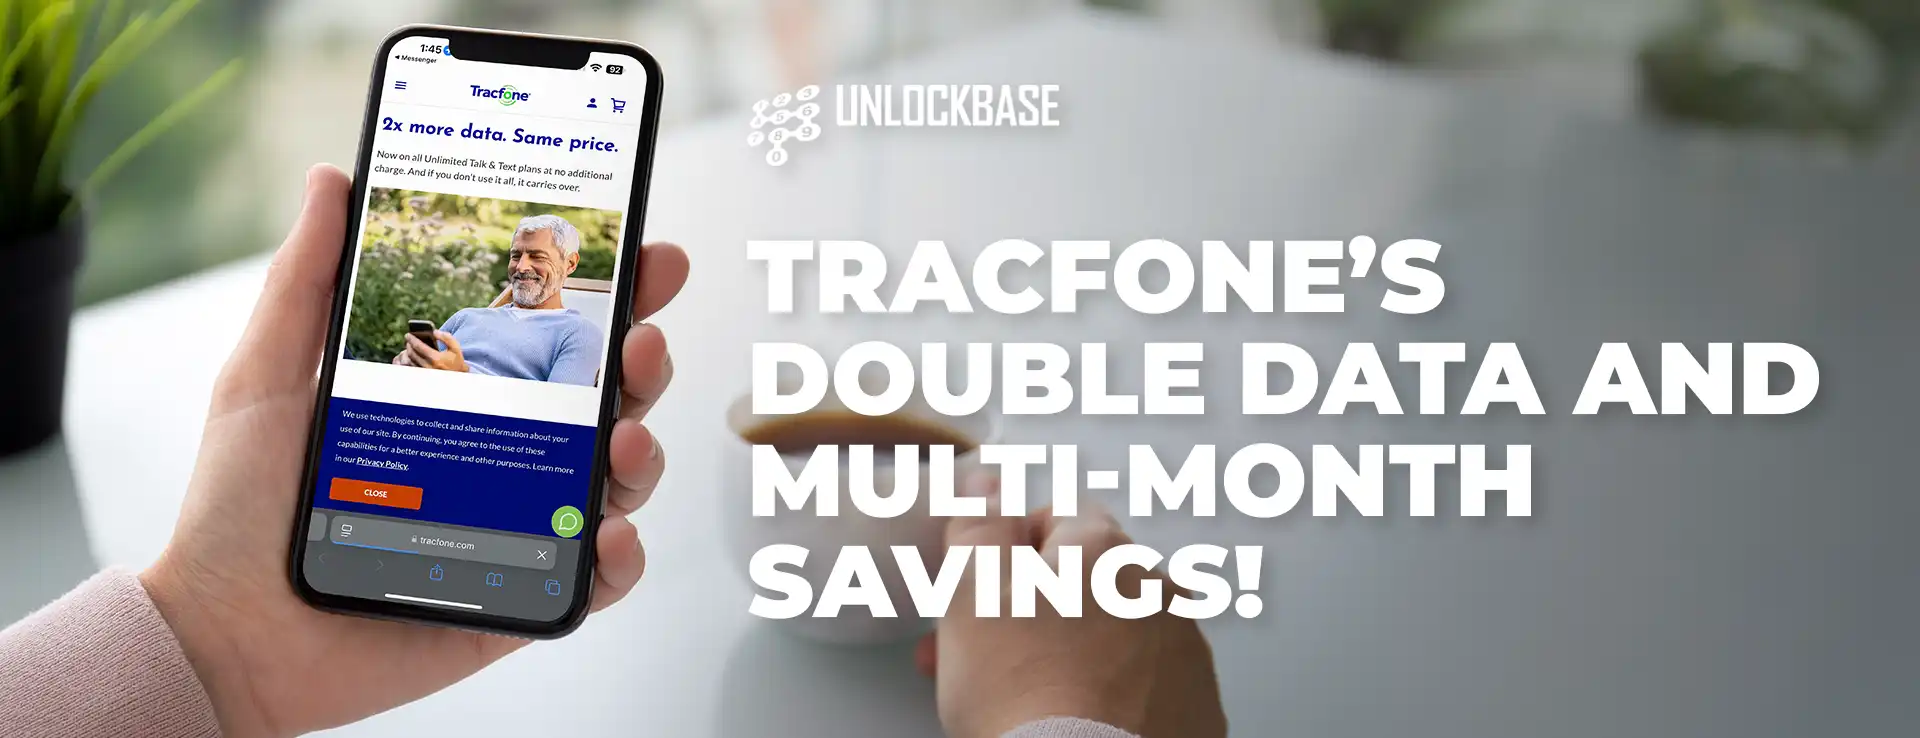
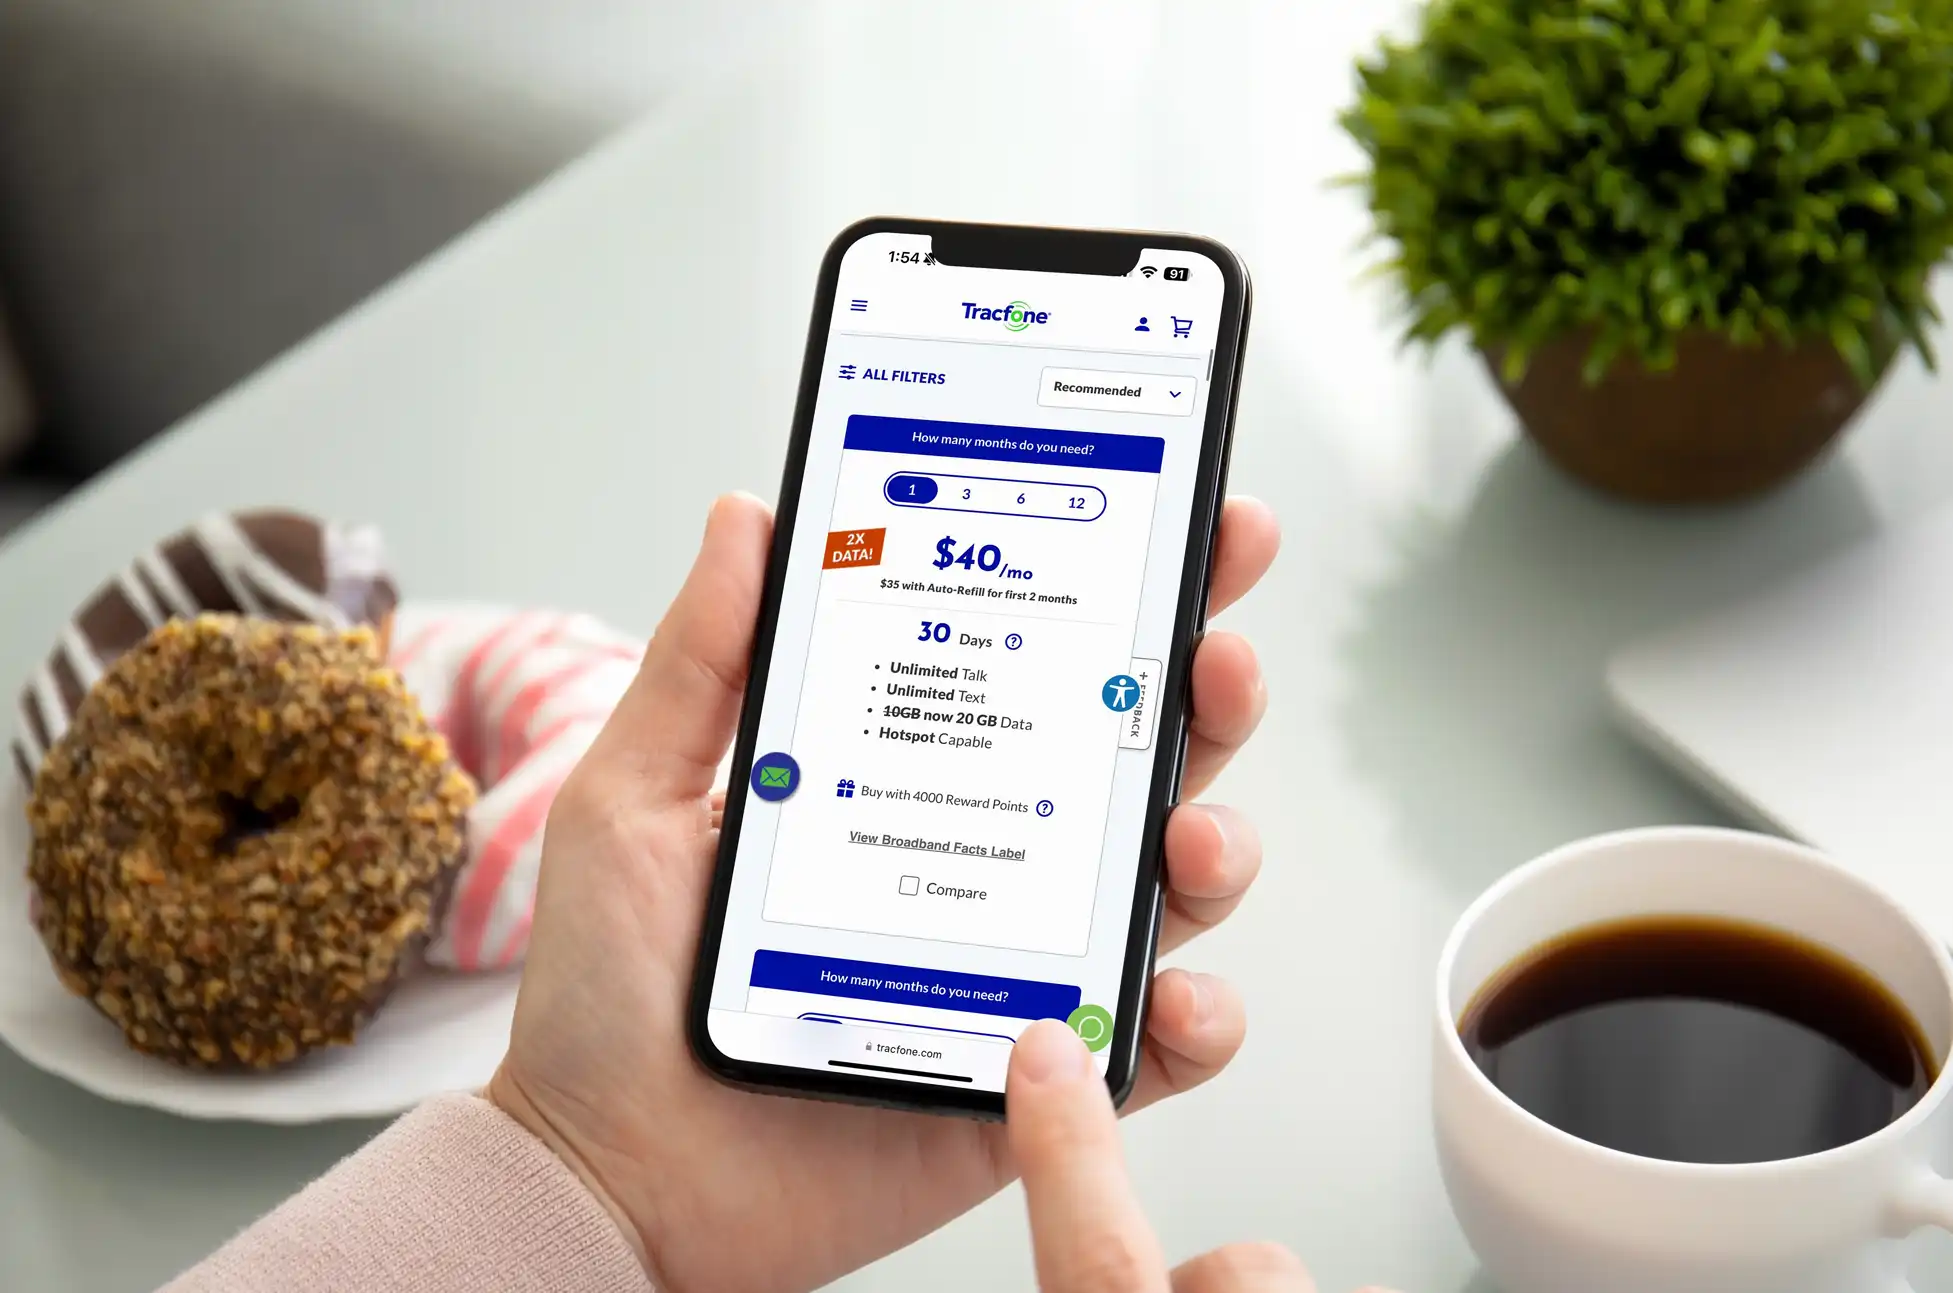
Tracfone’s Double Data? Hey tech enthusiasts and savvy phone users! Are you ready for some exciting news in the world of prepaid cell phone plans? Tracfone, a veteran in the mobile game and now part of the Verizon family, is making waves with some seriously sweet upgrades to their offerings. Let’s dive into the juicy details!
Tracfone’s Double Data : More Bang for Your Buck
Remember when Tracfone was all about basic prepaid plans? Well, those days are history! They’re stepping up their game big time, and here’s what you need to know:
Data Bonanza: Tracfone is doubling the data on their Unlimited Talk & Text (UTT) plans. Yes, you heard that right – double the data, same price!
Flex Your Payment Muscles: New multi-month options let you save even more when you commit to 3, 6, or 12 months upfront.
Hotspot Heaven: All updated plans now include hotspot capability. Netflix binge on your laptop during your commute? Yes, please!
Breaking Down the Data Doubling
Let’s talk numbers:
0GB → 1GB (Math wizards, explain this one!)
2GB → 4GB
3GB → 6GB
5GB → 10GB
10GB → 20GB
Comparing to competitors like Consumer Cellular, Tracfone’s new data allowances are looking pretty sweet. But keep in mind, they’re not the only ones upping their game – the prepaid market is heating up with players like MobileX, Total Wireless, and Ultra Mobile all making moves.
The Perks Keep Coming
Carryover Data: Didn’t use all your data this month? No worries! It rolls over, so you can save it for when you really need it.
Multi-Month Savings: The longer you commit, the more you save. For example, the 20GB plan drops from $40/month to about $32/month if you go for a full year. (Just remember, taxes are extra!)
Tracfone’s Double Data : Why This Matters to You
More Freedom: With double the data and hotspot capabilities, you’re free to stream, browse, and work on the go without constantly watching your data usage.
Better Value: Same price, way more data. It’s like getting a free upgrade!
Flexibility: Choose the payment term that works for you and your wallet.
The Verizon Connection
Don’t forget, Tracfone runs on Verizon’s network. That means you’re getting top-notch coverage and access to 5G (with a compatible phone, of course).
David Kim, Verizon Value’s Chief Revenue Officer, summed it up nicely: “We’re all about giving our customers the best price and value in the market. These changes? They’re just the start of our commitment to that mission.”
Tracfone’s Double Data : Ready to Make the Switch?
Hesitant to switch because of the locked device? Don’t worry UnlockBase Got you Covered! Just go to this link: https://www.unlockbase.com/unlock-phone/ and follow the instructions!
}With all these upgrades, Tracfone is positioning itself as a serious contender in the prepaid market. If you’re looking to save some cash without sacrificing data or quality, it might be time to give Tracfone a closer look.
So, what do you think? Is Tracfone’s new offering enough to tempt you away from your current plan? Let us know in the comments!
All products, and company names, logos, and service marks (collectively the "Trademarks") displayed are registered® and/or unregistered
trademarks™ of their respective owners.
The authors of this web site are not sponsored by or affiliated with any of the third-party trade mark or third-party registered trade mark owners,
and make no representations about them, their owners, their products or services.
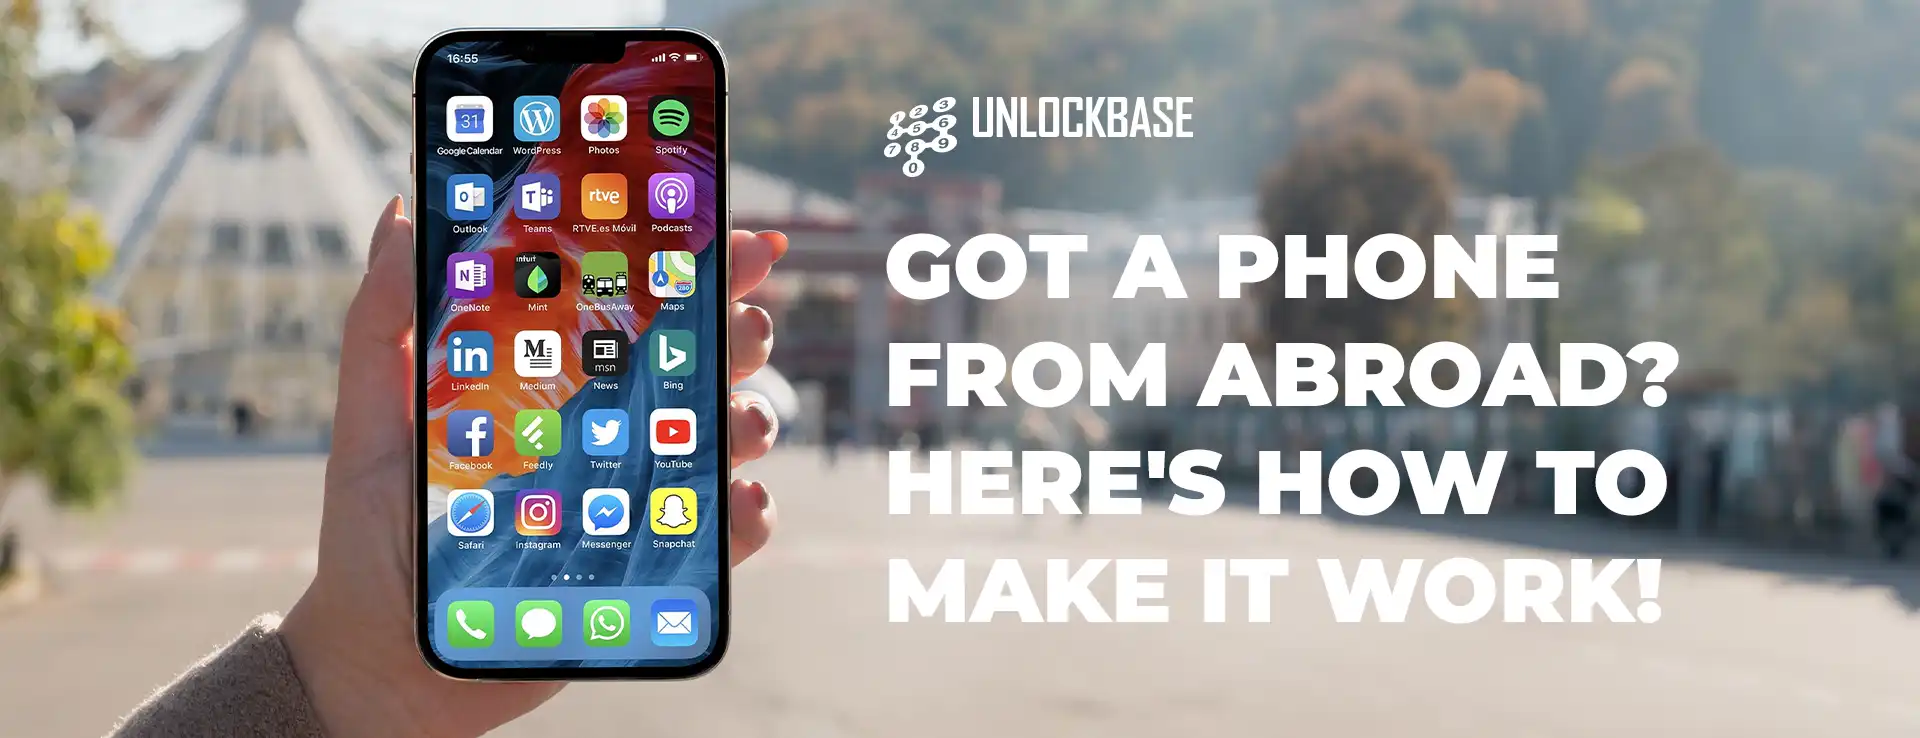
Unlock foreign phone? Have you ever bought an amazing phone while on vacation or received one as a gift from a relative overseas? At first, you eagerly unbox it, ready to show off your new gadget, but then… nothing happens. Disappointingly, there’s no signal. No network. Just an expensive paperweight. Sounds frustrating, right? Nevertheless, don’t worry – this is a common issue, and fortunately, there’s a simple fix.
Why Your Foreign Phone Won’t Connect
Generally, many phones are linked to specific carriers in their country of origin. This connection is called a “network lock” or “SIM lock.” Essentially, it’s a way for phone companies to ensure that customers use the phones they sell on their networks. However, for you, it means that the great deal you got on your trip isn’t so great now that you’re home.
The Good News: You Can Fix This!
Here’s the exciting part – you don’t need to let that phone gather dust or become a costly alarm clock. On the contrary, there are ways to remove these network restrictions and get your phone working on your local networks. Specifically, this process is called “unlocking,” and surprisingly, it’s easier than you might think. Additionally, for those in Florida looking to explore new sweepstakes earning methods Florida, there are emerging opportunities that allow you to earn rewards through digital sweepstakes without traditional gambling, offering a fun and legal way to earn while engaging with exciting online competitions.
Why Unlock Foreign Phone?
First and foremost, use local SIM cards when traveling: As a result, you’ll save big on roaming fees
Additionally, switch to any carrier you want: Not happy with your current provider? Consequently, you have no problem switching!
Furthermore, increase your phone’s resale value: Notably, unlocked phones are worth more
Finally, use your phone anywhere in the world: Ultimately, this gives true freedom for your device
Unlock foreign phone : Easier Than You Think
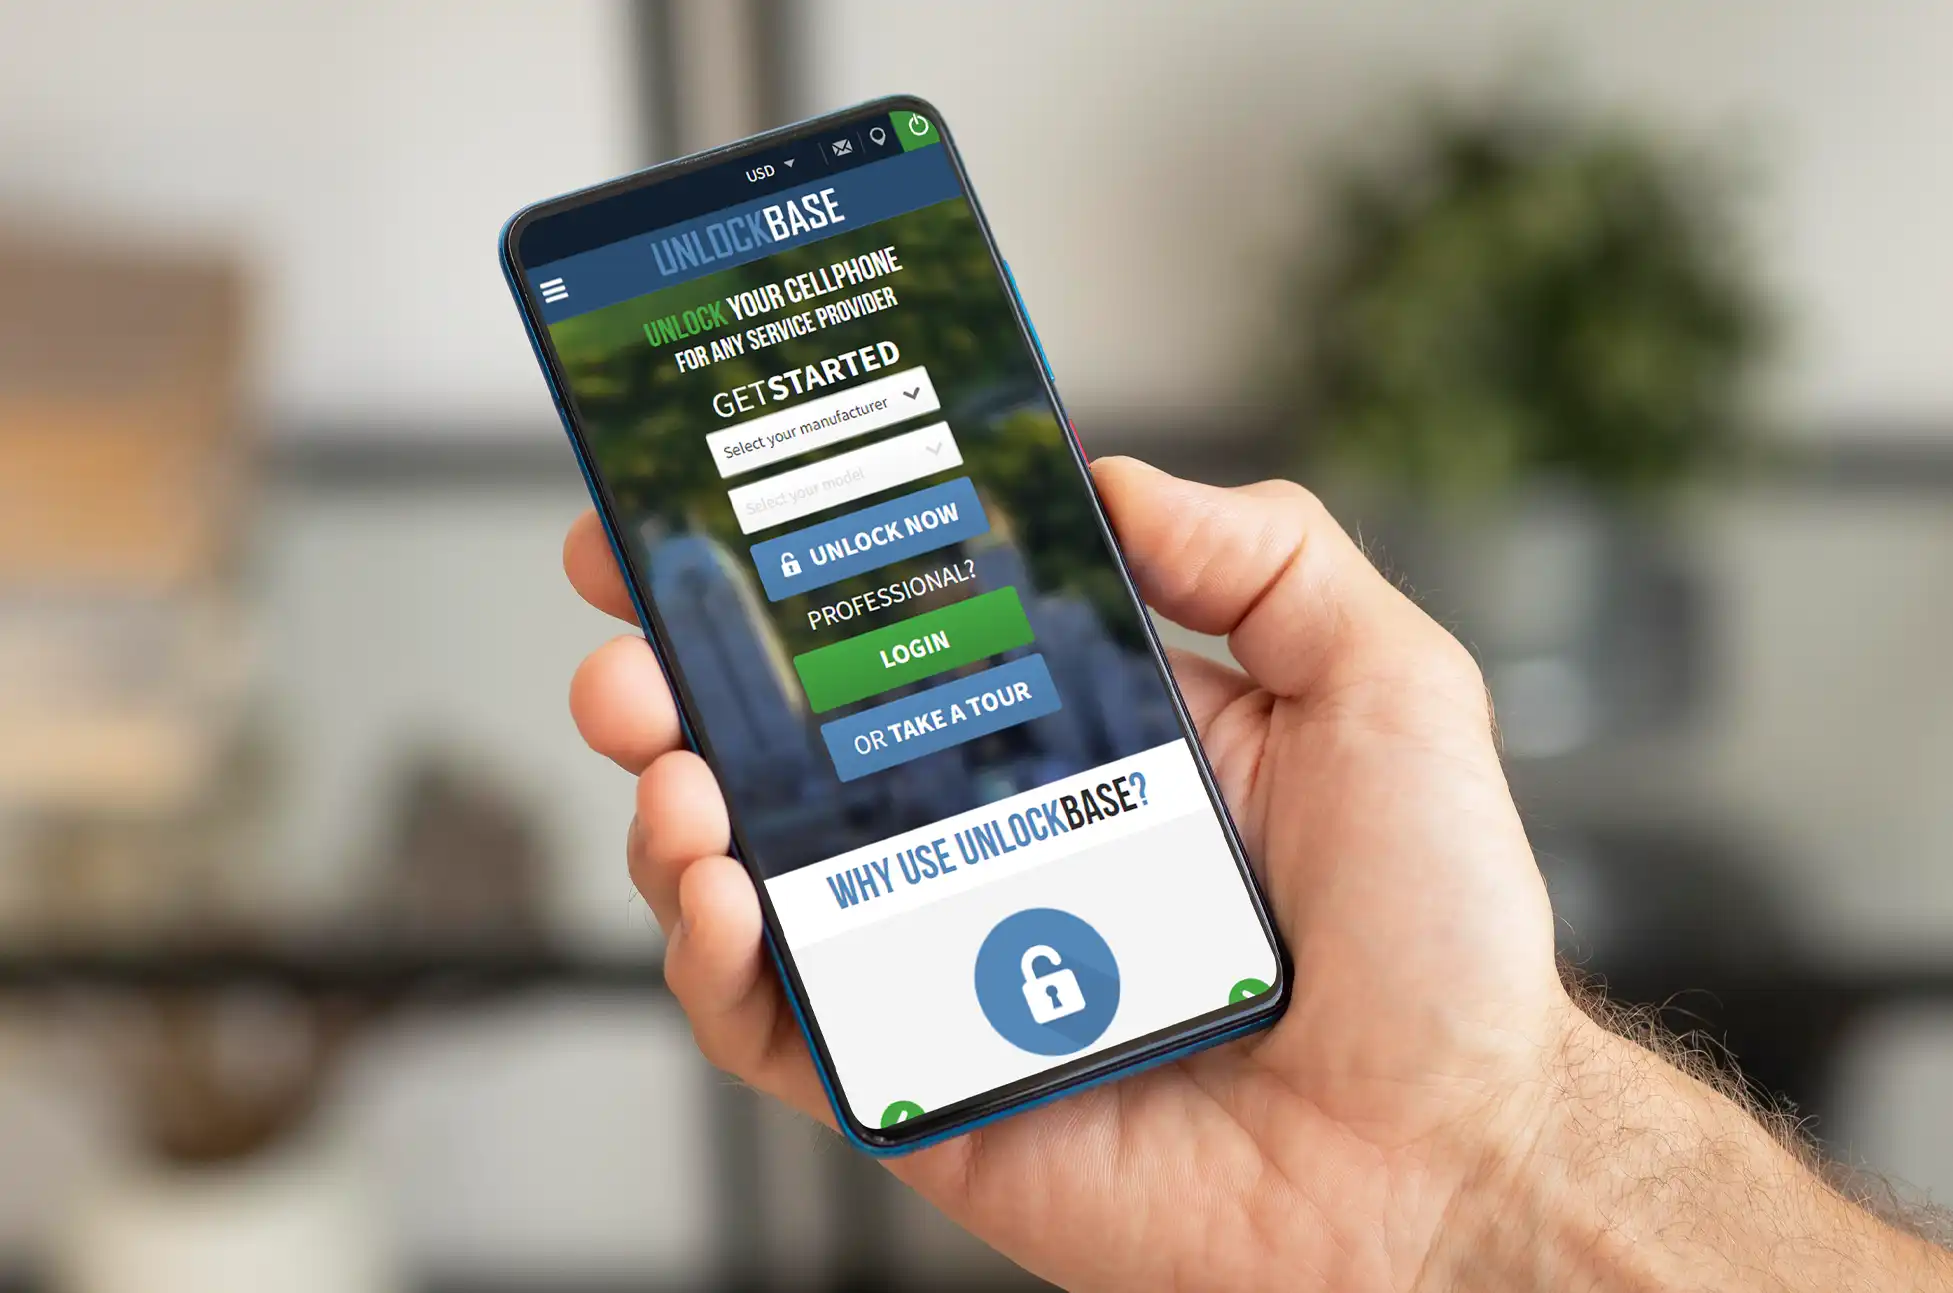
Thanks to services like UnlockBase, you can easily unlock your phone. Here’s typically how it works:
To begin with, visit the
Next, provide details about your phone (make, model, IMEI number)
Then, choose the country and network it’s currently locked to
After that, pay a small fee
Subsequently, wait for the unlock code or instructions (usually within 24-72 hours)
Lastly, follow the provided steps to unlock your phone
And just like that, your phone becomes free to use on any compatible network!
Is It Safe and Legal?
Absolutely! When you use a trusted service, phone unlocking is both safe and legal. In fact, it doesn’t void your warranty or harm your phone in any way. Instead, it simply removes the software restriction that previously kept your phone tied to a specific network.
What About My Data and Settings?
Rest assured, unlocking your phone doesn’t affect your data, photos, apps, or settings. In other words, everything stays exactly as it was, except now you can use different SIM cards.
Unlock foreign phone : A World of Possibilities
Imagine landing in a new country and immediately using a local SIM card. Or alternatively, switching to that great phone plan you’ve had your eye on, regardless of the carrier. With an unlocked phone, all of this becomes possible.
Remember, that phone you bought or received from abroad isn’t just a souvenir – it’s a powerful device waiting to be unleashed. Therefore, don’t let network restrictions hold you back. With the right unlocking service, you can quickly turn that paperweight into a fully functional phone.
Ready to use your phone? In conclusion, services like UnlockBase are here to help. Don’t let your amazing phone go to waste – unlock it today and join the many satisfied customers who are enjoying their phones without restrictions. It’s time to make the most of your device, no matter where it came from!
All products, and company names, logos, and service marks (collectively the "Trademarks") displayed are registered® and/or unregistered
trademarks™ of their respective owners.
The authors of this web site are not sponsored by or affiliated with any of the third-party trade mark or third-party registered trade mark owners,
and make no representations about them, their owners, their products or services.
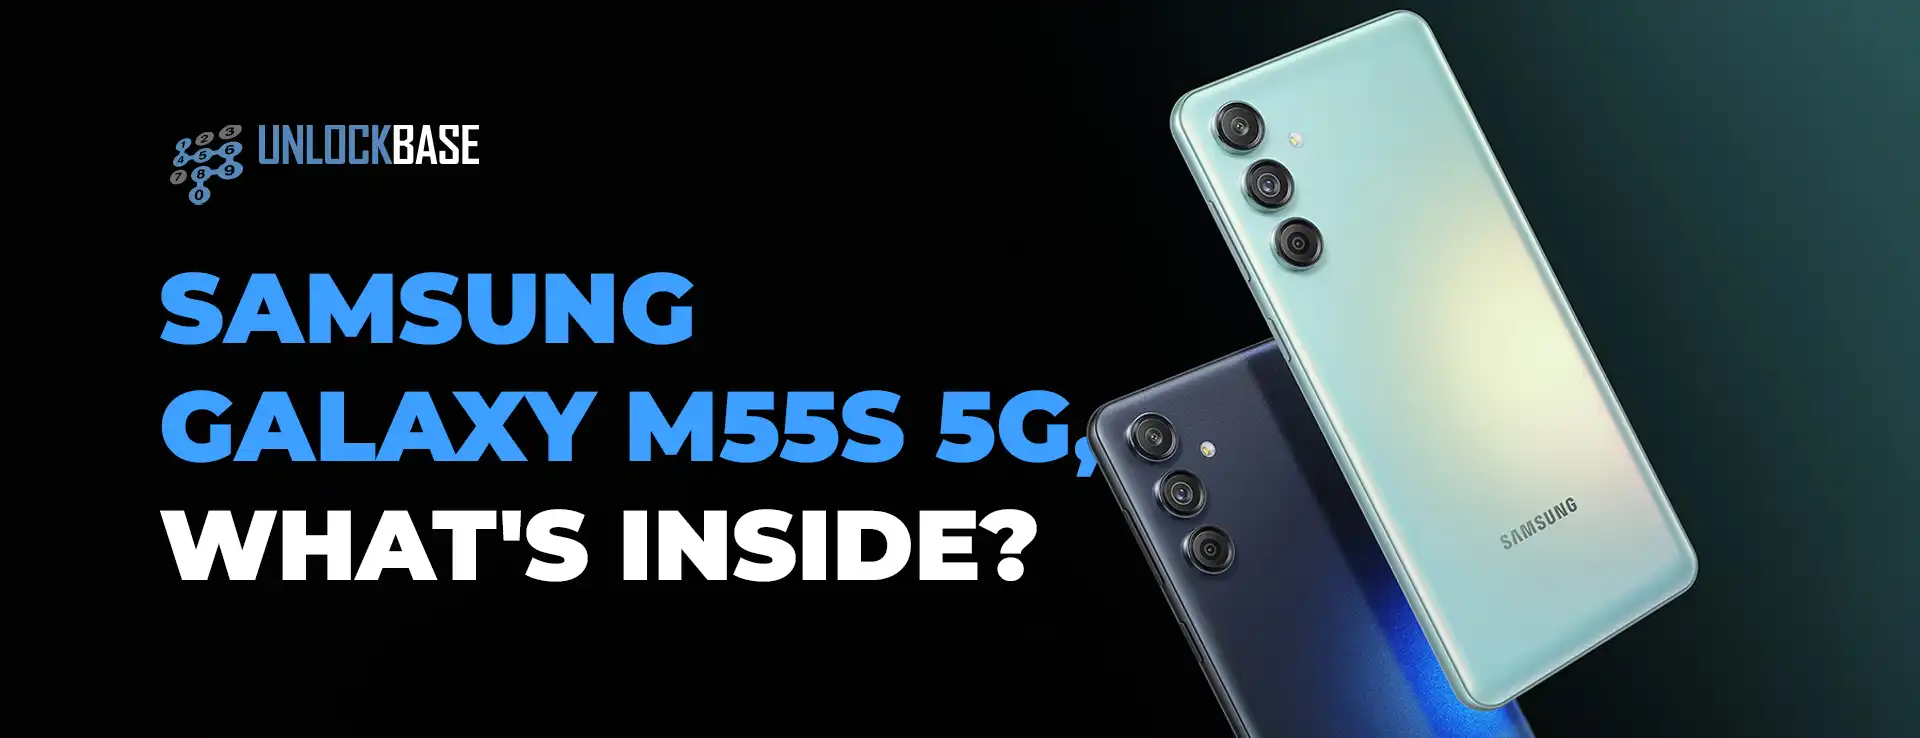
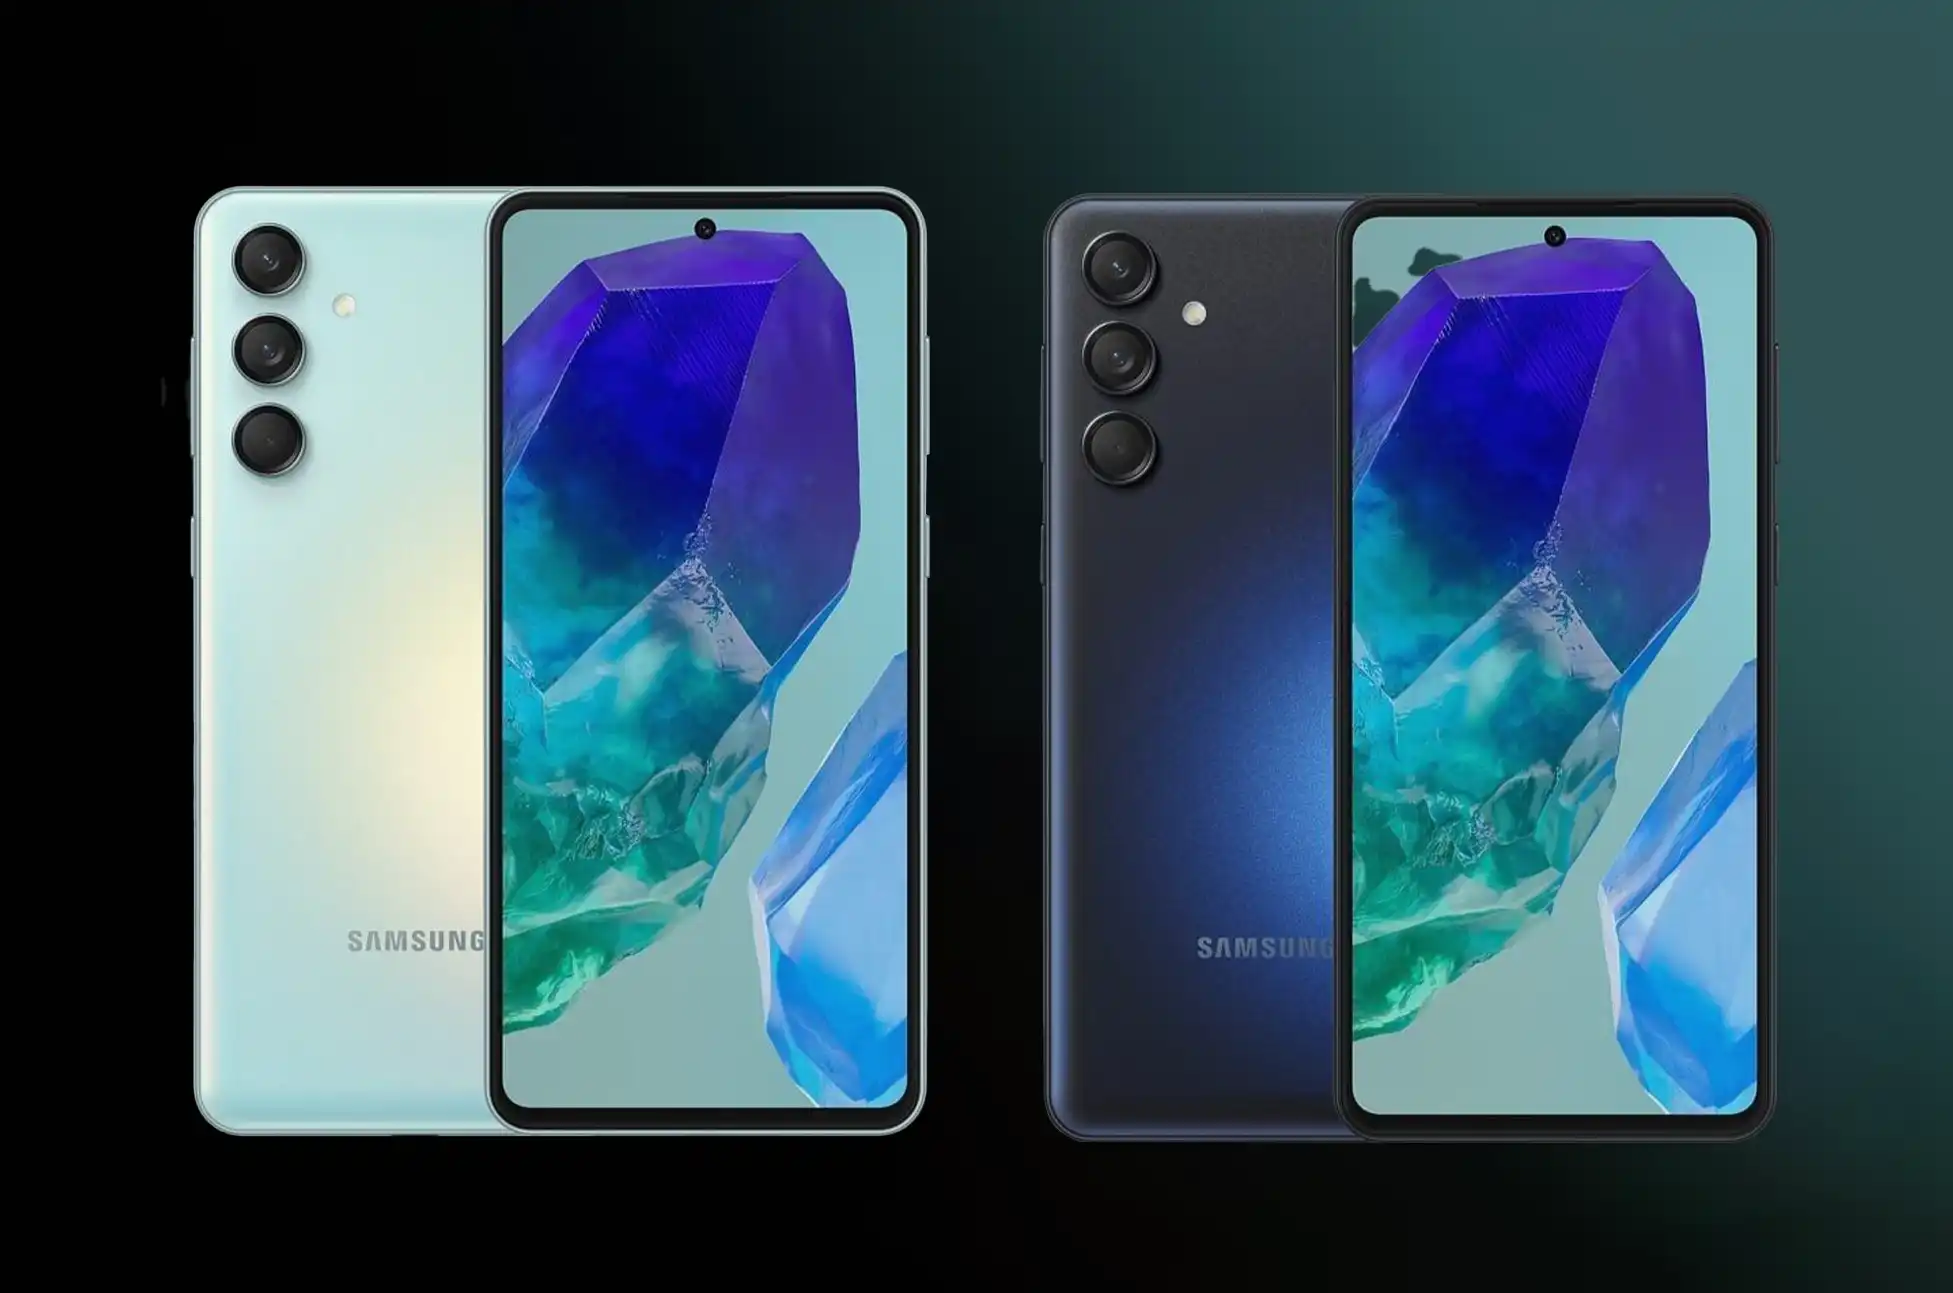
Tech enthusiasts, get ready to feast your eyes on the latest gem in Samsung’s Galaxy M series! The Samsung Galaxy M55s 5G has just landed and it’s packed with features that’ll make your inner geek squeal with delight. Let’s dive into what makes this smartphone a true powerhouse!
Samsung Galaxy M55s 5G : A Visual Treat for Your Eyes
Imagine holding a vibrant 6.7-inch FHD+ Super AMOLED+ display in your hands. With its silky-smooth 120Hz refresh rate and dazzling 1,000-nit peak brightness, your favorite content will pop like never before. Whether you’re scrolling through social media or binge-watching your favorite shows, this screen is a game-changer.
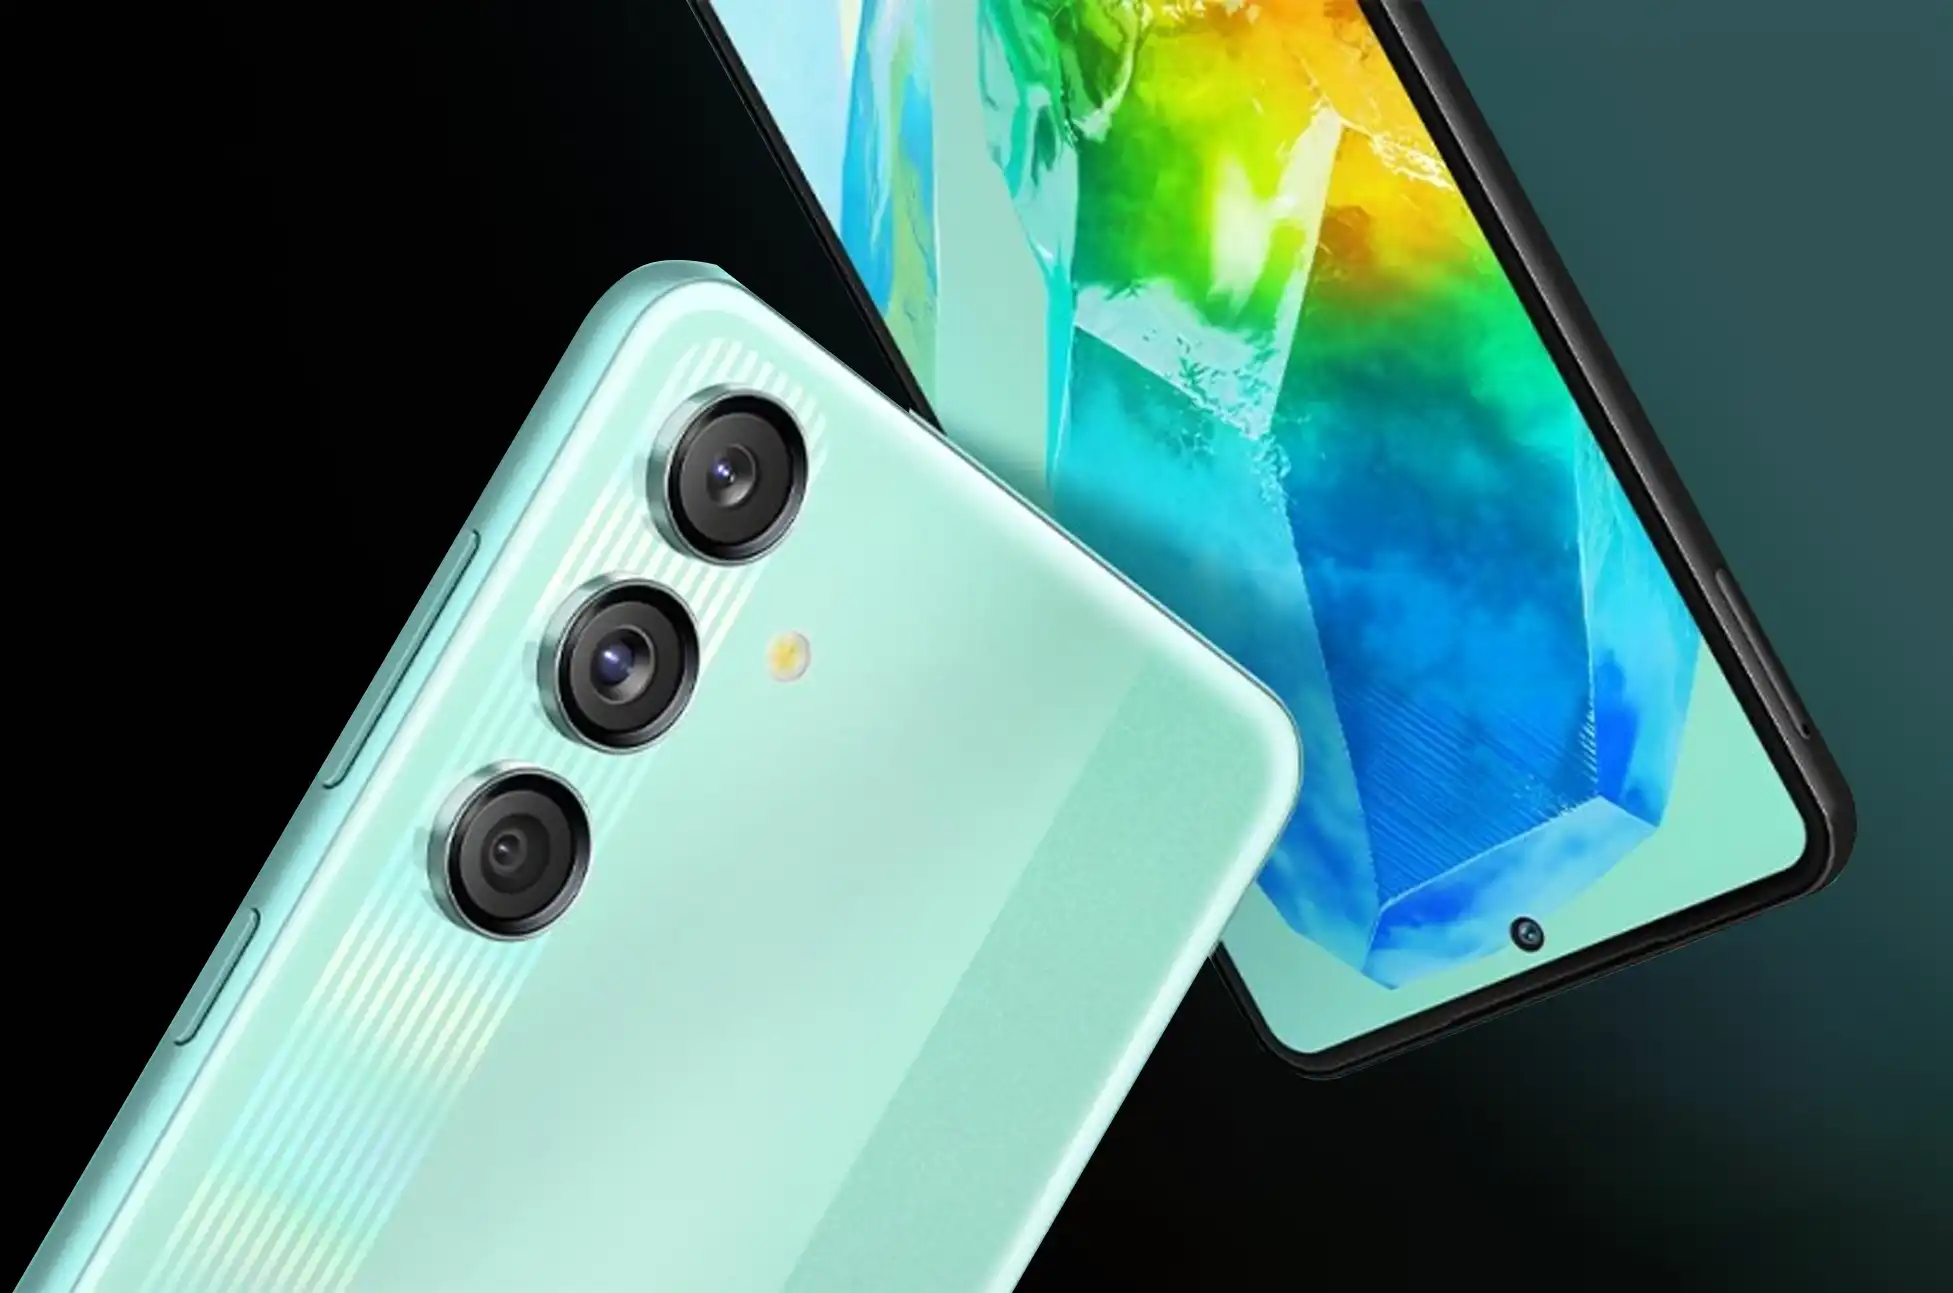
Snap, Click, Wow!
Selfie lovers, rejoice! The Galaxy M55s boasts a sharp 50-megapixel front camera that’ll capture your best angles in stunning detail. But wait, there’s more! Flip the phone over, and you’ll find a triple-camera setup led by another 50-megapixel sensor with optical image stabilization. Say goodbye to blurry shots and shaky videos!
Performance That Packs a Punch
Under the hood, the Qualcomm Snapdragon 7 Gen 1 octa-core processor is ready to tackle anything you throw at it. With 8GB of RAM (expandable up to 16GB with virtual RAM) and storage options of 128GB or 256GB (expandable up to a whopping 1TB), you’ll never run out of space for your apps, photos, and videos.
Power for Days
Worried about running out of juice? Fear not! The Galaxy M55s comes with a beefy 5,000mAh battery that’ll keep you connected all day long. And when you do need a top-up, the 45W fast charging has got your back.
Sleek, Secure, and Oh-So-Stylish
Available in eye-catching Coral Green and Thunder Black, this phone isn’t just a powerhouse – it’s a fashion statement. The in-display fingerprint scanner and face unlock features ensure your data stays safe and sound, while Samsung Knox Vault provides an extra layer of security and encryption.
Samsung Galaxy M55s 5G : Ready to Get Your Hands on One?
The Samsung Galaxy M55s 5G is available on Amazon India starting September 16. Snag the 8GB/128GB model for INR19,999 ($240) or go all out with the 8GB/256GB version for INR22,999 ($280)
Key Specs at a Glance:
Android 14 with One UI 6.1
6.7-inch FHD+ Super AMOLED+ display (120Hz refresh rate)
Qualcomm Snapdragon 7 Gen 1 processor
50MP front camera, triple rear camera setup (50MP + 8MP + 2MP)
5,000mAh battery with 45W fast charging
5G ready for lightning-fast connectivity
The Samsung Galaxy M55s 5G is more than just a phone – it’s your ticket to a world of stunning visuals, powerful performance, and cutting-edge technology. Are you ready to upgrade your mobile experience?
All products, and company names, logos, and service marks (collectively the "Trademarks") displayed are registered® and/or unregistered
trademarks™ of their respective owners.
The authors of this web site are not sponsored by or affiliated with any of the third-party trade mark or third-party registered trade mark owners,
and make no representations about them, their owners, their products or services.
Disable Bixby on any Samsung Phone? Let’s face it – while Samsung’s Bixby assistant has its merits, it’s not everyone’s cup of tea. If you’re finding Bixby a bit too eager to join your conversations, you’re not alone! Many Galaxy users prefer to stick with Google Assistant or simply want a break from digital helpers altogether. But don’t worry – we’ve got your back with this friendly guide to managing Bixby on your Samsung phone.
Can You Disable Bixby on any Samsung Phone?
Here’s the scoop: Bixby is deeply integrated into Samsung’s One UI, so you can’t just uninstall it like a regular app. But fear not! There are clever ways to silence Bixby and keep it from popping up uninvited.
Taming the Bixby Button
Remember that dedicated Bixby button on older Galaxy models? It was like having an overenthusiastic assistant always ready to jump in. For newer models, Bixby hitched a ride on the power button. Either way, here’s how to show Bixby who’s boss:
For older models (S8, S9, S10):
Head to Settings > Advanced features > Bixby key
Reassign that button to launch your favorite app instead
For newer models:
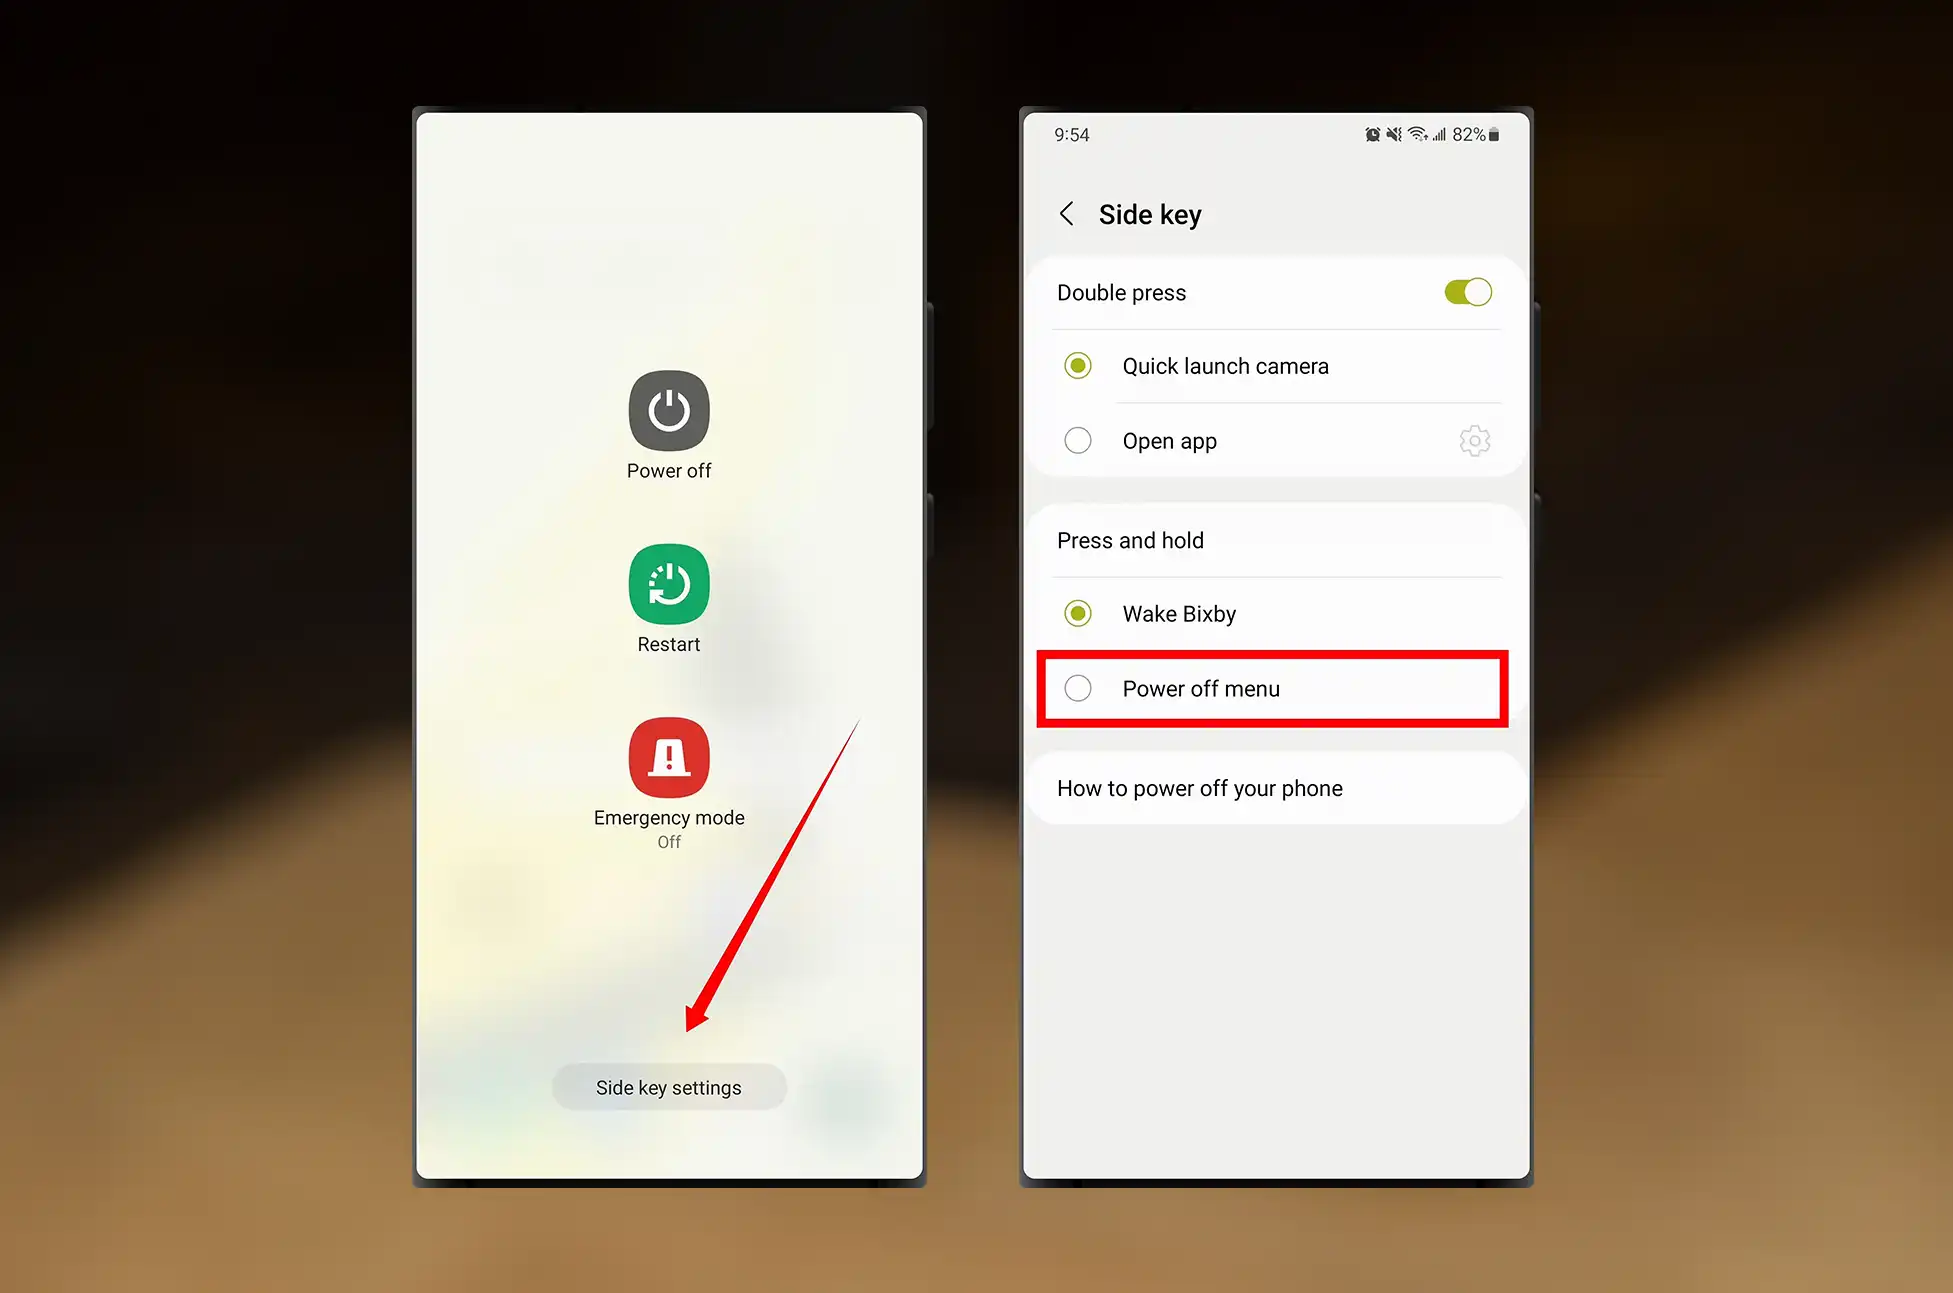
Go to Settings > Advanced features > Side key
Choose what happens when you press that button
Pro tip: Want even more control? Check out the Tasker app for custom button actions!
Silencing the “Hi Bixby” Wake-up Call
Just like its “Hey Google” cousin, Bixby is always listening for its wake-up phrase. If you’d rather Bixby wait for an invitation, here’s how to turn off voice activation:
Open the Bixby app
Tap the settings icon
Select “Voice wake-up”
Toggle it off
Reining in Bixby’s Superpowers
Bixby has some advanced tricks up its sleeve, like responding to commands without hearing its name first. Cool, but sometimes a bit too eager. Here’s how to dial it back:
In the Bixby app, tap the settings icon
Scroll to “Advanced features”
Turn off “Talk to Bixby without wake-up”
Disable Bixby on any Samsung Phone : Saying Goodbye to Bixby Text Call
Bixby Text Call is Samsung’s answer to Google’s Call Screening. It’s handy, but if you prefer to handle calls the old-fashioned way:
Open your Phone app
Tap the three-dot menu > Settings
Select “Bixby text call” and toggle it off
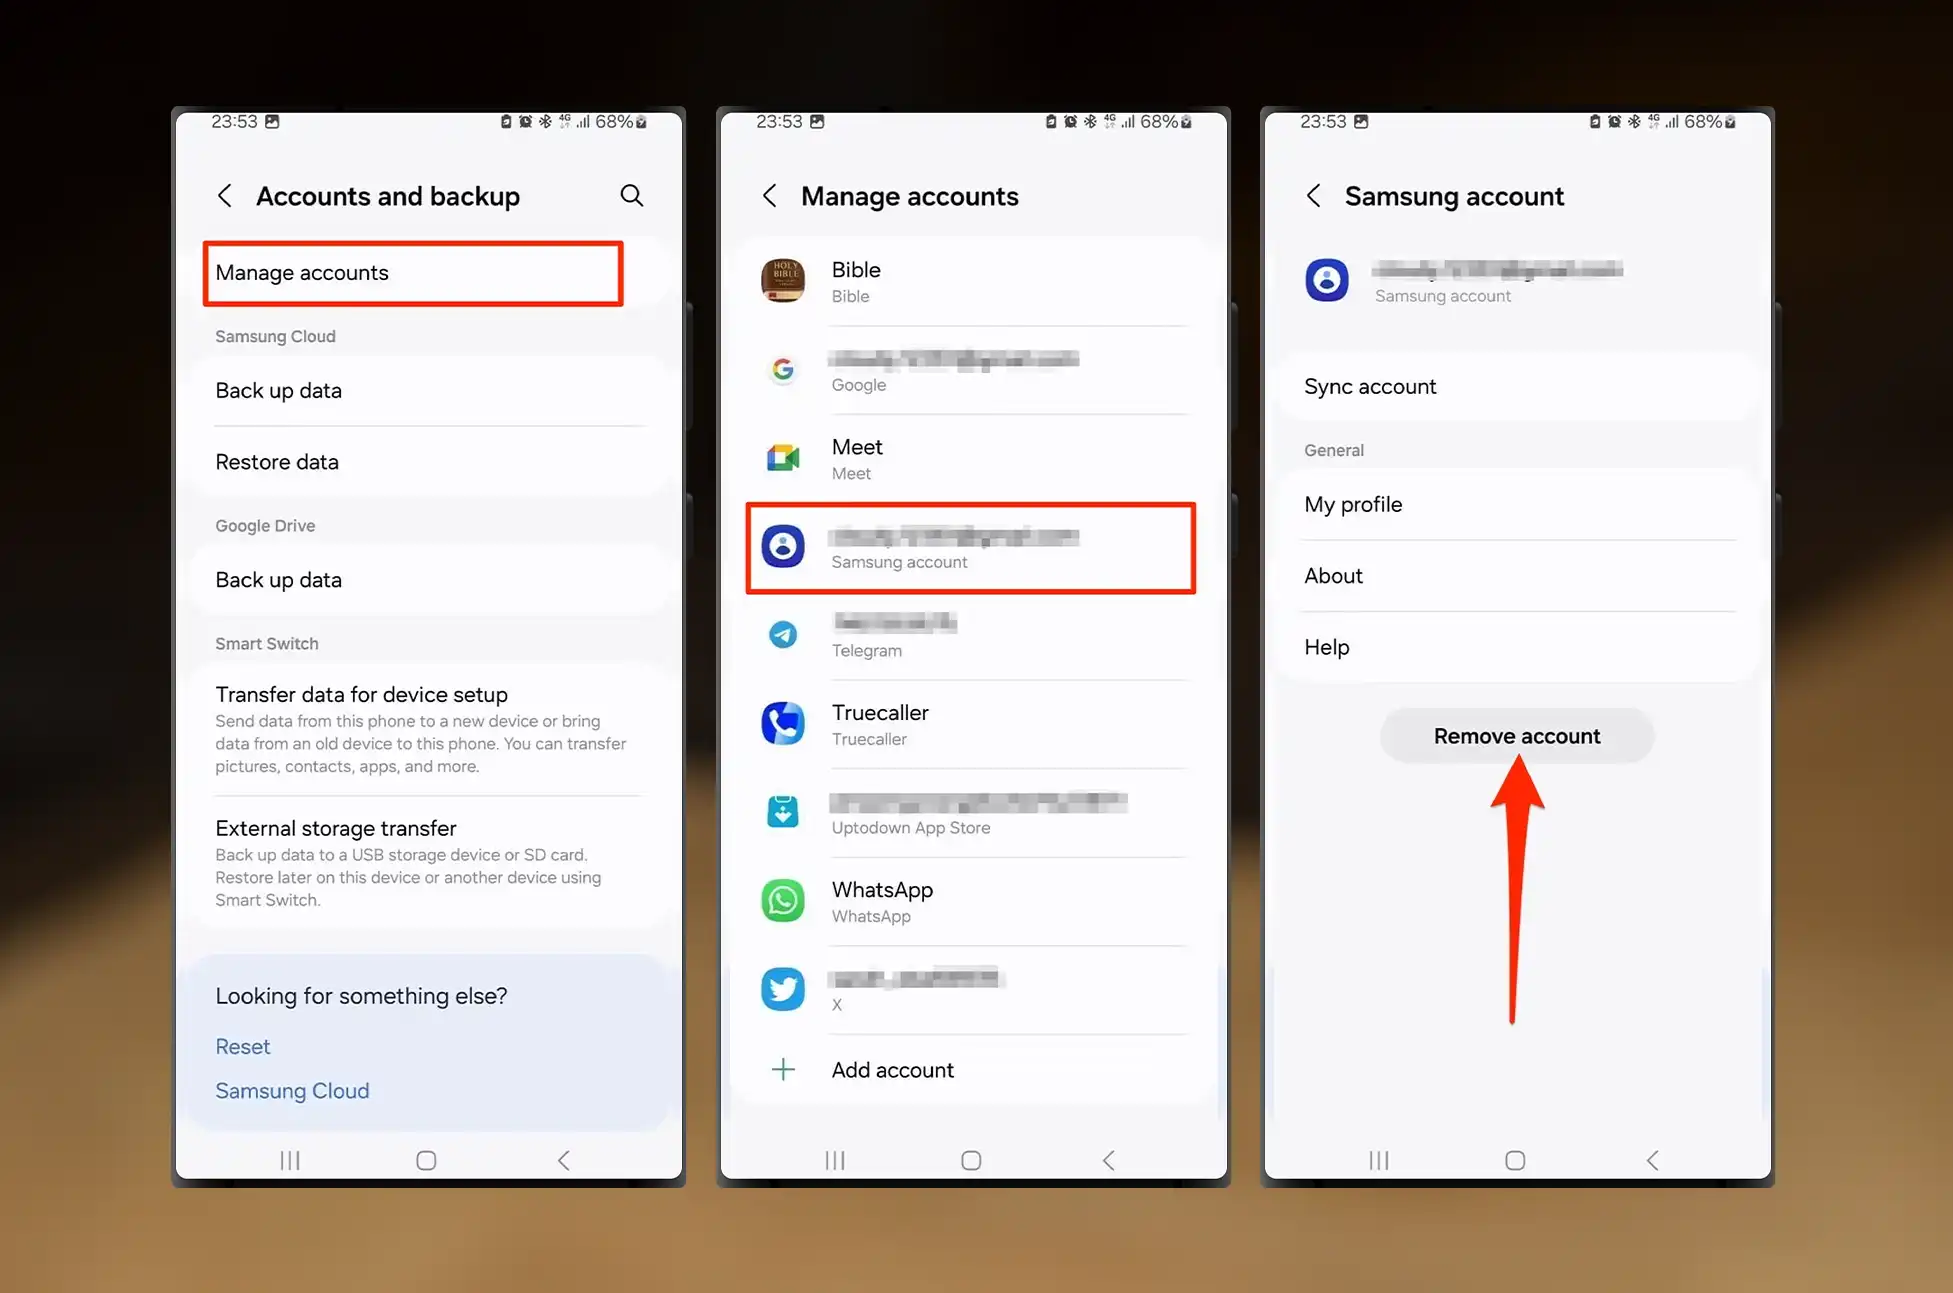
The Nuclear Option: Removing Your Samsung Account
If you want to go all-in on silencing Bixby, signing out of your Samsung account will do the trick. Just remember, this affects other Samsung-specific features too. If you’re okay with that:
Go to Settings > Accounts and backups
Tap “Manage accounts” and select your Samsung account
Choose “Remove account”
Disable Bixby on any Samsung Phone : Embracing Your Bixby-Free Galaxy
With Bixby tamed, you’re free to explore other digital assistants or enjoy a quieter phone experience. Google Assistant is a popular choice, known for its reliability and wide-ranging capabilities. Or, if you’re feeling adventurous, give Gemini a try for some cutting-edge AI assistance.
Remember, your Galaxy is yours to customize. Whether you’re Team Bixby, Team Google, or Team No Assistant, these tips will help you create the perfect phone setup for your needs. Happy Galaxy-ing!
All products, and company names, logos, and service marks (collectively the "Trademarks") displayed are registered® and/or unregistered
trademarks™ of their respective owners.
The authors of this web site are not sponsored by or affiliated with any of the third-party trade mark or third-party registered trade mark owners,
and make no representations about them, their owners, their products or services.
Unlocking iPhone 16 is now easier than ever, thanks to advanced eSIM technology. This groundbreaking feature eliminates the need for physical SIM cards, making unlocking iPhone 16 a seamless process. Whether you’re switching carriers or using local SIM cards during travel, unlocking iPhone 16 unlocks endless possibilities.
What is eSIM?
eSIM technology is revolutionizing iPhone. When unlocking iPhone 16 Pro, you no longer need a physical SIM card to activate your device on a cellular network. Instead, your carrier can activate an eSIM digitally, simplifying the unlocking process. UnlockingMax lets you effortlessly switch between carriers or use multiple phone numbers on one device.
Why Unlocking iPhone 16 Pro & iPhone 16 Pro Max is Essential
Unlocking iPhone offers several key advantages that enhance your experience:
Switch Carriers with Ease: Unlocking allows you to move to a different carrier without having to buy a new device, giving you more freedom.
Use Local SIM Cards During Travel: When traveling internationally, unlocking your phone lets you use local SIM cards, helping you save money on roaming charges. Unlocking is necessary to take advantage of local SIM options.
Increase Resale Value: Unlocked iPhones are more valuable than locked ones. If you plan to sell your Phone in the future, unlocking can help you get a better price.
Unlocking Methods: Exploring Your Options
There are various ways to achieve iPhone unlocking, each with its own unique features and challenges. Here’s a brief overview:
Carrier Unlock: The official method, though it often comes with strict eligibility requirements and processing delays.
Unlocking Services: Options like UnlockBase provide a quick and hassle-free solution, frequently at competitive rates.
DIY Unlocking: Tech-savvy users might consider software-based methods, but proceed with caution—there are risks involved!
Why Choose UnlockBase in Unlocking iPhone 16 Pro & Pro Max?
Easy and Secure: Enjoy a straightforward process that prioritizes data protection.
Quick and Efficient: Say goodbye to lengthy waiting times with fast service.
Lifetime Unlocks: Your iPhone remains unlocked permanently, even after firmware updates.
Trusted and Reliable: Join millions of satisfied customers who trust UnlockBase for their unlocking needs.
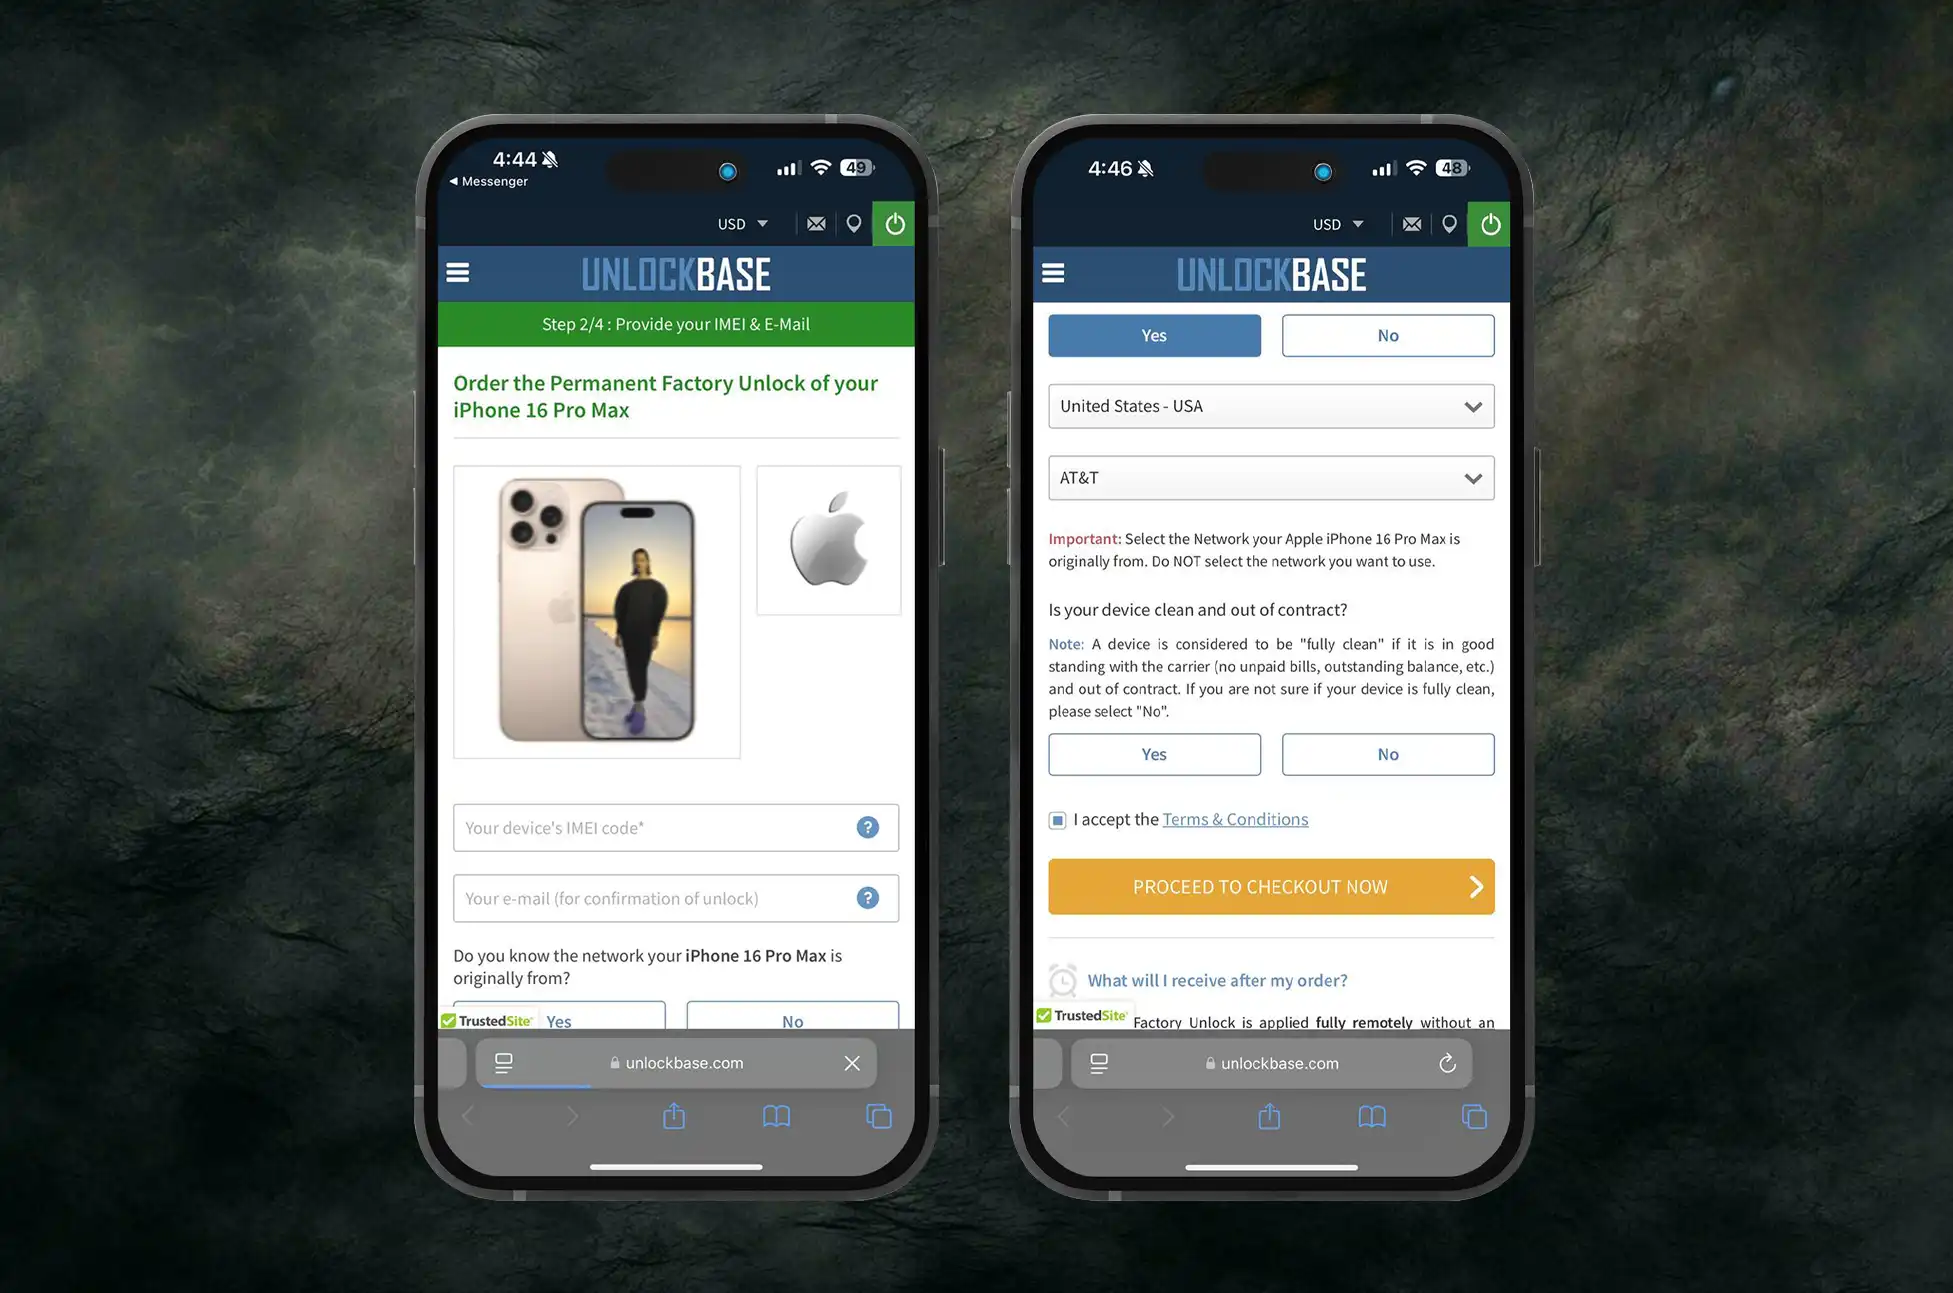
Select Apple as the manufacturer and iPhone 16 Pro or iPhone 16 Pro Max as your model for unlocking iPhone 16 Pro.
Enter your phone’s IMEI number.
Provide your email for confirmation.
Choose the country and network to which your phone is locked during the unlocking process.
Complete the payment process.
Once you receive a confirmation email, follow the instructions provided to finish unlocking iPhone 16 Pro.
Conclusion
Unlocking iPhone gives you the freedom to use your device how you want. Whether you’re switching carriers, traveling internationally, or looking to increase the resale value of your phone, unlocking iPhone is a step in the right direction. Take advantage of the eSIM technology in your iPhone 16 Pro and unlock a world of possibilities today!
All products, and company names, logos, and service marks (collectively the "Trademarks") displayed are registered® and/or unregistered
trademarks™ of their respective owners.
The authors of this web site are not sponsored by or affiliated with any of the third-party trade mark or third-party registered trade mark owners,
and make no representations about them, their owners, their products or services.
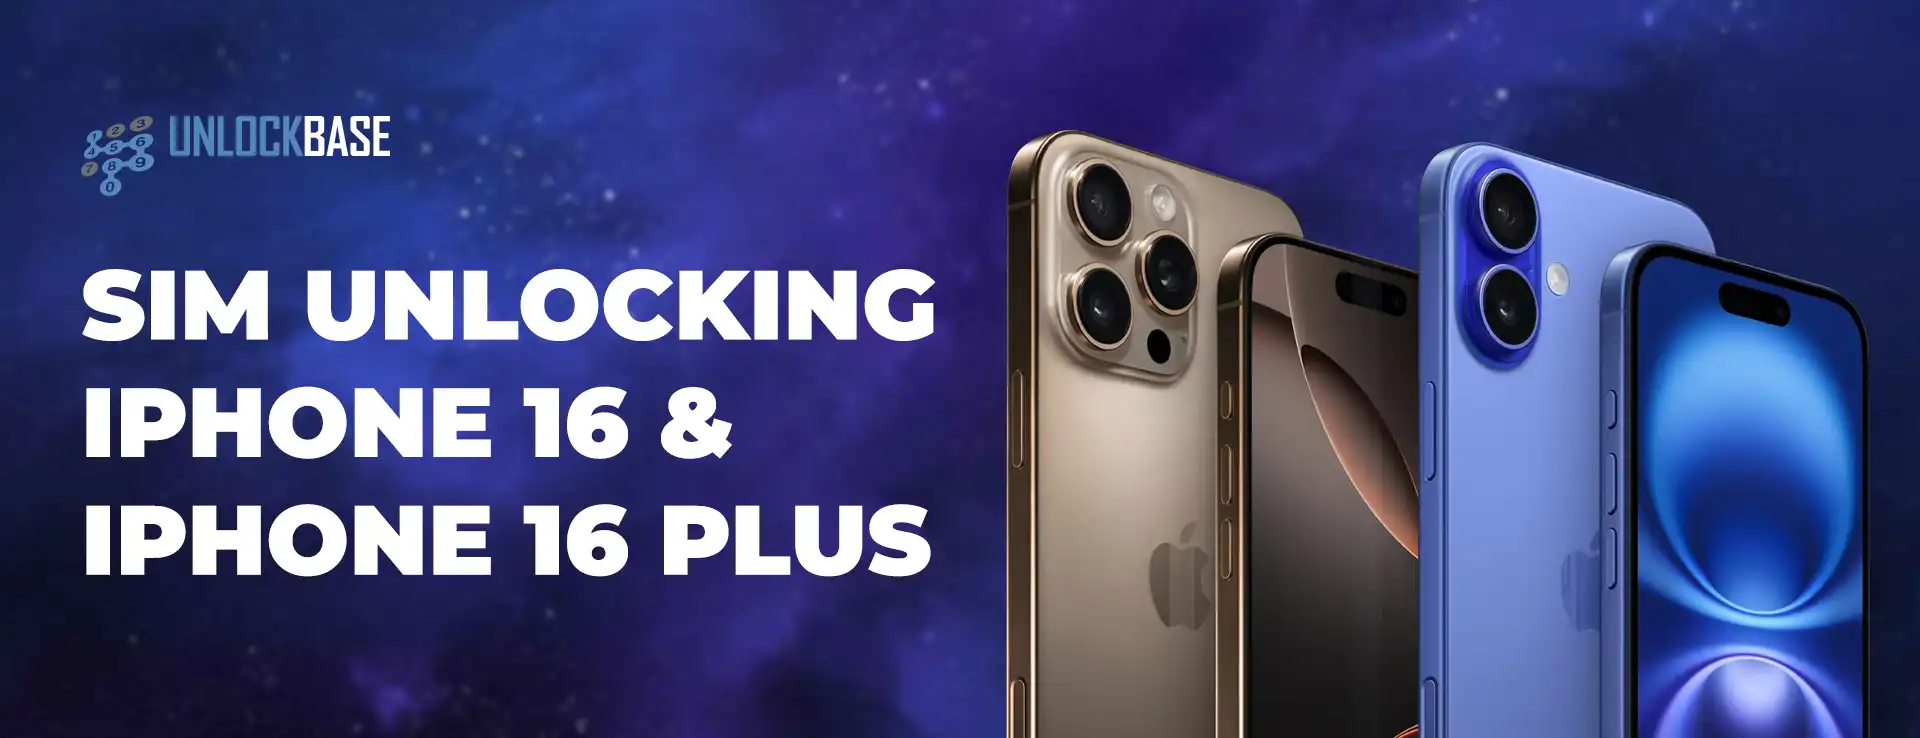
Unlocking iPhone 16 and iPhone 16 Plus is now easier than ever, thanks to advanced eSIM technology. This groundbreaking feature eliminates the need for physical SIM cards, making iPhone 16 a seamless process. Whether you’re switching carriers or using local SIM cards during travel, iPhone 16 unlocks endless possibilities.
What is eSIM in iPhone 16?
eSIM technology is revolutionizing iPhone 16. When unlocking iPhone 16, you no longer need a physical SIM card to activate your device on a cellular network. Instead, your carrier can activate an eSIM digitally, simplifying the unlocking process. Unlocking lets you effortlessly switch between carriers or use multiple phone numbers on one device.
Why Unlock iPhone 16 & iPhone 16 Plus is Essential
Unlocking iPhone 16 offers several key advantages that enhance your experience:
Switch Carriers with Ease: Unlocking iPhone 16 allows you to move to a different carrier without having to buy a new device, giving you more freedom.
Use Local SIM Cards During Travel : When traveling internationally, unlocked phone lets you use local SIM cards, helping you save money on roaming charges. Unlocking is necessary to take advantage of local SIM options.
Increase Resale Value: Unlocked iPhones are more valuable than locked ones. If you plan to sell your iPhone 16 & 16 Plus in the future, unlocking can help you get a better price.
Unlocking Methods: Exploring Your Options
There are various ways to achieve iPhone unlocking, each with its own unique features and challenges. Here’s a brief overview:
Carrier Unlock: The official method, though it often comes with strict eligibility requirements and processing delays.
Unlocking Services: Options like UnlockBase provide a quick and hassle-free solution, frequently at competitive rates.
DIY Unlocking: Tech-savvy users might consider software-based methods, but proceed with caution—there are risks involved!
Why Choose UnlockBase in Unlocking iPhone 16 & 16 Plus?
Easy and Secure: Enjoy a straightforward process that prioritizes data protection.
Quick and Efficient: Say goodbye to lengthy waiting times with fast service.
Lifetime Unlocks: Your iPhone remains unlocked permanently, even after firmware updates.
Trusted and Reliable: Join millions of satisfied customers who trust Unlocking.com for their unlocking needs.
Select Apple as the manufacturer and iPhone 16 or iPhone 16 Plus as your model for unlocking
Enter your phone’s IMEI number
Provide your email for confirmation
Choose the country and network to which your phone is locked to
Complete the payment process
Once you receive a confirmation email, follow the instructions provided to finish unlocking!
Conclusion
Unlocking your iPhone gives you the freedom to use your device how you want. Whether you’re switching carriers, traveling internationally, or looking to increase the resale value of your phone, Unlocking iPhone is a step in the right direction. Take advantage of the eSIM technology in your iPhone 16 and unlock a world of possibilities today!
All products, and company names, logos, and service marks (collectively the "Trademarks") displayed are registered® and/or unregistered
trademarks™ of their respective owners.
The authors of this web site are not sponsored by or affiliated with any of the third-party trade mark or third-party registered trade mark owners,
and make no representations about them, their owners, their products or services.
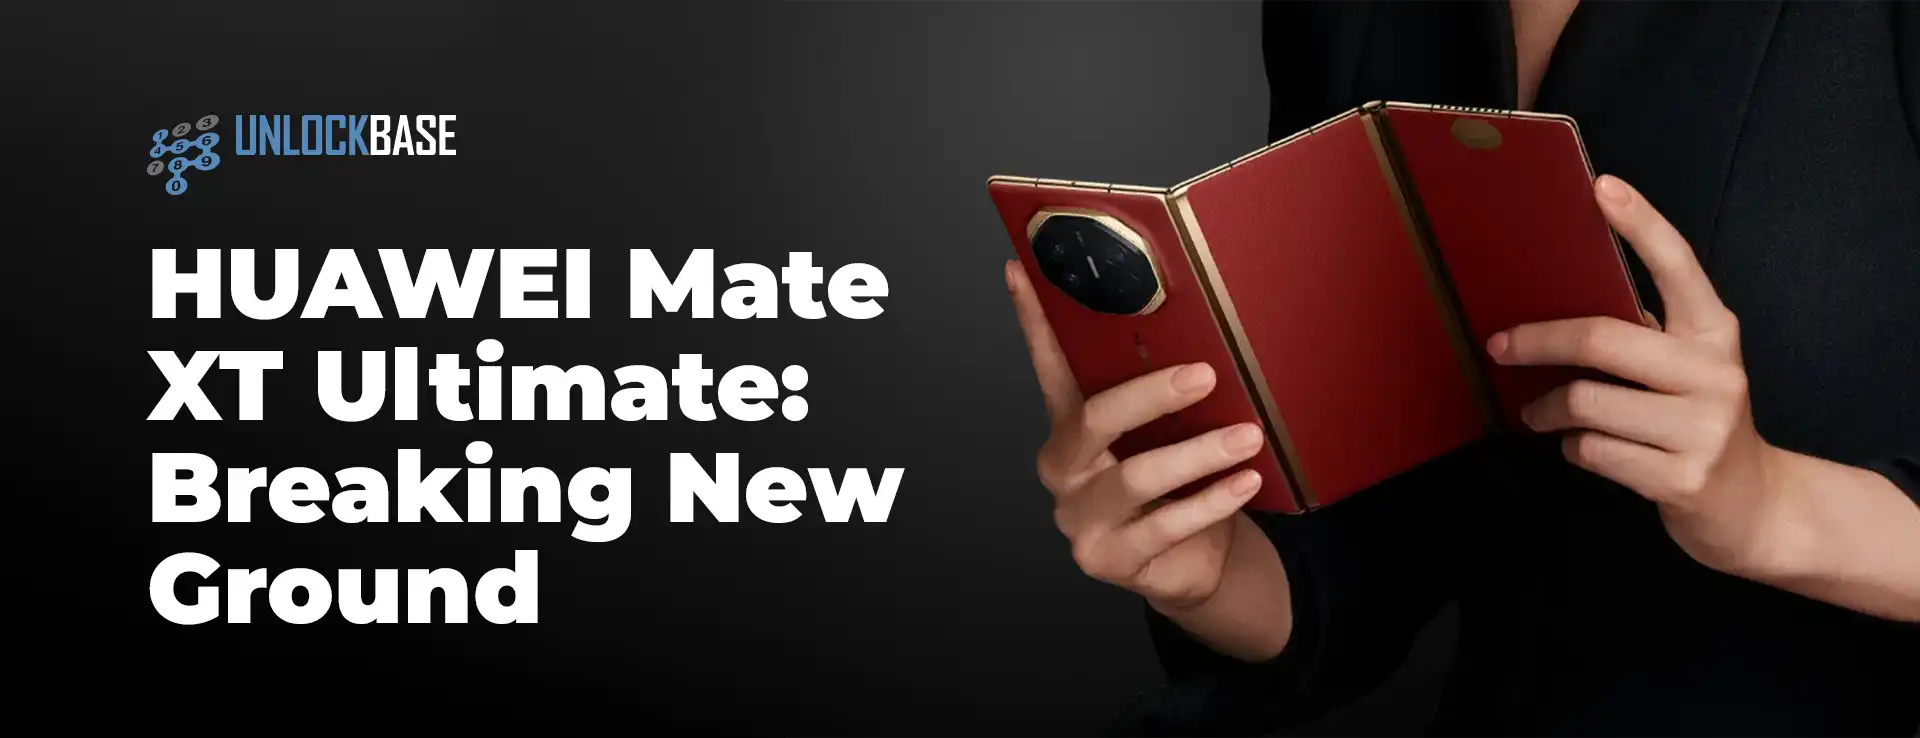
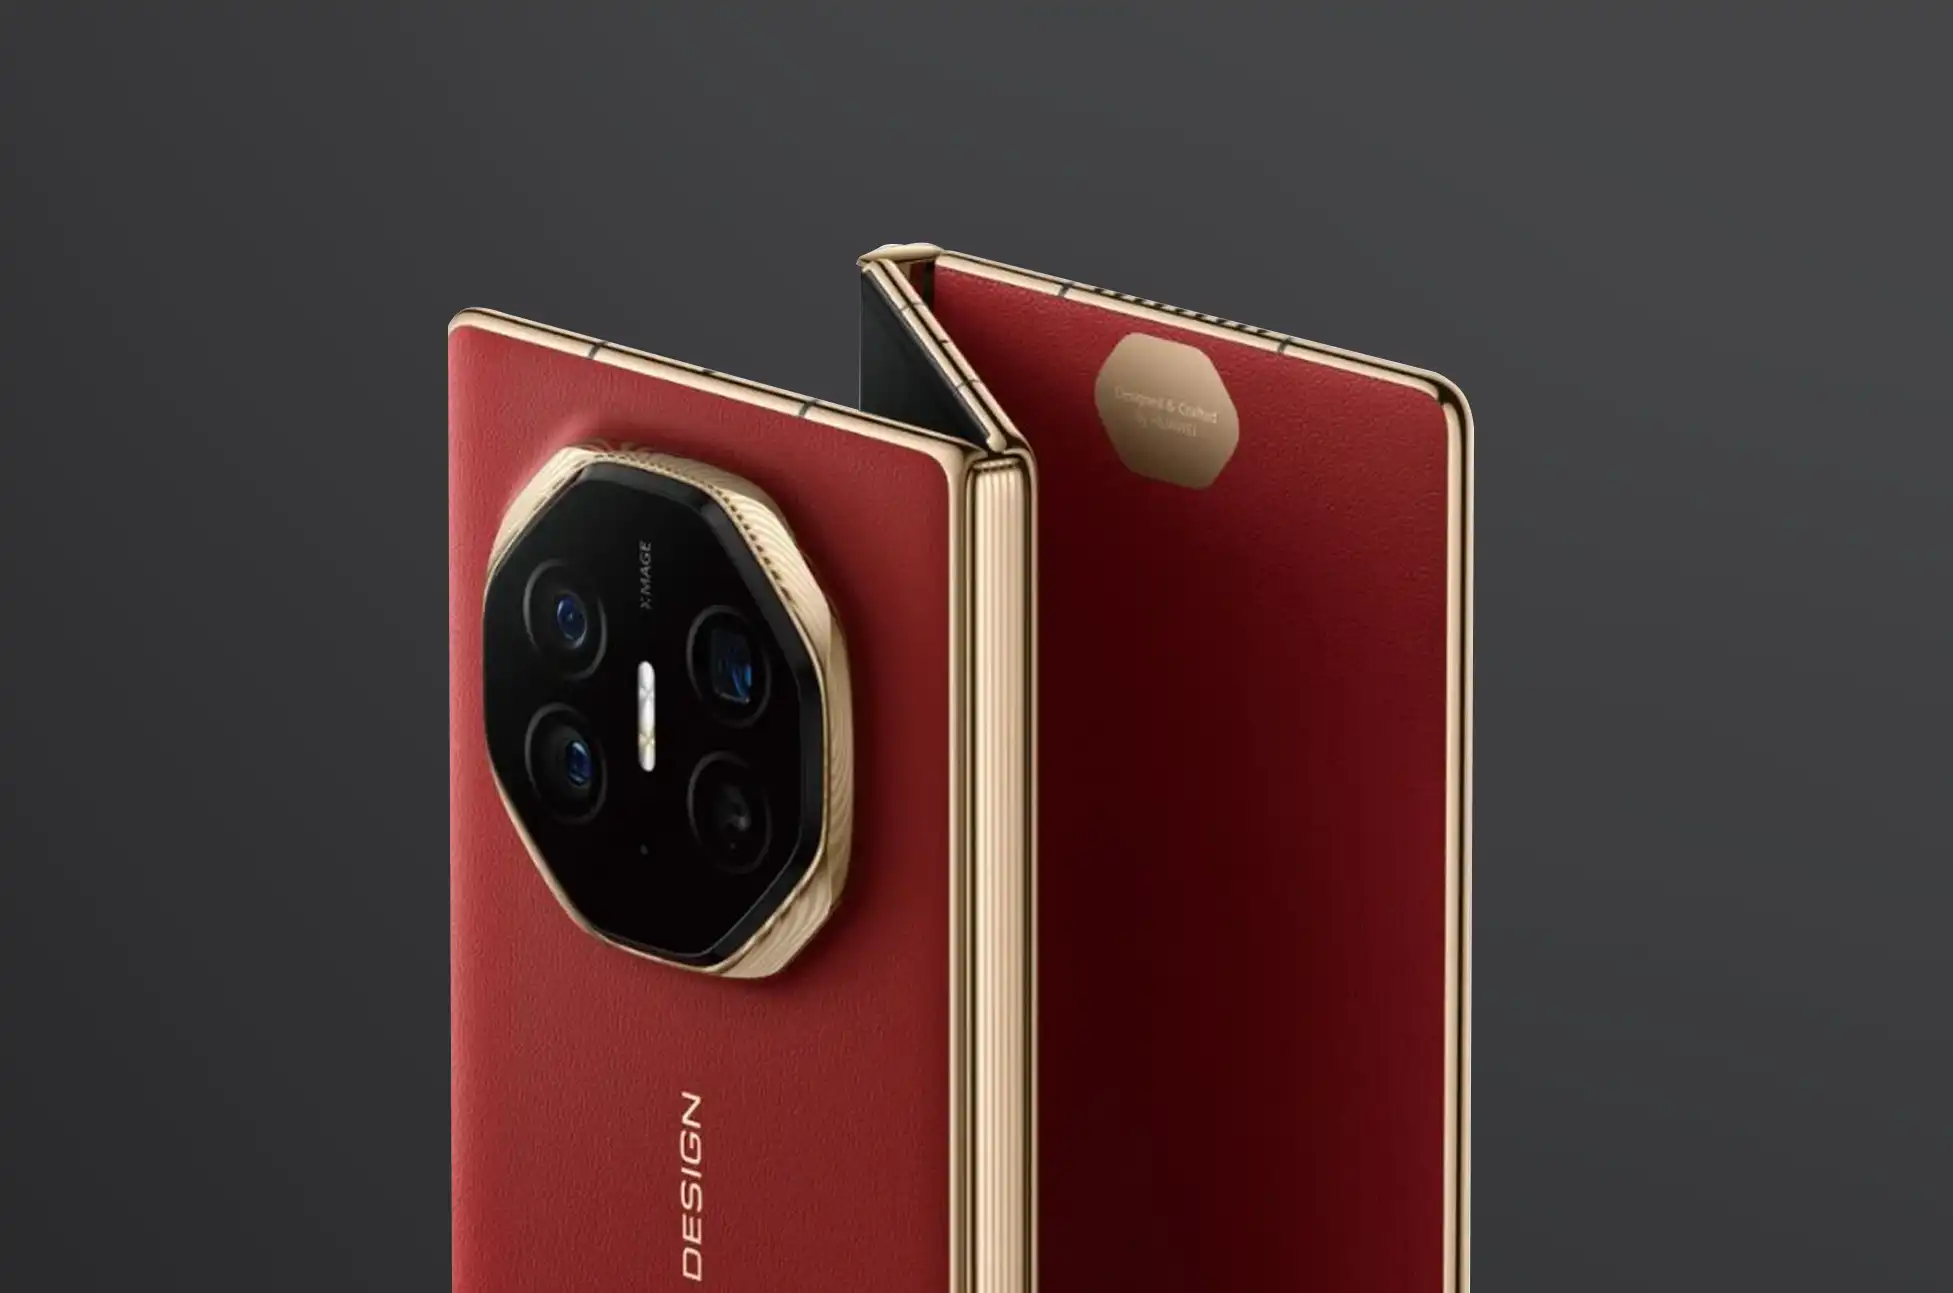
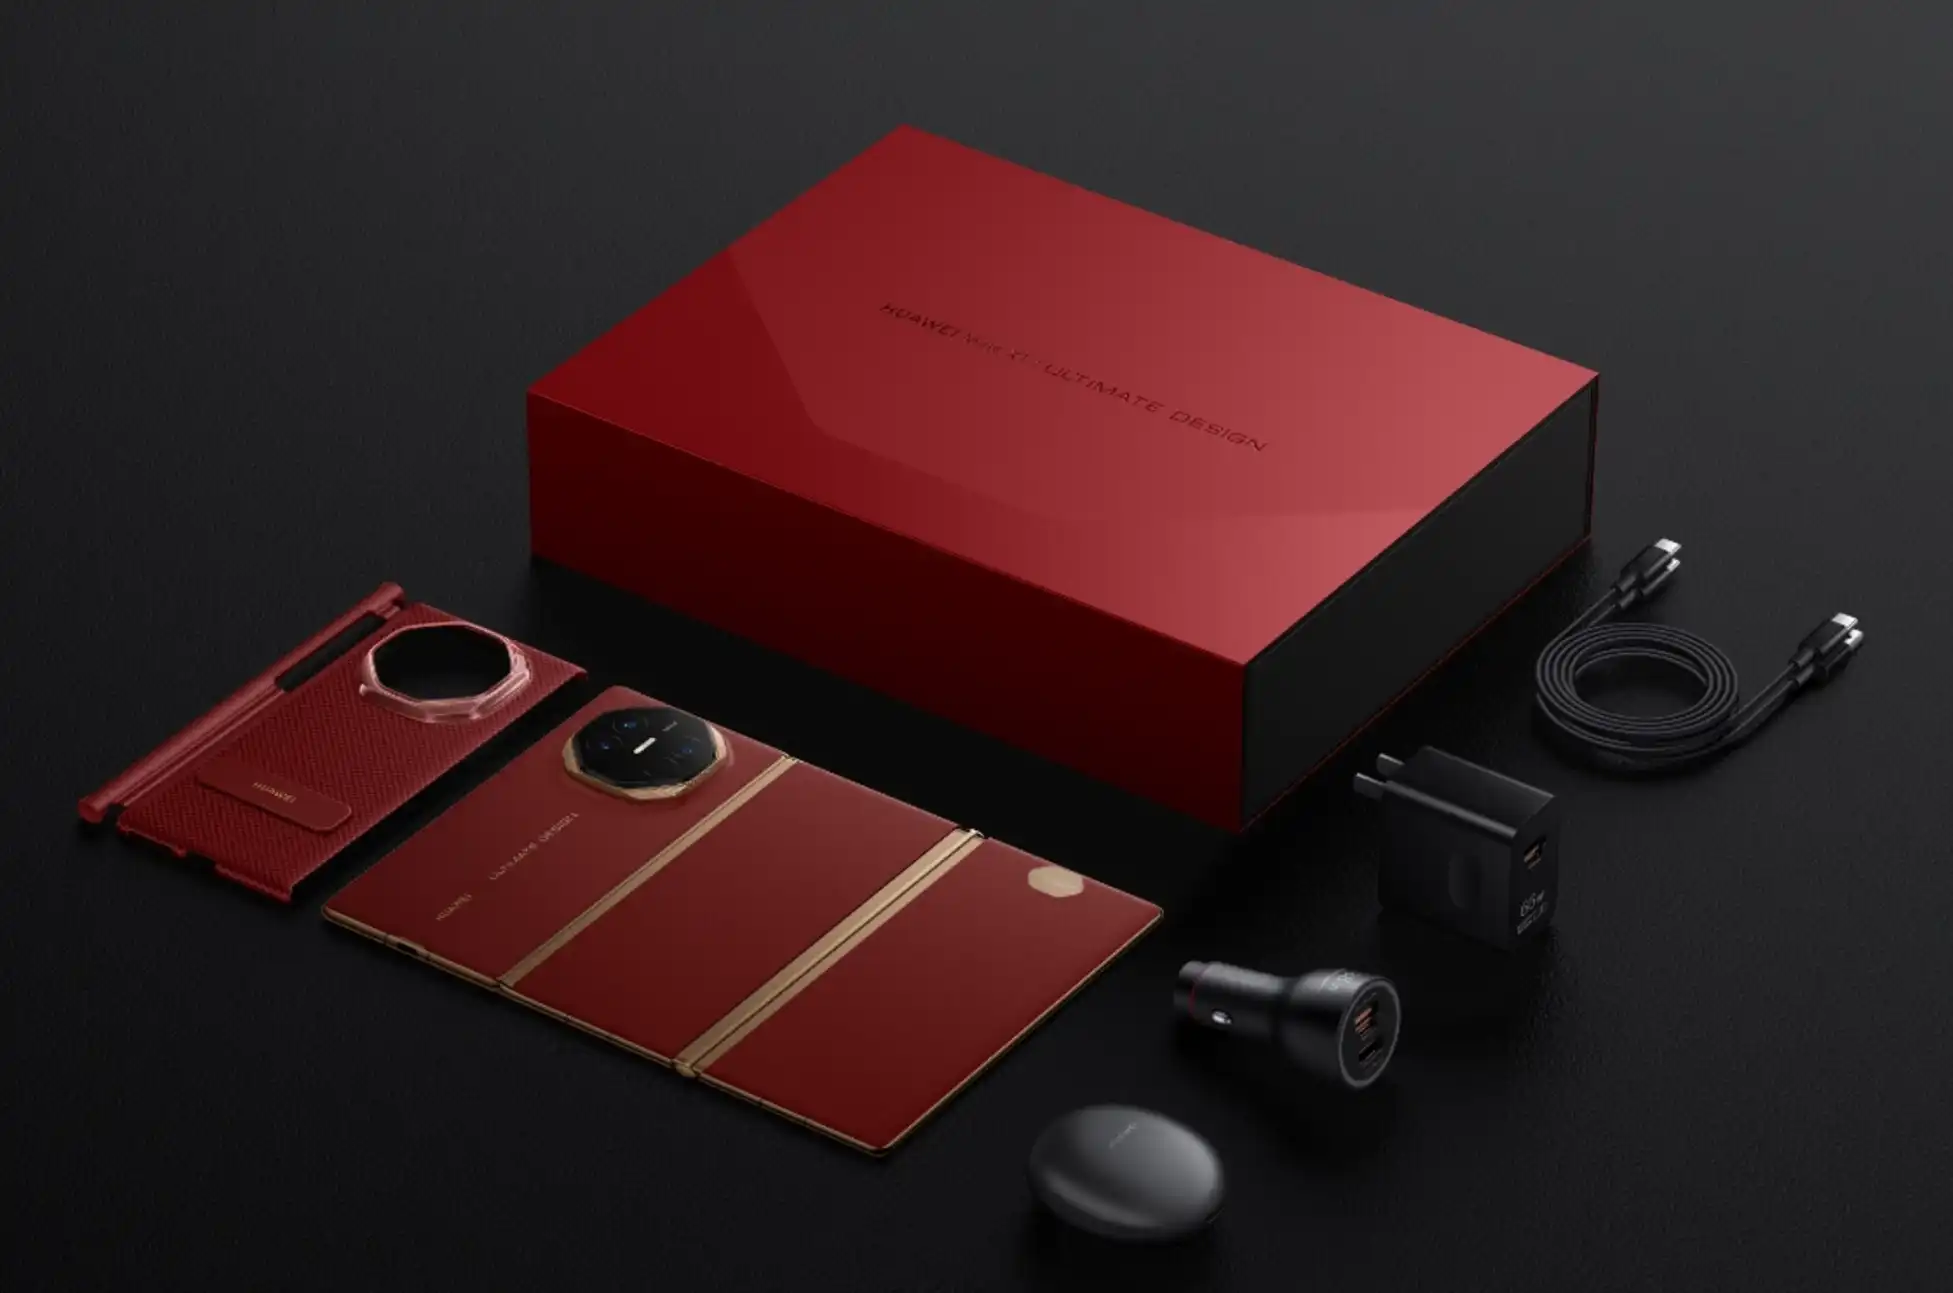
HUAWEI revolutionizes the foldable phone market with its Mate XT Ultimate, the world’s first market-ready tri-folding device. This groundbreaking innovation sets a new benchmark in mobile technology.
HUAWEI Mate XT Ultimate : What’s New and Special Features
The Mate XT Ultimate introduces several advancements in foldable technology. First, it offers a unique 10.2-inch display when fully unfolded. Moreover, its innovative hinge system and durable build distinguish it from other foldables.
HUAWEI incorporates the Tiangong hinge system, ensuring a seamless folding experience. Furthermore, they designed the device with a composite laminate and non-Newtonian fluid components, enhancing its durability.
Display
The Mate XT Ultimate boasts an impressive display setup. Its main screen features a flexible LTPO OLED panel with a high 120Hz refresh rate and 3184 x 2232 pixel resolution. Unfolding twice reveals a massive 10.2-inch display. When folded, it provides a 7.9-inch screen or a traditional 6.4-inch smartphone experience, offering versatility for various uses.
Durability and Build
HUAWEI excels in durability and build quality. The Tiangong hinge system, named after China’s space station, allows smooth internal and external bending without gaps when folded. Additionally, its composite laminate construction with non-Newtonian fluid components enhances overall durability. Despite its large display, the device remains ultra-thin, measuring just 3.6mm unfolded and 12.8mm folded.
Camera
Photography enthusiasts will appreciate the Mate XT Ultimate’s advanced camera system. It features a 50-megapixel main sensor with variable f/1.4-f/4.0 aperture and optical image stabilization. Additionally, it includes a 12-megapixel telephoto lens with 5.5x optical zoom and a 12-megapixel ultra-wide lens. For selfies and video calls, an 8-megapixel front camera ensures excellent clarity.
Battery
A substantial 5,600mAh battery powers the Mate XT Ultimate, divided into three silicone-carbide cells for improved efficiency. It supports 66W wired charging, 50W wireless charging, and reverse wired and wireless charging up to 7.5W, offering convenient fast charging and power-sharing capabilities.
HUAWEI Mate XT Ultimate : Availability
Currently, the Mate XT Ultimate is available in China with three storage options: 256GB (CNY19,999), 512GB (CNY21,999), and 1TB (CNY23,999). However, information about its international release remains unavailable.
HUAWEI Mate XT Ultimate : Conclusion
The HUAWEI Mate XT Ultimate redefines foldable phones with its innovative tri-fold design. It combines a sleek, durable build with a powerful camera system, long-lasting battery, and cutting-edge software. While currently available only in China, it offers a glimpse into the future of foldable technology. For those excited about mobile innovation, the Mate XT Ultimate certainly merits consideration
All products, and company names, logos, and service marks (collectively the "Trademarks") displayed are registered® and/or unregistered
trademarks™ of their respective owners.
The authors of this web site are not sponsored by or affiliated with any of the third-party trade mark or third-party registered trade mark owners,
and make no representations about them, their owners, their products or services.